Continuous Integration and Delivery
Continuous Deployment and Continuous Delivery | ECS | ECR | Docker

Passionate about helping organizations build scalable infrastructure and DevOps solutions with cloud technologies. Experienced in designing robust systems, automating processes, and driving efficiency through innovative cloud solutions. Advocate for best practices in DevOps and cloud computing, committed to enabling teams to achieve their full potential.
Project Overview
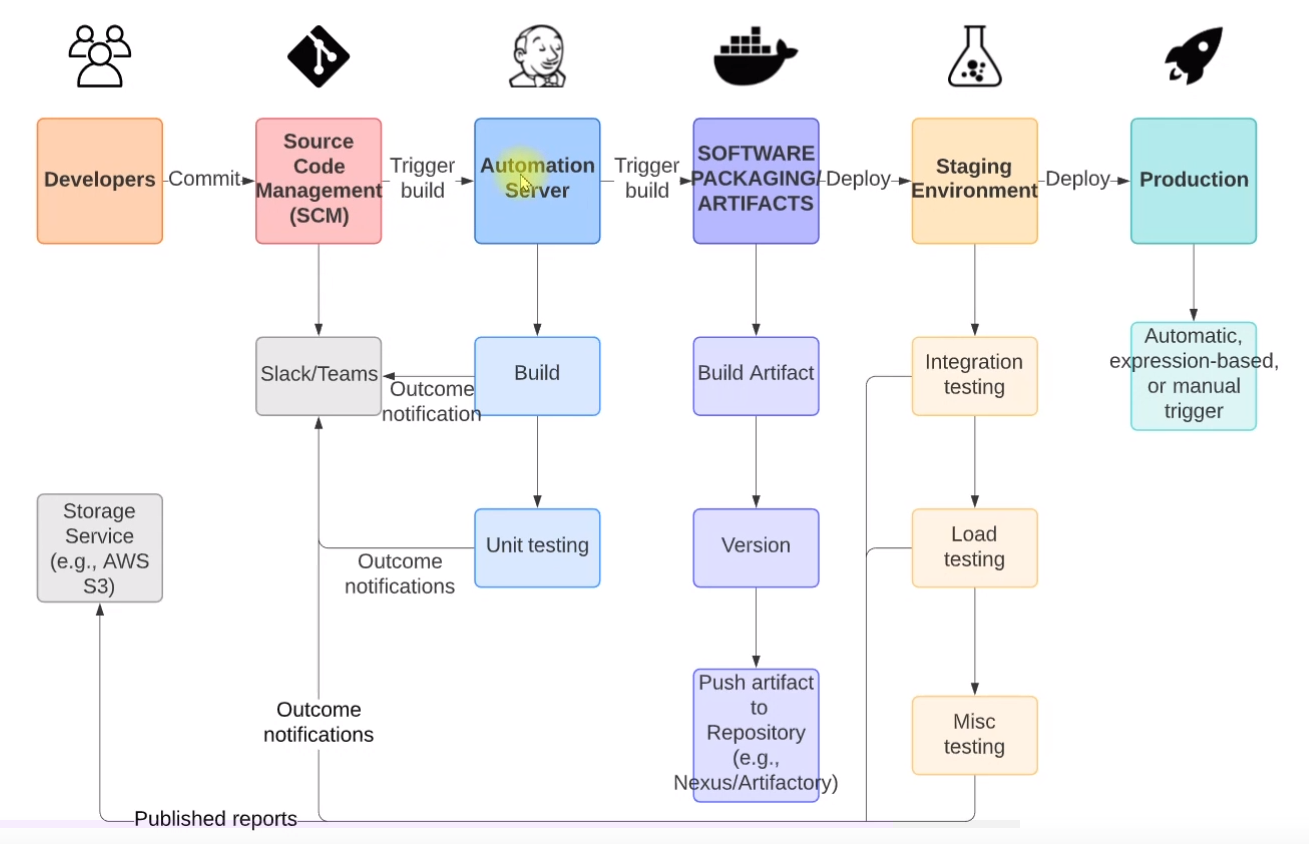
This project is an extension of continuous integration in which, we'll move the application until the Continuous Delivery phase.
Developers will make code commits to the source code management tool Git which will trigger the build.
The build tool(Maven) starts the code build and performs unit testing automatically and sends the report to the Slack channel.
In the next phase, it will perform a code analysis with code analysis tools and a notification will be sent to Slack on passing or failing the Quality Gates.
On passing the code analysis phase, a docker image will be built that contains the artifact inside it.
The docker image will further be pushed into Amazon ECR(Elastic Container Registry).
We'll run the AWS CLI command from Jenkins that will fetch the docker image from ECR to Amazon ECS(Elastic Container Service).
Flow of Execution
Update GitHub WebHook with the new Jenkins Server's IP
Copy the Docker file from the VProfile repo to our repository as it is already written
Prepare 2 different Jenkins files for Staging and Production in the source code
AWS Steps
Creating IAM user to access ECR from AWS CLI
Setting up the ECR repository
Jenkins Plugin Installation
Amazon ECR plugin
Docker plugin
Docker build & Publish plugin
Pipeline: aws steps
Install docker engine and aws-CLI from Jenkins
Write Jenkins file for build and publish the image to ECS(Elastic Container Service)
ECS Setup
- Cluster, task definition, and service
Update the Jenkins file with the code to deploy the image to ECS.
Repeat the 8 and 9th steps for production ECS Cluster
Promoting docker image for Prod
Branches and WebHook
We have already set up the Jenkins server from the previous continuous integration project and we'll use the same servers so, we just need to update the public IP of restarted Jenkins server in our repository webhook.
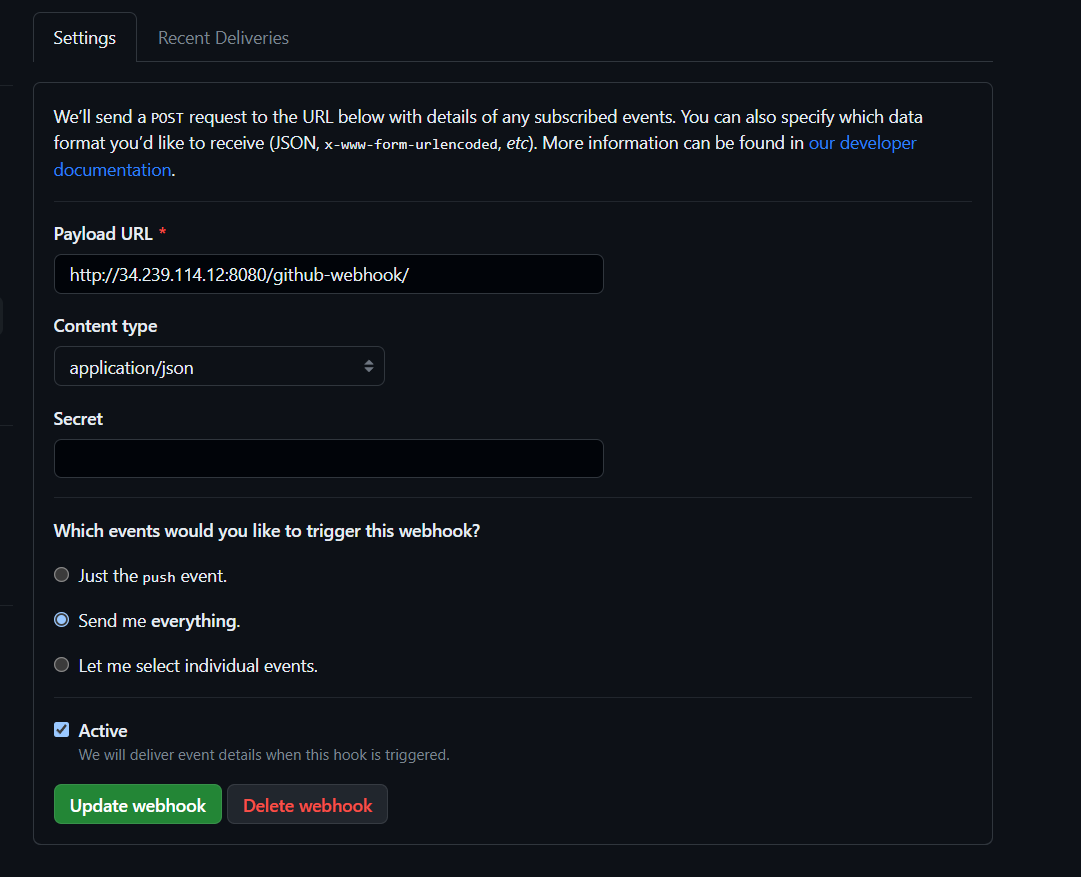
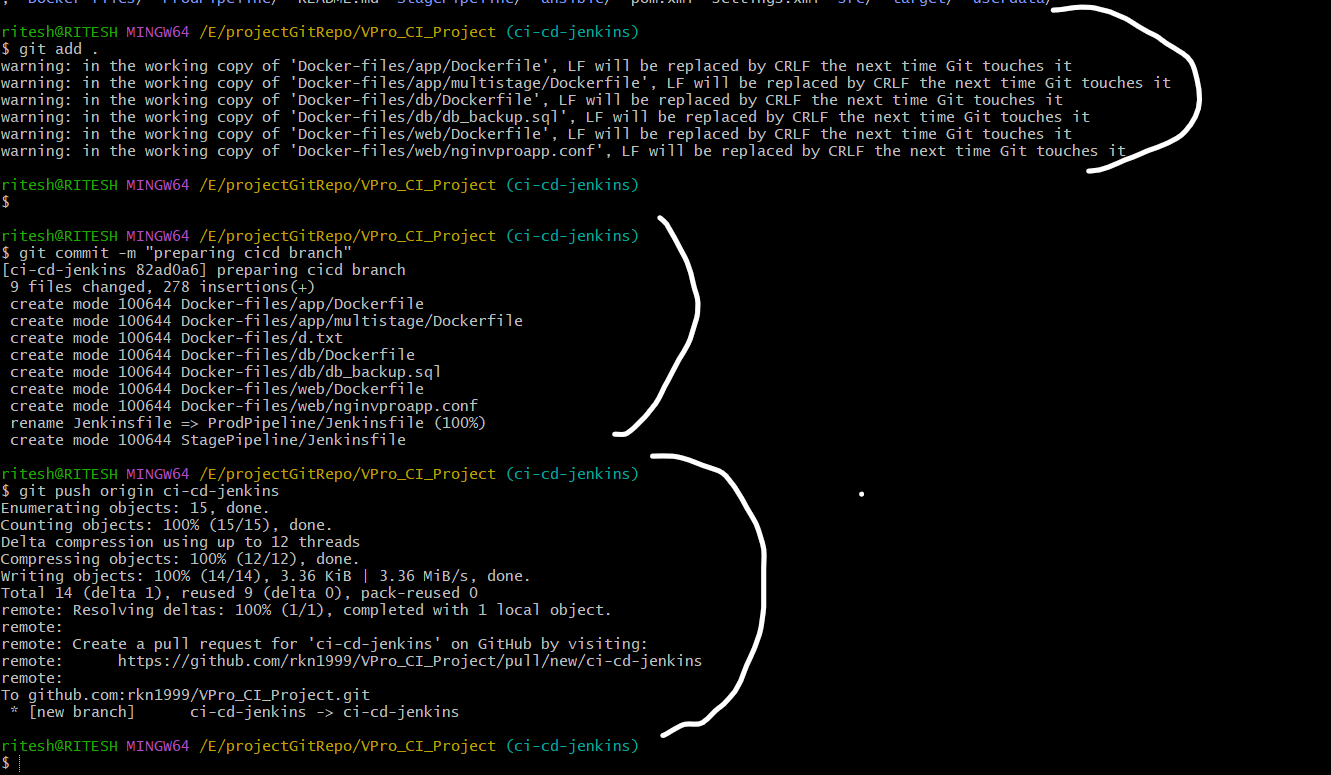
As we have set up the webhook now, we'll prepare our branch to push the code changes, newly created docker files, and Jenkinsfile for two different environments that are Staging and Production.
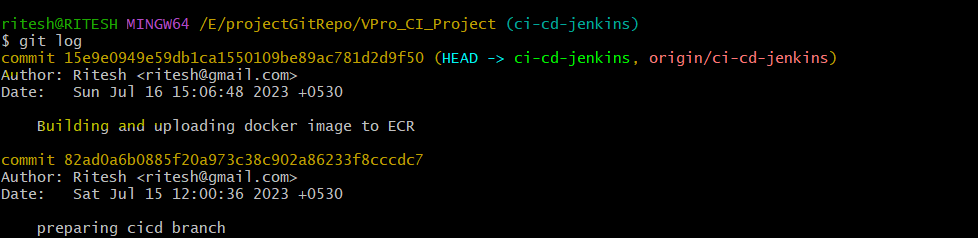
Currently, we are on ci-cd-jenkins branch.
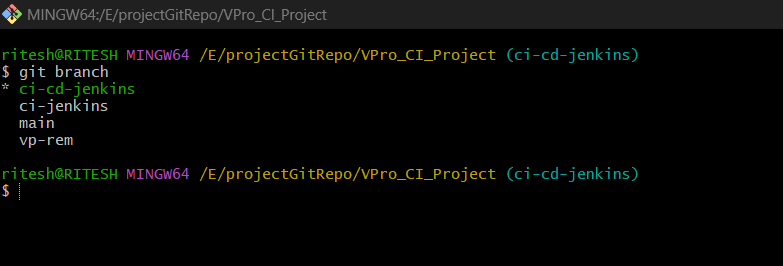
And in that branch, we have newly added Docker files, and 2 new folders named StagePipeline and ProdPipeline.

The ProdPipeline contains the Jenkinsfile for the Production environment and StagPipeline contains Jenkinsfile for the Staging environment.
Now, we'll push the codes to the remote Git repository:
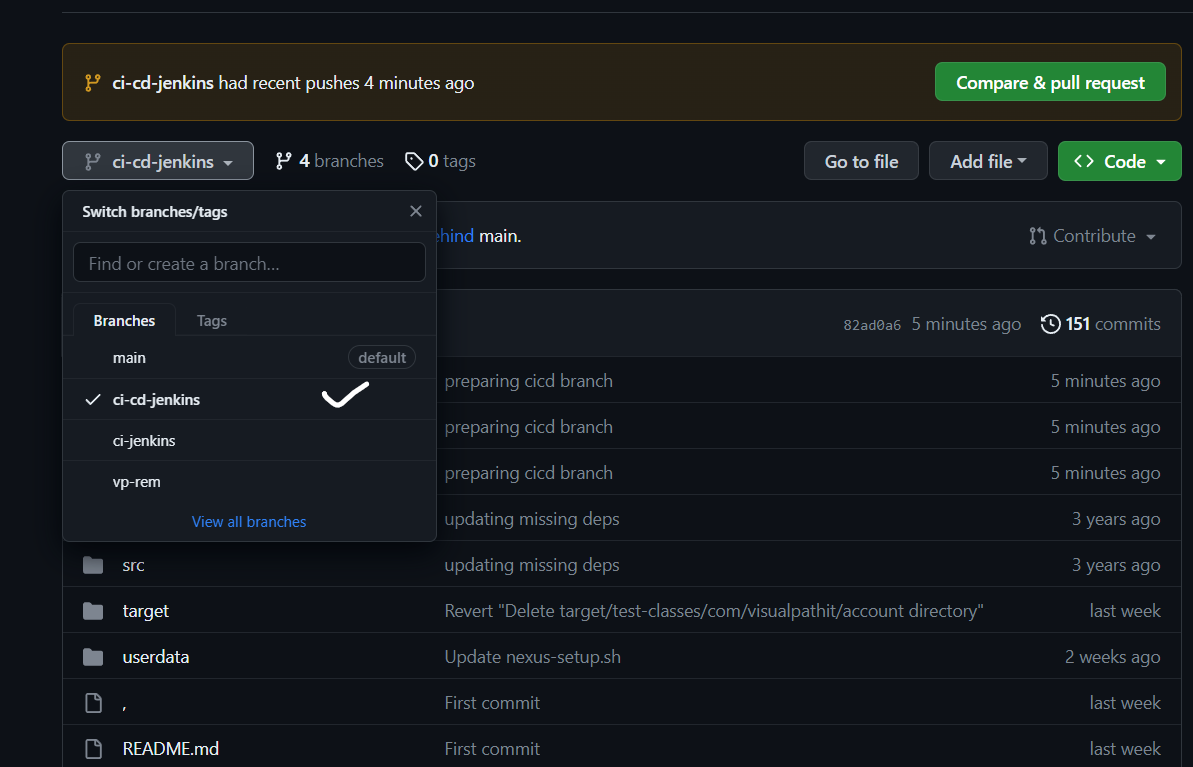
Now a new branch jenkins-ci-cd has been created containing all the files and code changes:
IAM and ECR
Creating Jenkins user for programmatic access
As we have prepared our Git repository with all our essential code changes now we'll create an IAM user and ECR(Elastic Container Registry).
The IAM user will access ECR from AWS CLI for security purposes we won't be accessing ECR or ECS as a root user instead we'll access them with limited permissions.
We need to create the IAM user with the below permissions:
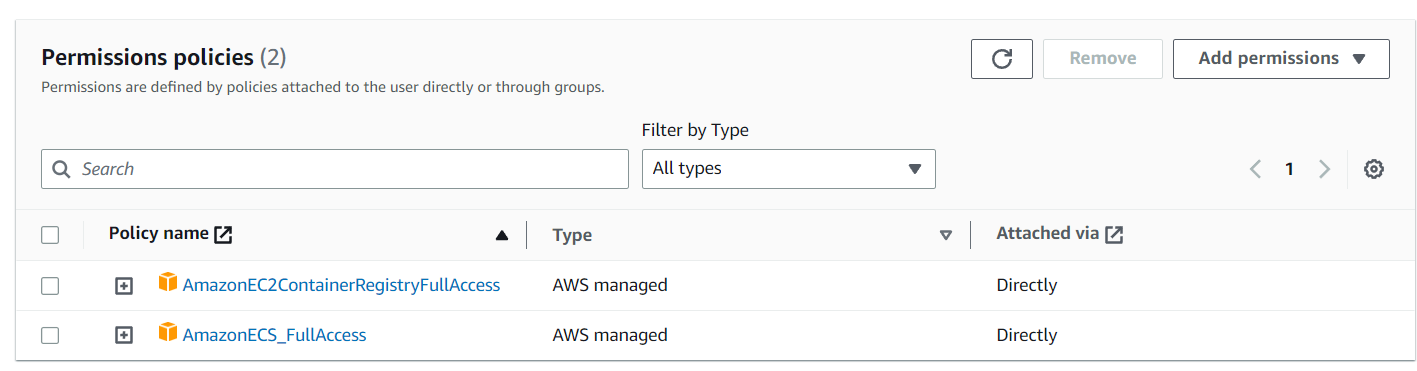
Both permissions are required to access ECS and ECR from AWS CLI as we are going to push the container images to ECR and deploy them in ECS.
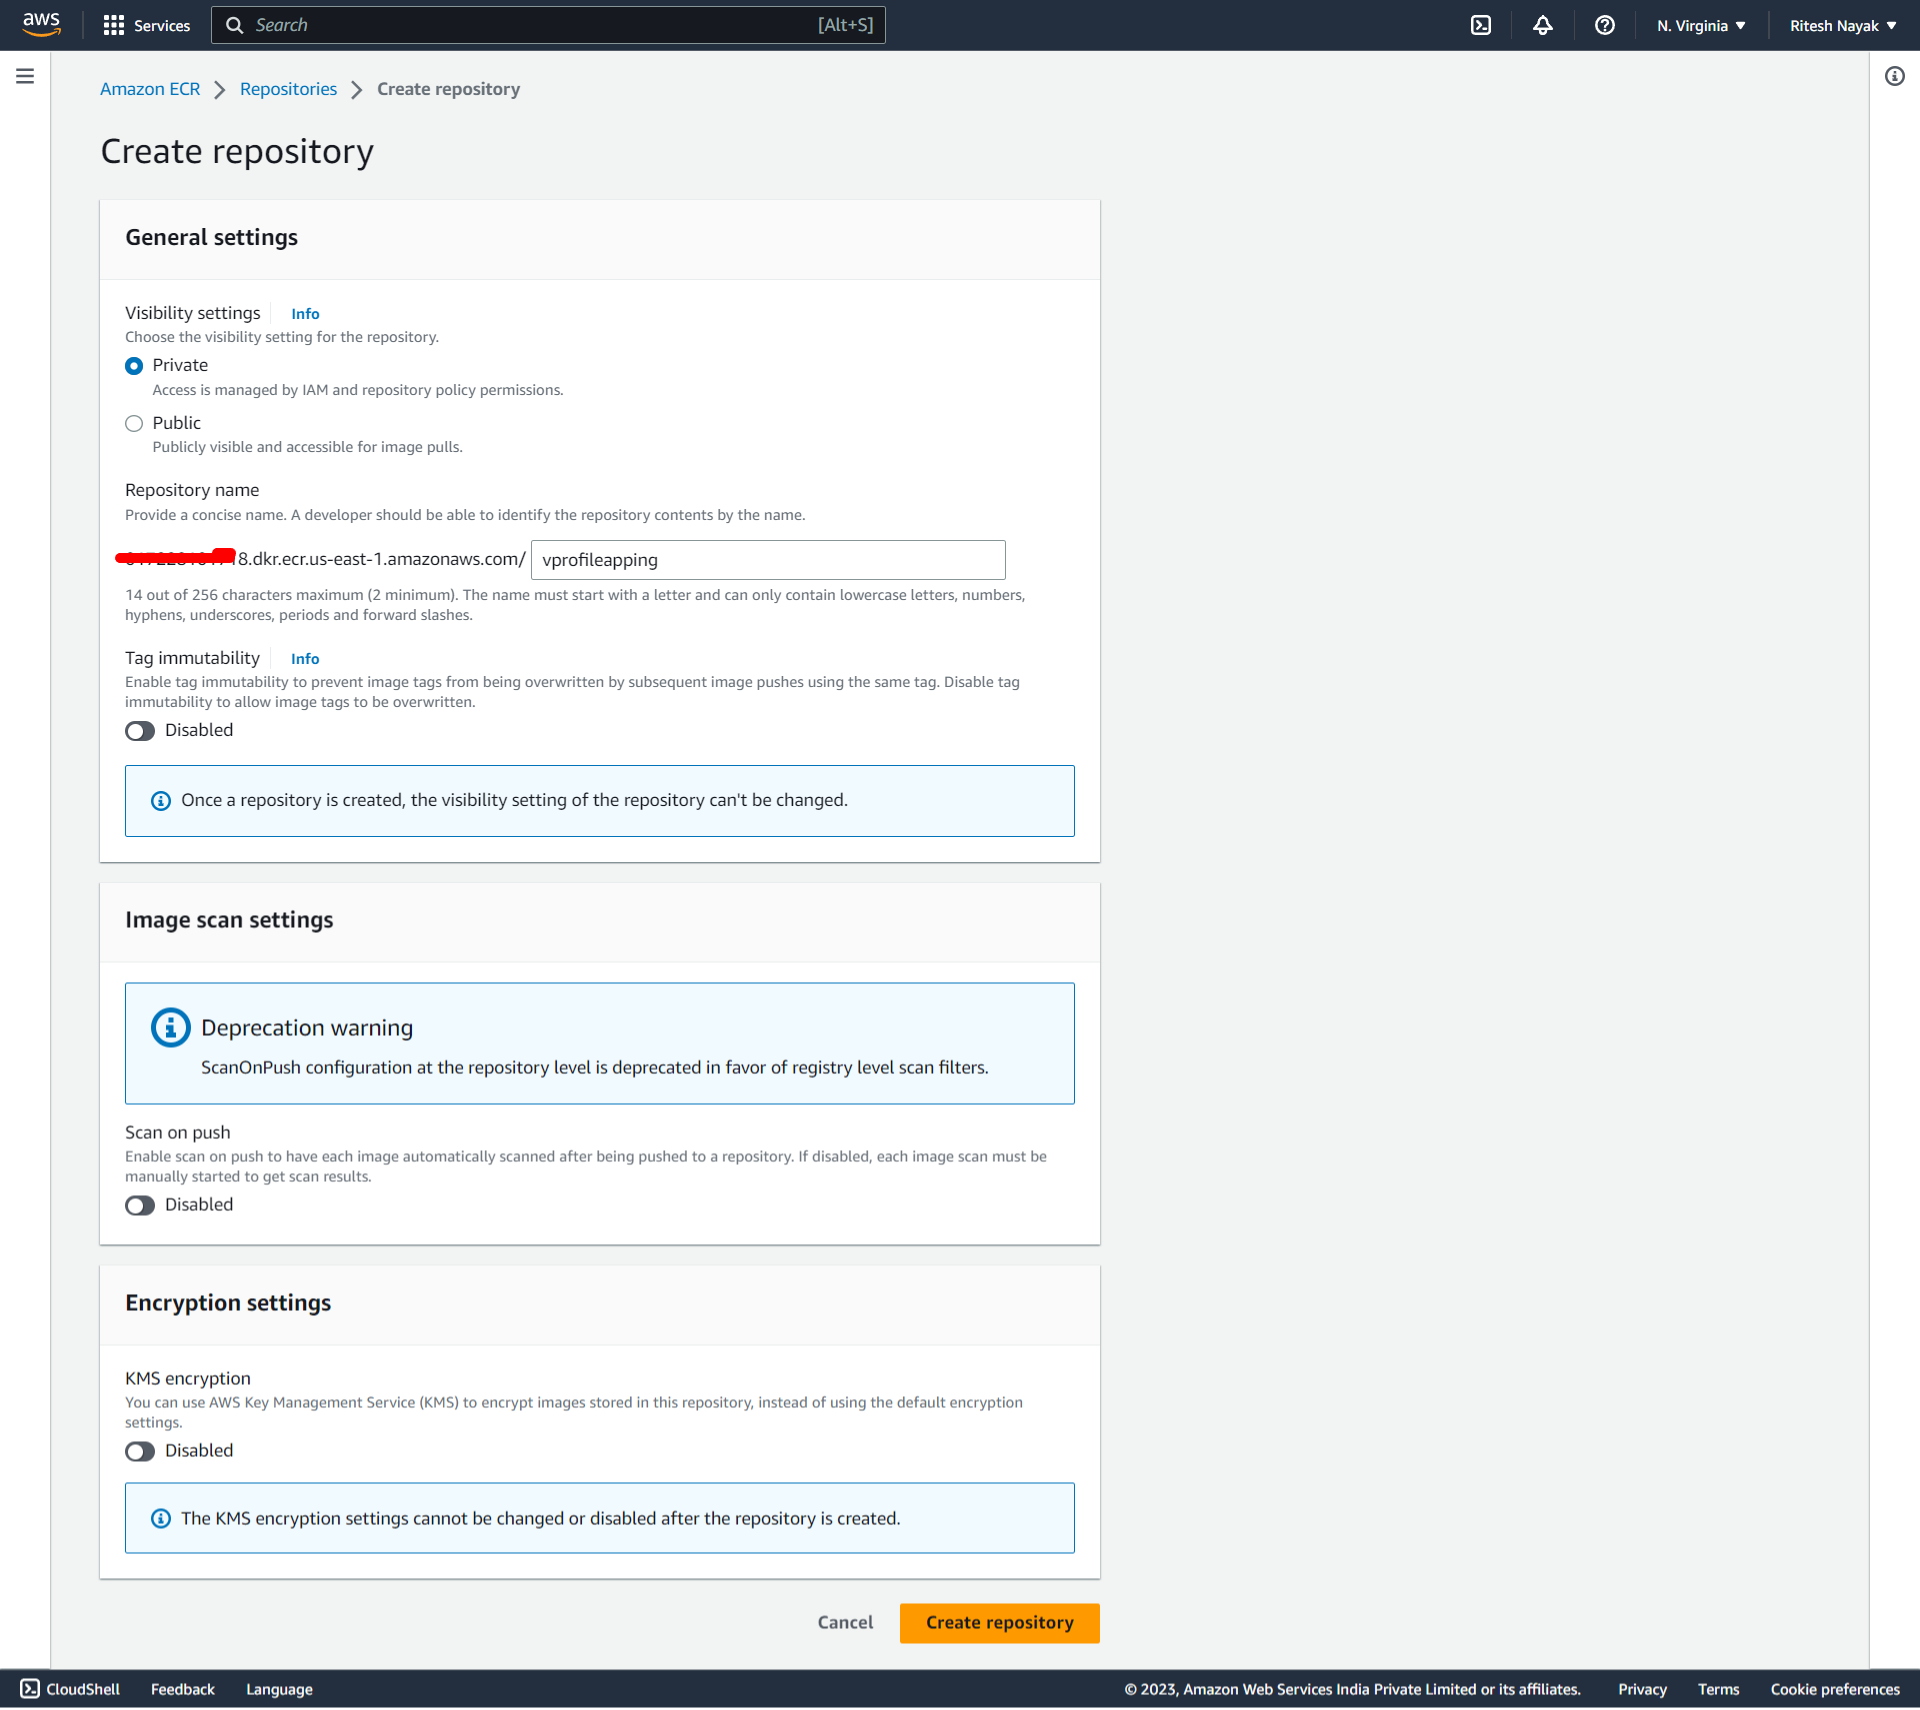
Creating ECR repository
As discussed previously we need a container repository just like we have DockerHub, nexus repository, etc, ECR is an AWS-managed container registry. We are going to create a repository in it to store our Docker Images that will be created from the Docker files that we have in our Git repository.
Jenkins Configurations
In this section, we'll configure 3 things on Jenkins.
Installing necessary plugins
Storing AWS credentials in it
Installing docker-engine in Jenkins
Installing necessary plugins
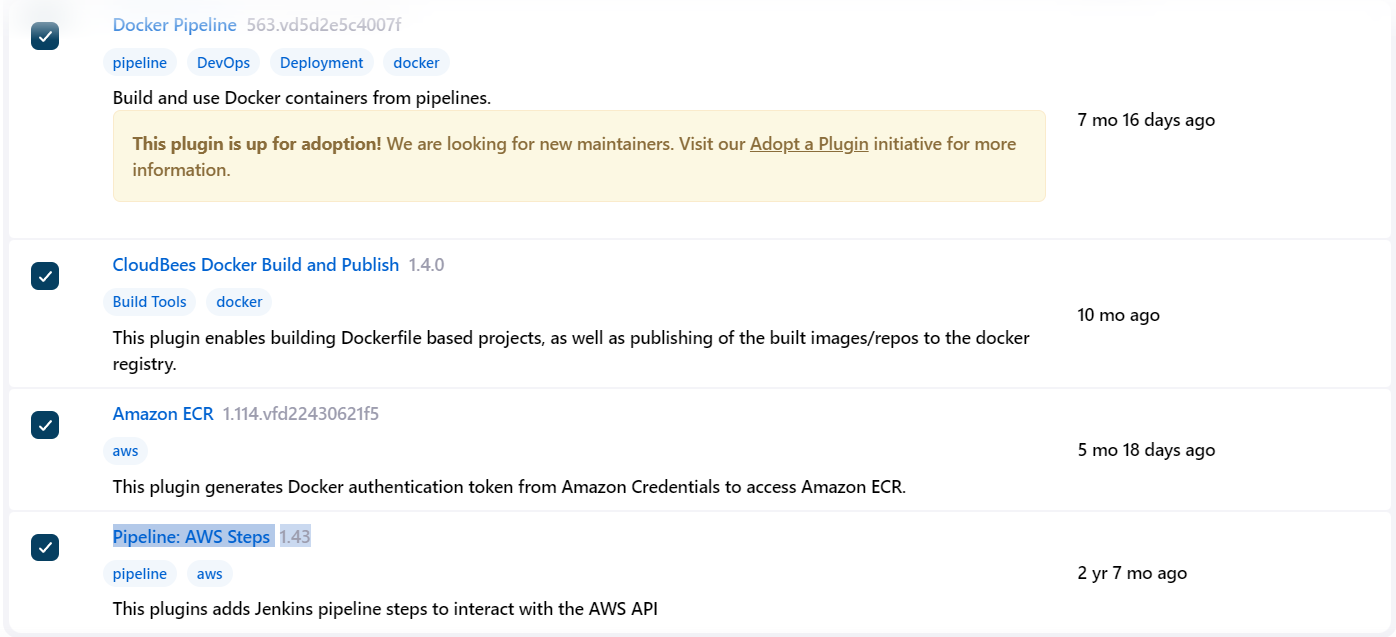
These are the plugins we need additionally for continuous delivery apart from the existing plugins.
Storing AWS credentials in Jenkins
Now, we'll store AWS credentials such as an access key and secret key for authentication to AWS services via AWS CLI that will be used by Jenkins.
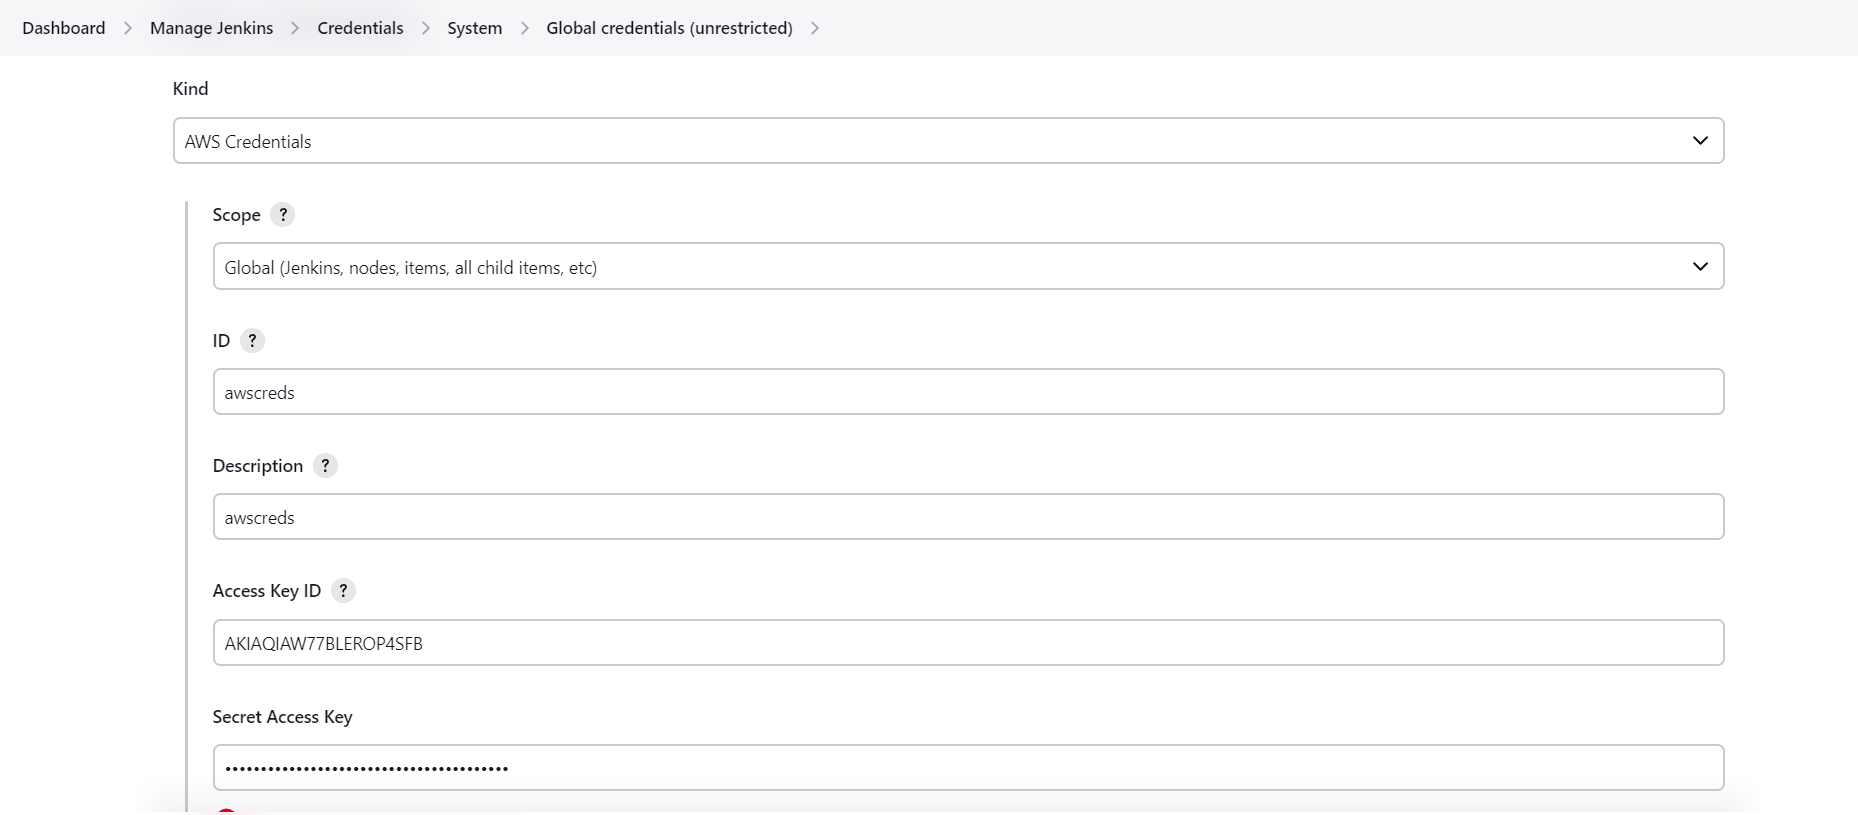
This will be used in the pipeline code.
Installing docker-engine & AWS CLI in Jenkins server
We have to do SSH to the Jenkins server and the with the below command we can install all the dependencies.
Before installing docker, we need to install aws cli sudo apt update && apt install awscli -y .
With sudo apt install docker.io -y we can install docker.
We are going to write code in Jenkins to build the docker image
The docker image is built by docker commands so we need to have the docker engine installed in the Jenkins server so Jenkins can run the docker command and build the images.
However, docker commands can only be run by the root users or by the users present in the Docker Group. Jenkins user by default can't run docker commands
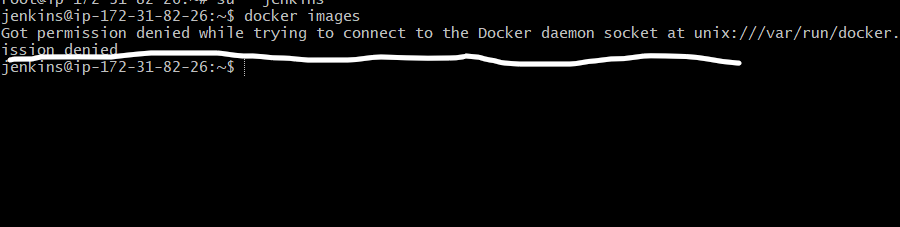
Now, either we always have to run the command being the root user or we have to add the Jenkins user to the Docker group which is more feasible.
To add a Jenkins user to the Docker group we can use:
$ usermod -aG docker jenkinsAnd then reboot the Jenkins server to make it effective.

Now, Jenkins is configured with all the necessary plugins, AWS CLI, docker-engine also Jenkins user is now enabled to run docker commands.
Docker build in the pipeline
Here we'll edit the Jenkins file that will include the stages for building docker images and uploading them to Elastic Container Registry(ECR). So, the new Jenkins file will have the below configurations:
We have added 3 new environment variables which are:
  registryCredential = 'ecr:us-east-1:awscreds'
  appRegistry = '017758101718.dkr.ecr.us-east-1.amazonaws.com/vprofileapping'
  vprofileRegistry = 'https://017758101718.dkr.ecr.us-east-1.amazonaws.com'
the
registryCredentialwill be used to access ECR and push the image to ECR so that, we have written it likeecr:regionName:awscreds. The 'awscreds' is the credential name in Jenkins where we have stored the access key and secret key of IAM user that'll access ECR.appRegistryvariable stores the image name. Here whatever is assigned to the variable is the image name.The
vprofileRegistryvariable stores the ECR registry URL where the images will be stored and fetched from by ECS.
Now our next step is to create 2 stages:
The stage for building the Docker image
stage("Build app image"){
            steps{
                script{
                    dockerImage = docker.build( appRegistry + ":$BUILD_NUMBER", "./Docker-files/app/multistage/" )
                }
            }
        }
This step builds the Docker image for the application using a multistage build.
stage("Build app image"): This line defines a Jenkins stage with the label "Build app image". A stage is a logical division of work within a pipeline.steps{}: This block contains the steps to be executed within the stage.script{}: This block allows the execution of Groovy script code.dockerImage =docker.build( appRegistry + ":$BUILD_NUMBER", "./Docker-files/app/multistage/" ): This line builds a Docker image using thedocker.buildmethod provided by the Jenkins Docker Plugin. It takes two parameters: the image name and the path to the Dockerfile.appRegistry + ":$BUILD_NUMBER"is the image name with a dynamic tag$BUILD_NUMBER. TheappRegistryvariable refers to the registry where the image will be pushed. It is likely defined earlier in the pipeline script."./Docker-files/app/multistage/"is the path to the Dockerfile. The Dockerfile is expected to be located in the specified directory.
The docker.build method builds the Docker image based on the provided Dockerfile and returns a reference to the built image, which is stored in the dockerImage variable.
Overall, this stage in the Jenkins Pipeline script is responsible for building the Docker image for the application using the specified Dockerfile in the multistage build directory. The image is tagged with the registry name and the Jenkins build number.
The stage for uploading the Docker image to ECR
stage("Upload app image to ECR"){
            steps{
                script{
                    docker.withRegistry( vprofileRegistry, registryCredential)
                    dockerImage.push("$BUILD_NUMBER")
                    dockerImage.push('latest')
                }
            }
        }
This is another stage in a Jenkins Pipeline script that handles the upload of a Docker image to an Amazon Elastic Container Registry (ECR).
stage("Upload app image to ECR"): This line defines a Jenkins stage with the label "Upload app image to ECR".steps{}: This block contains the steps to be executed within the stage.script{}: This block allows the execution of Groovy script code.docker.withRegistry( vprofileRegistry, registryCredential): This line configures the Docker daemon to use the specified registry for pushing the image. ThevprofileRegistryvariable contains the URL or name of the ECR registry andregistryCredentialrefers to the credentials required to authenticate with the registry.dockerImage.push("$BUILD_NUMBER"): This line pushes the Docker image with the tag "$BUILD_NUMBER" to the configured registry. The$BUILD_NUMBERis a Jenkins environment variable that represents the current build number. This allows each build to have a unique tag.dockerImage.push('latest'): This line pushes the same Docker image with the "latest" tag to the configured registry. The "latest" tag is commonly used to refer to the most recent version of an image.
Overall, this stage in the Jenkins Pipeline script is responsible for uploading the Docker image, which was built in a previous stage, to the specified ECR registry. The image is pushed with the build number tag and the "latest" tag. This step ensures that the image is available in the ECR registry for deployment or further use in the CI/CD pipeline.
Creating stage pipeline
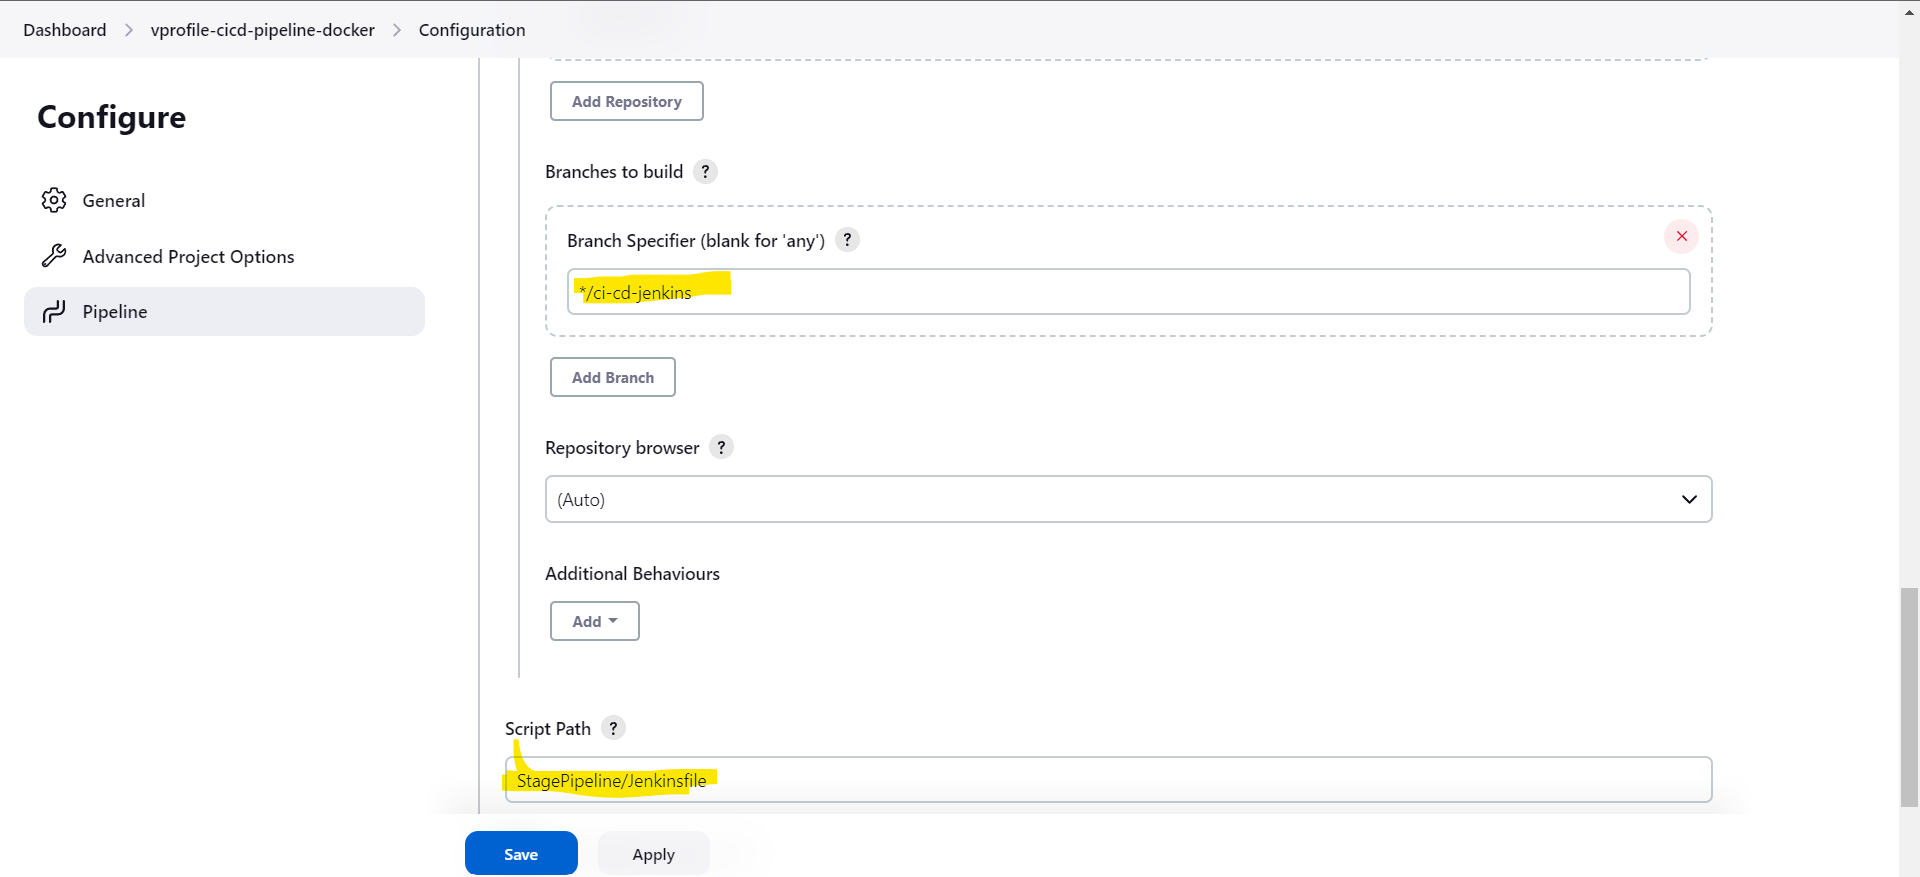
As we have prepared the new Jenkins file that contains all the stages to build and push docker images now our goal is to create the pipeline for the staging environment as we have modified the pipeline script of staging. The below image shows the same pipeline configuration for the staging environment:
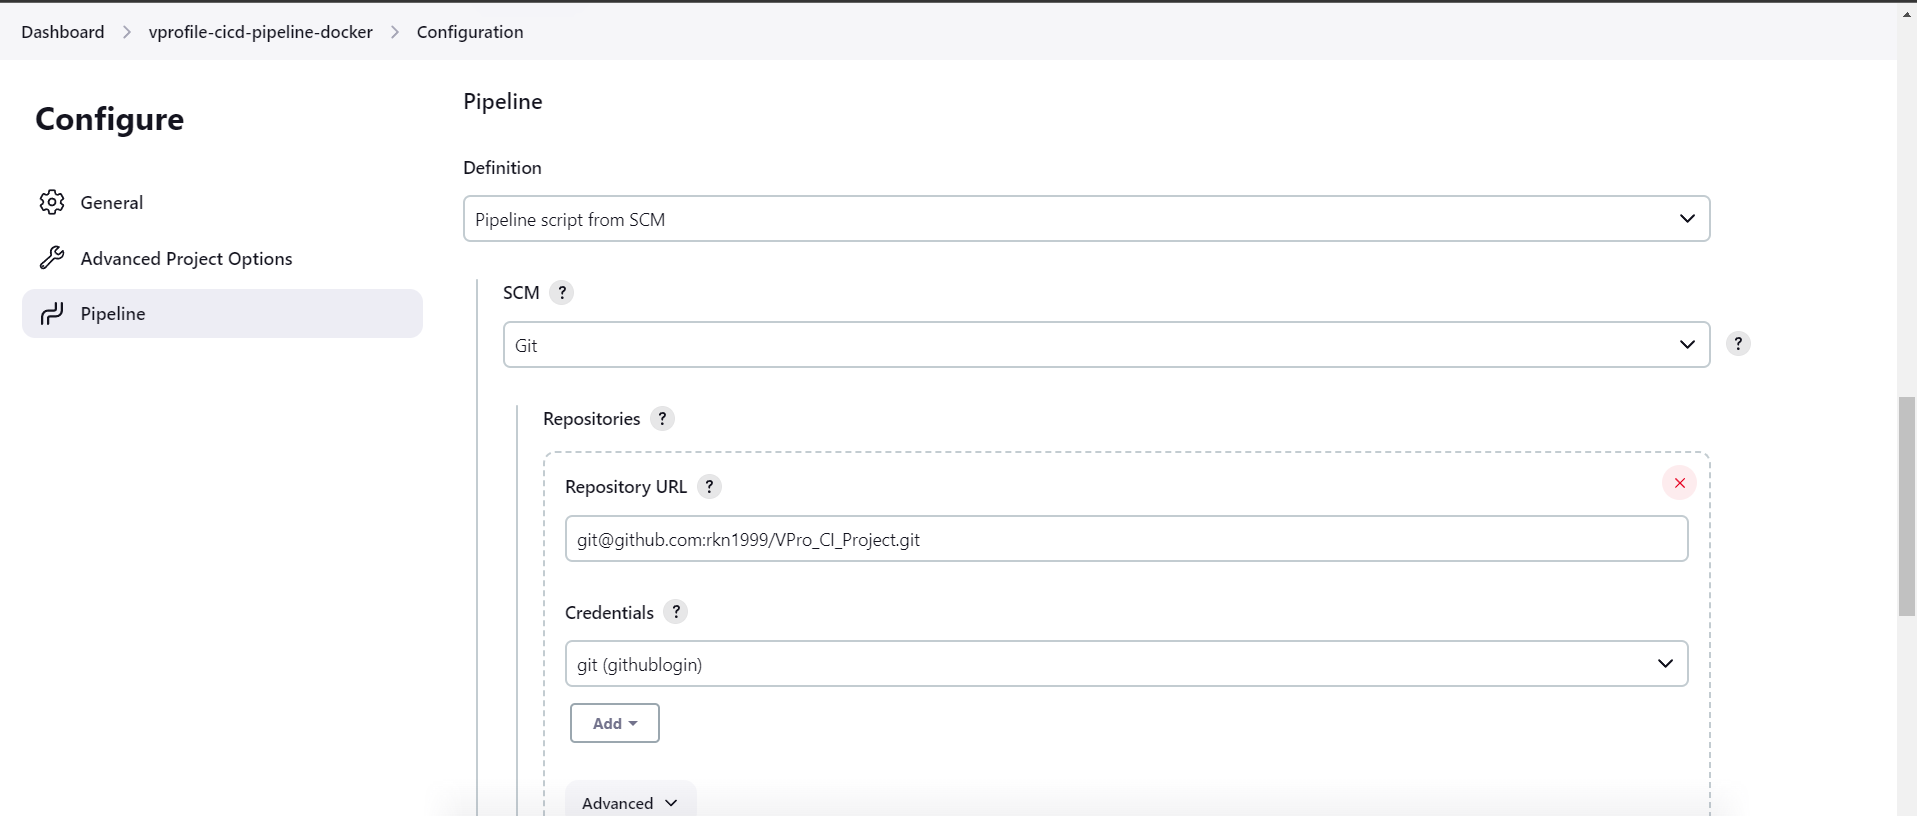
Here we are referring to the new branch that we have created especially for Delivery and the script path is changed to StagePipeline/Jenkinsfiles which means now Jenkins will build this pipeline based on the Jenkinsfile present in StagePipeline directory.
Now, once we commit and push the pipeline code changes it will trigger the Jenkins and build the pipeline.
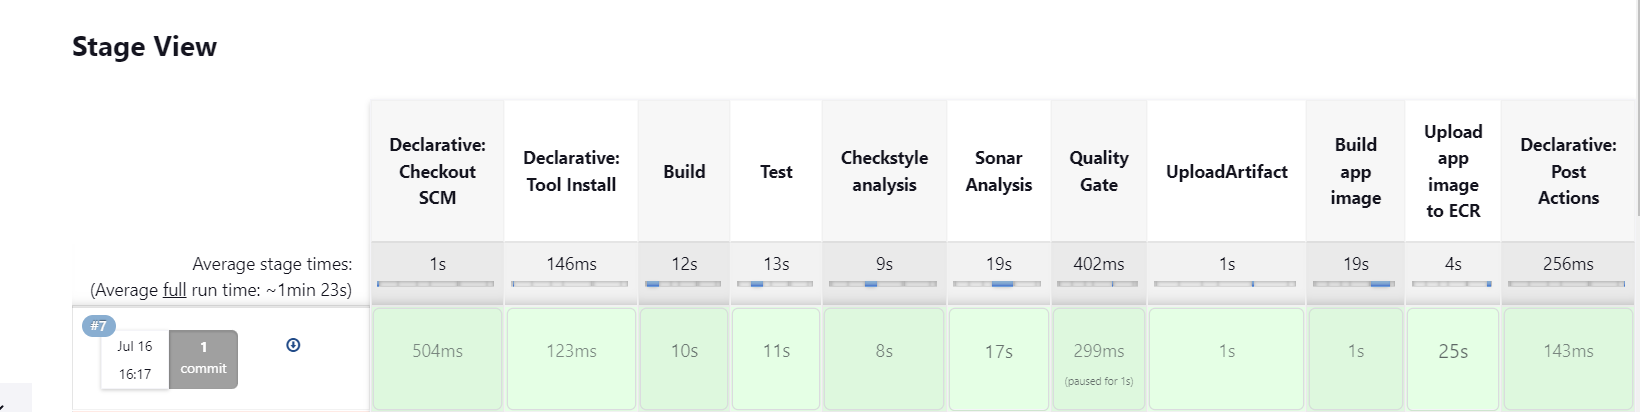
Right after committing the build has been started:
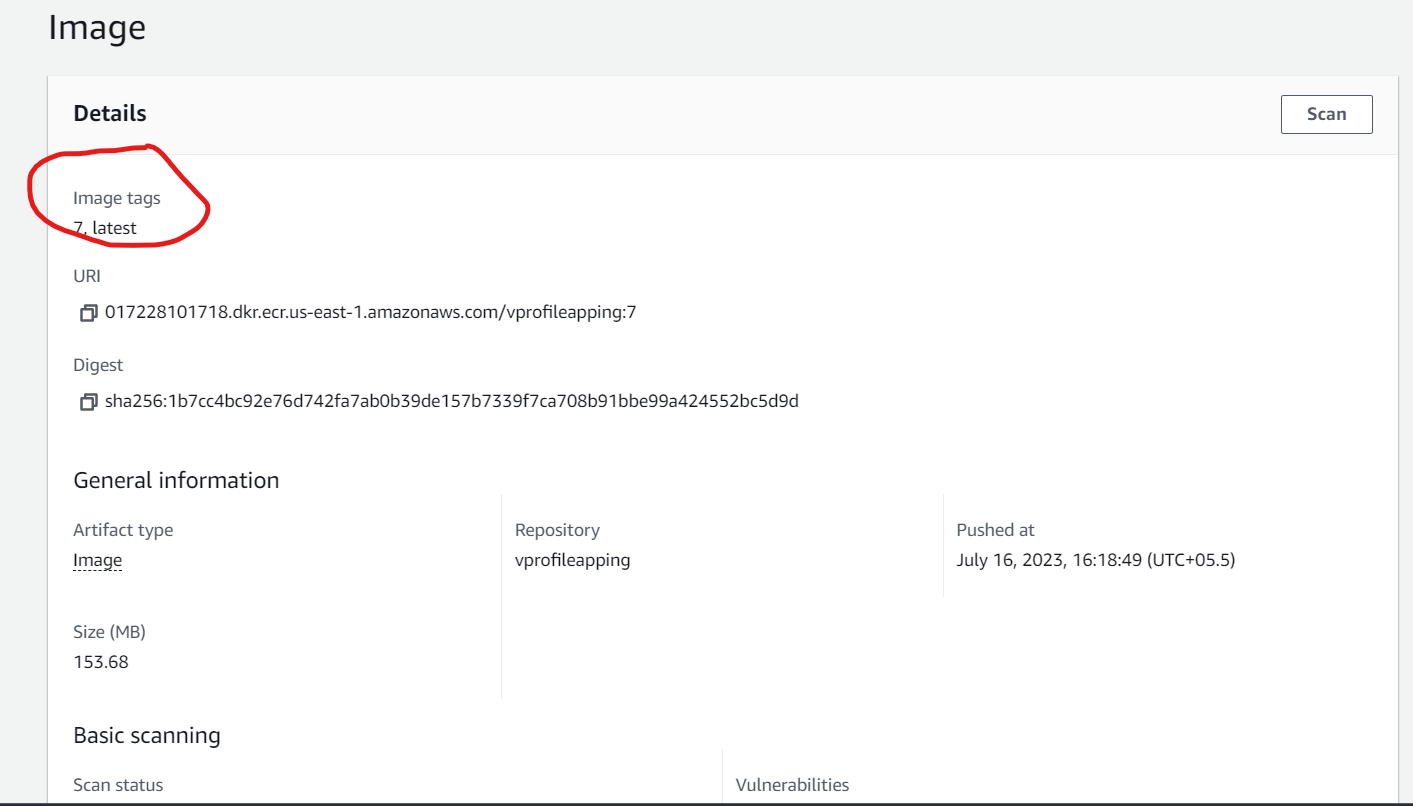
Now our job is successful and the docker image has been uploaded to ECR and it has been tagged to 7 which is the build number and latest:
Now our image is ready to be deployed. Our next goal is to deploy the image to ECS.
AWS ECS Setup
We have already prepared the docker image of our application having the artifact in it and uploaded it to ECR. Now, the next step is to deploy the same to ECS, to achieve that we need to set up the ECS cluster.
We'll be setting up 2 clusters that are Staging and Production.
Staging
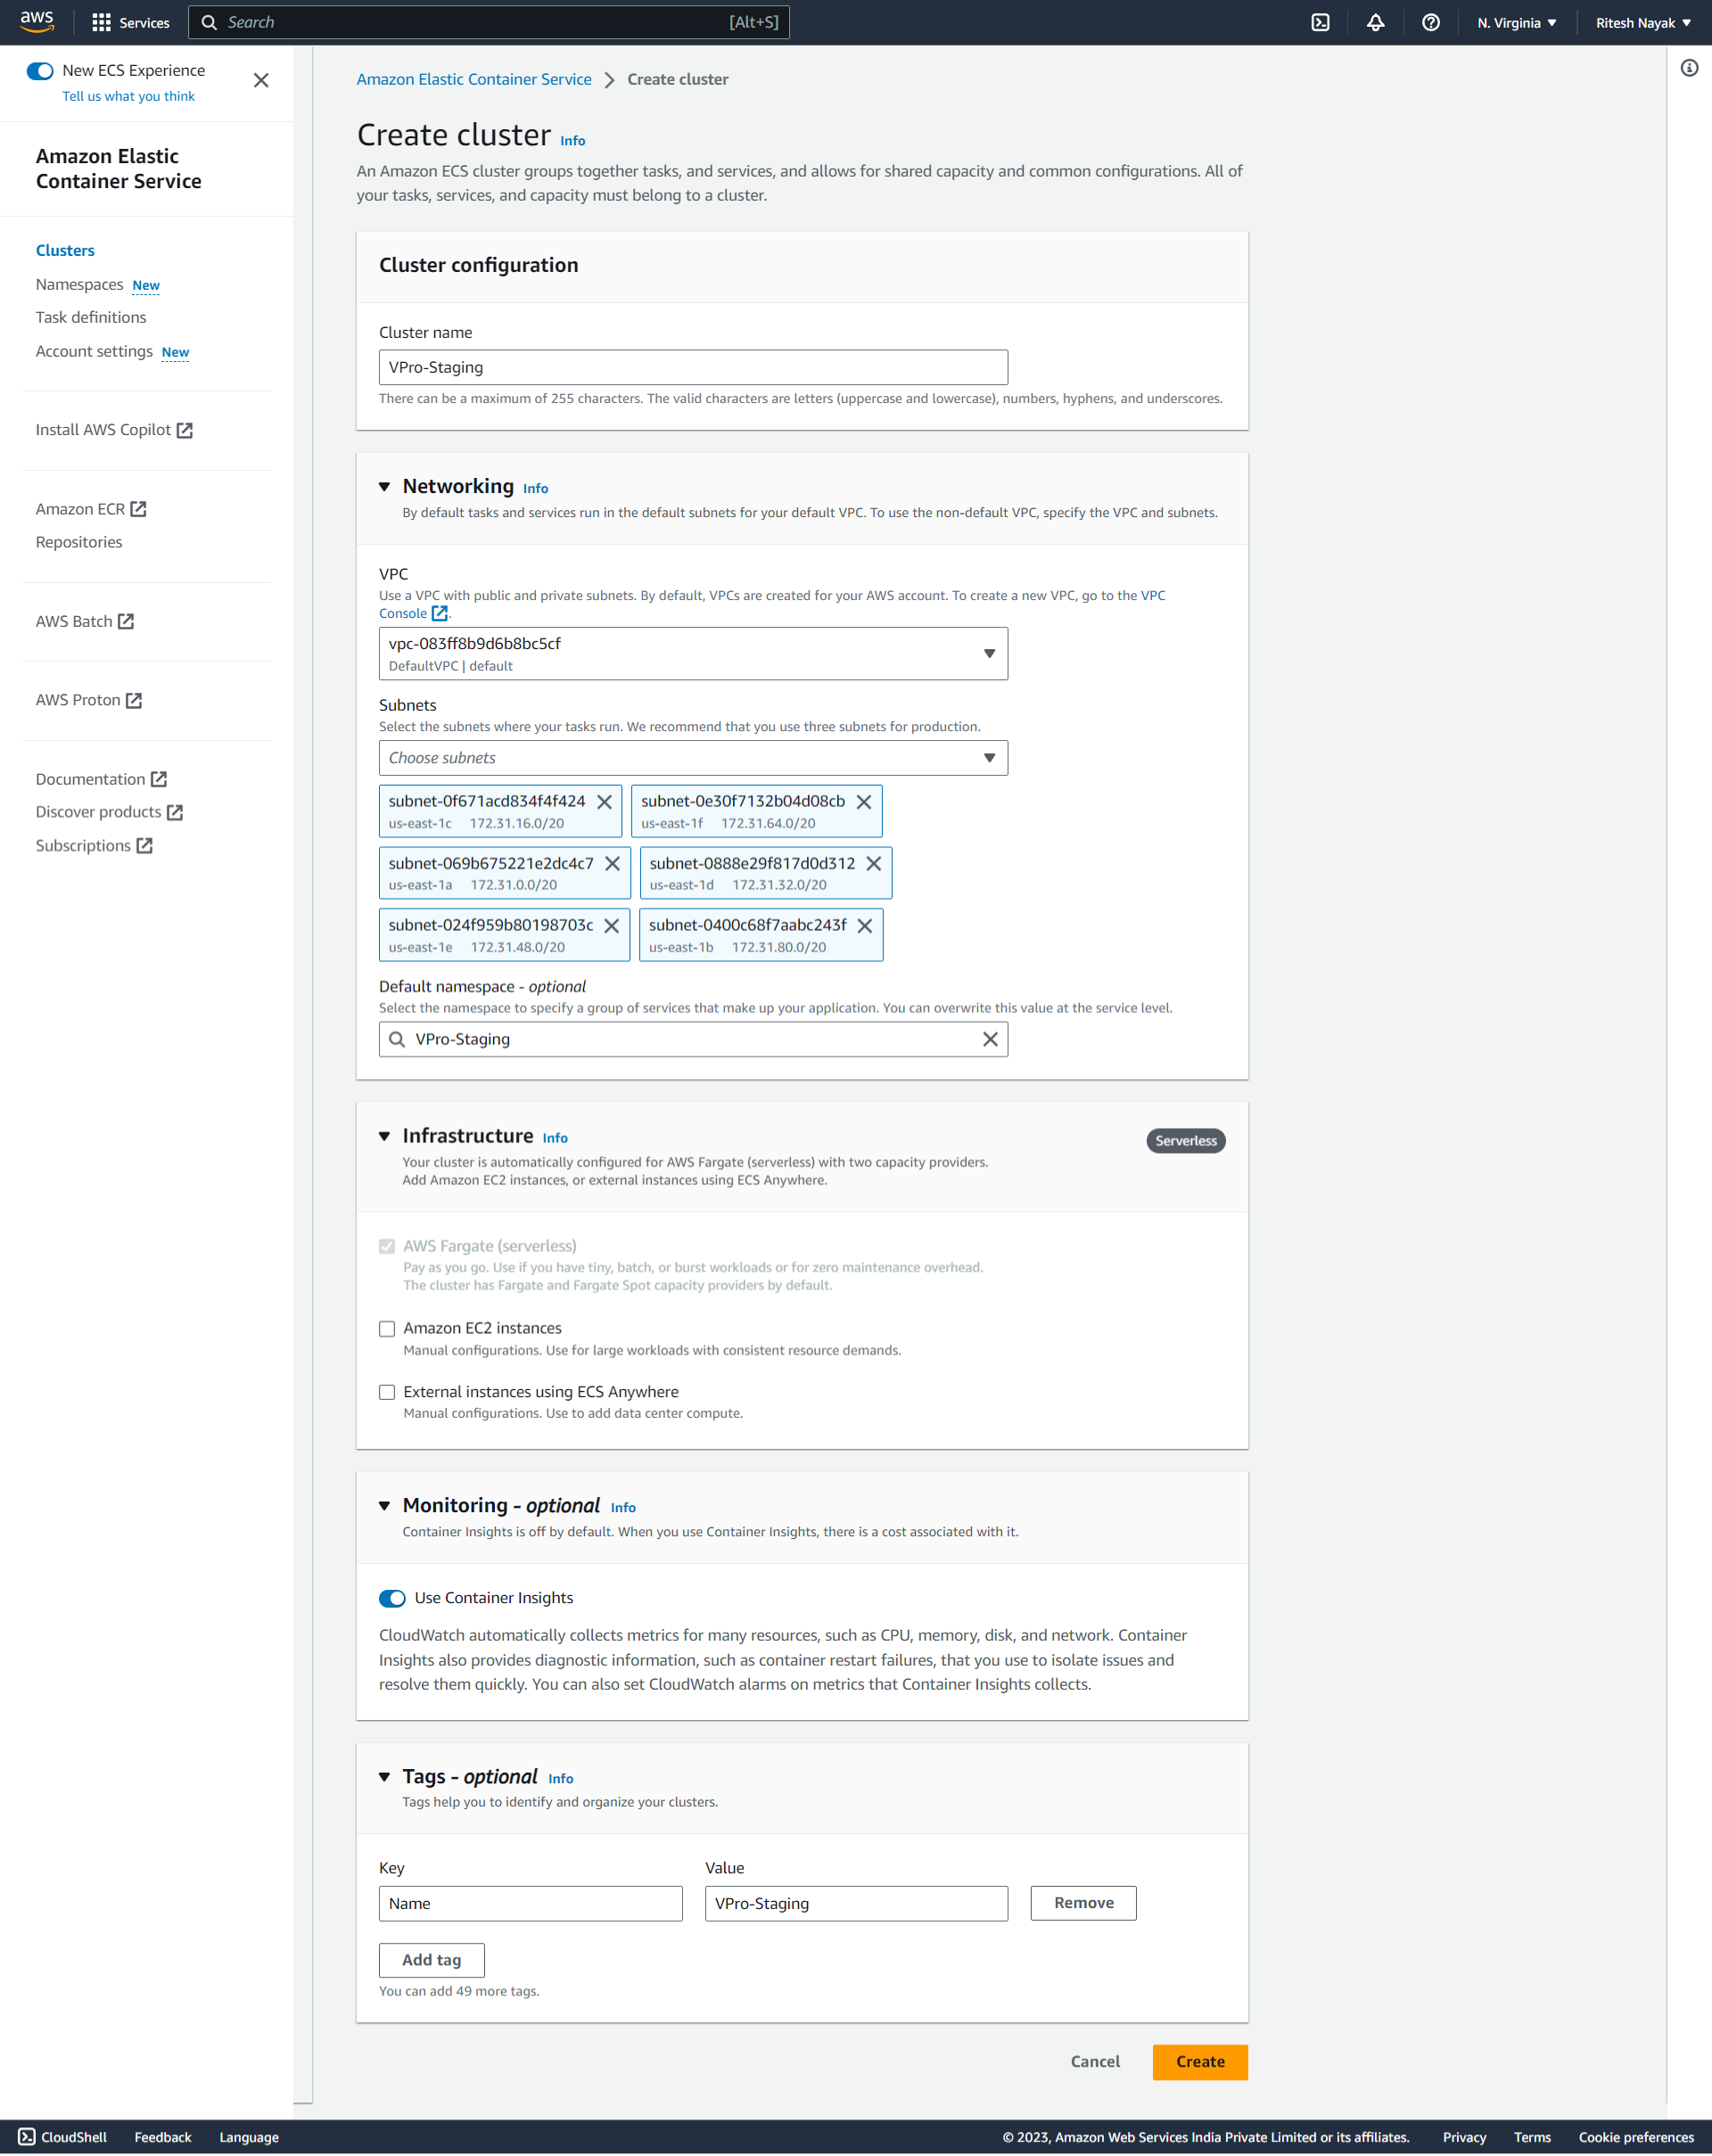
With the above configuration, we are creating the cluster and the cluster is up and running
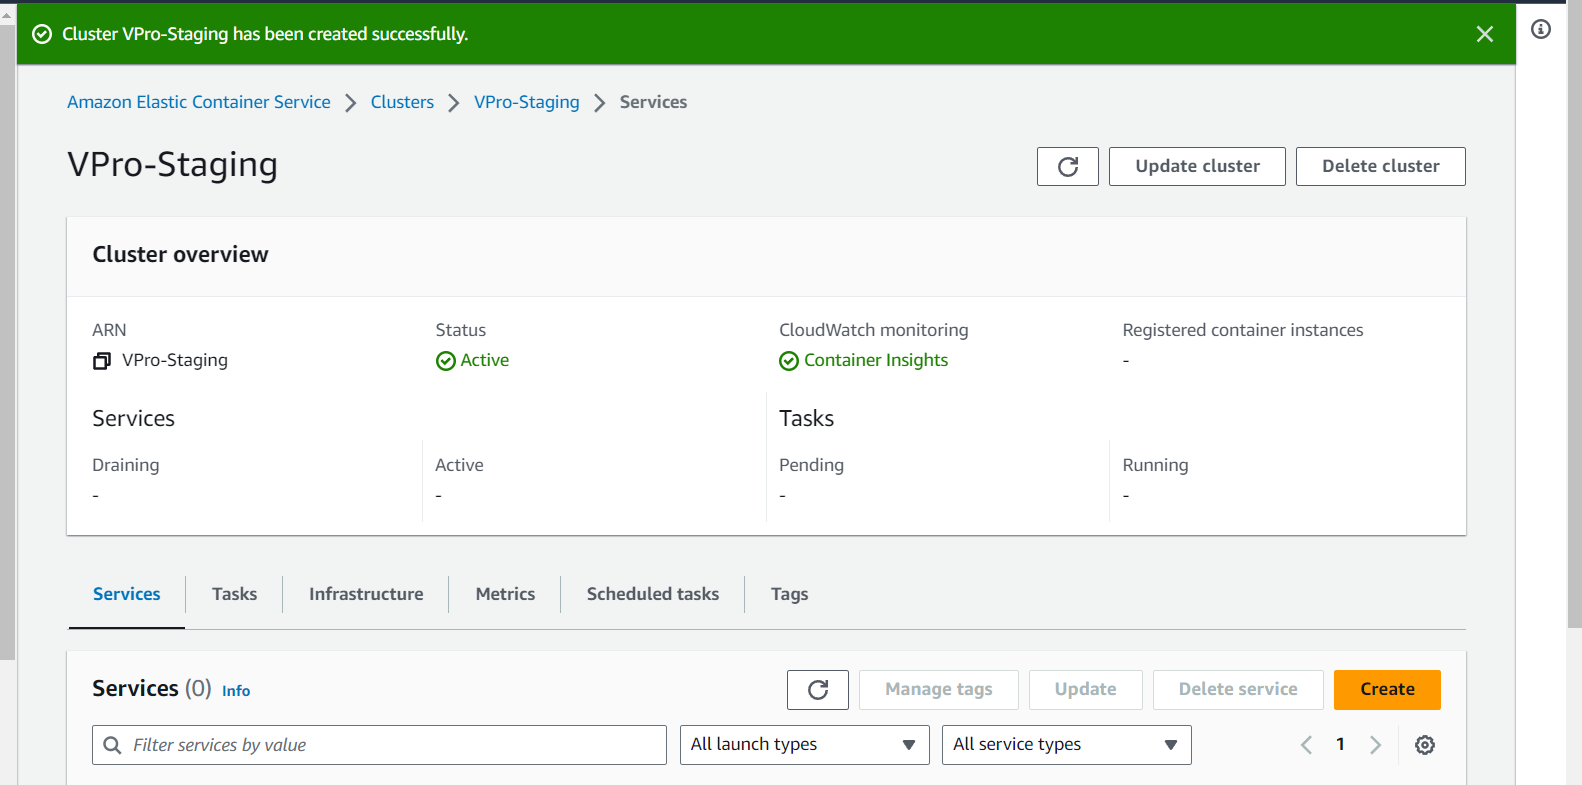
Creating Task Definition
We'll create the task here and the service will use this task definition to create and manage the container.
Step-1
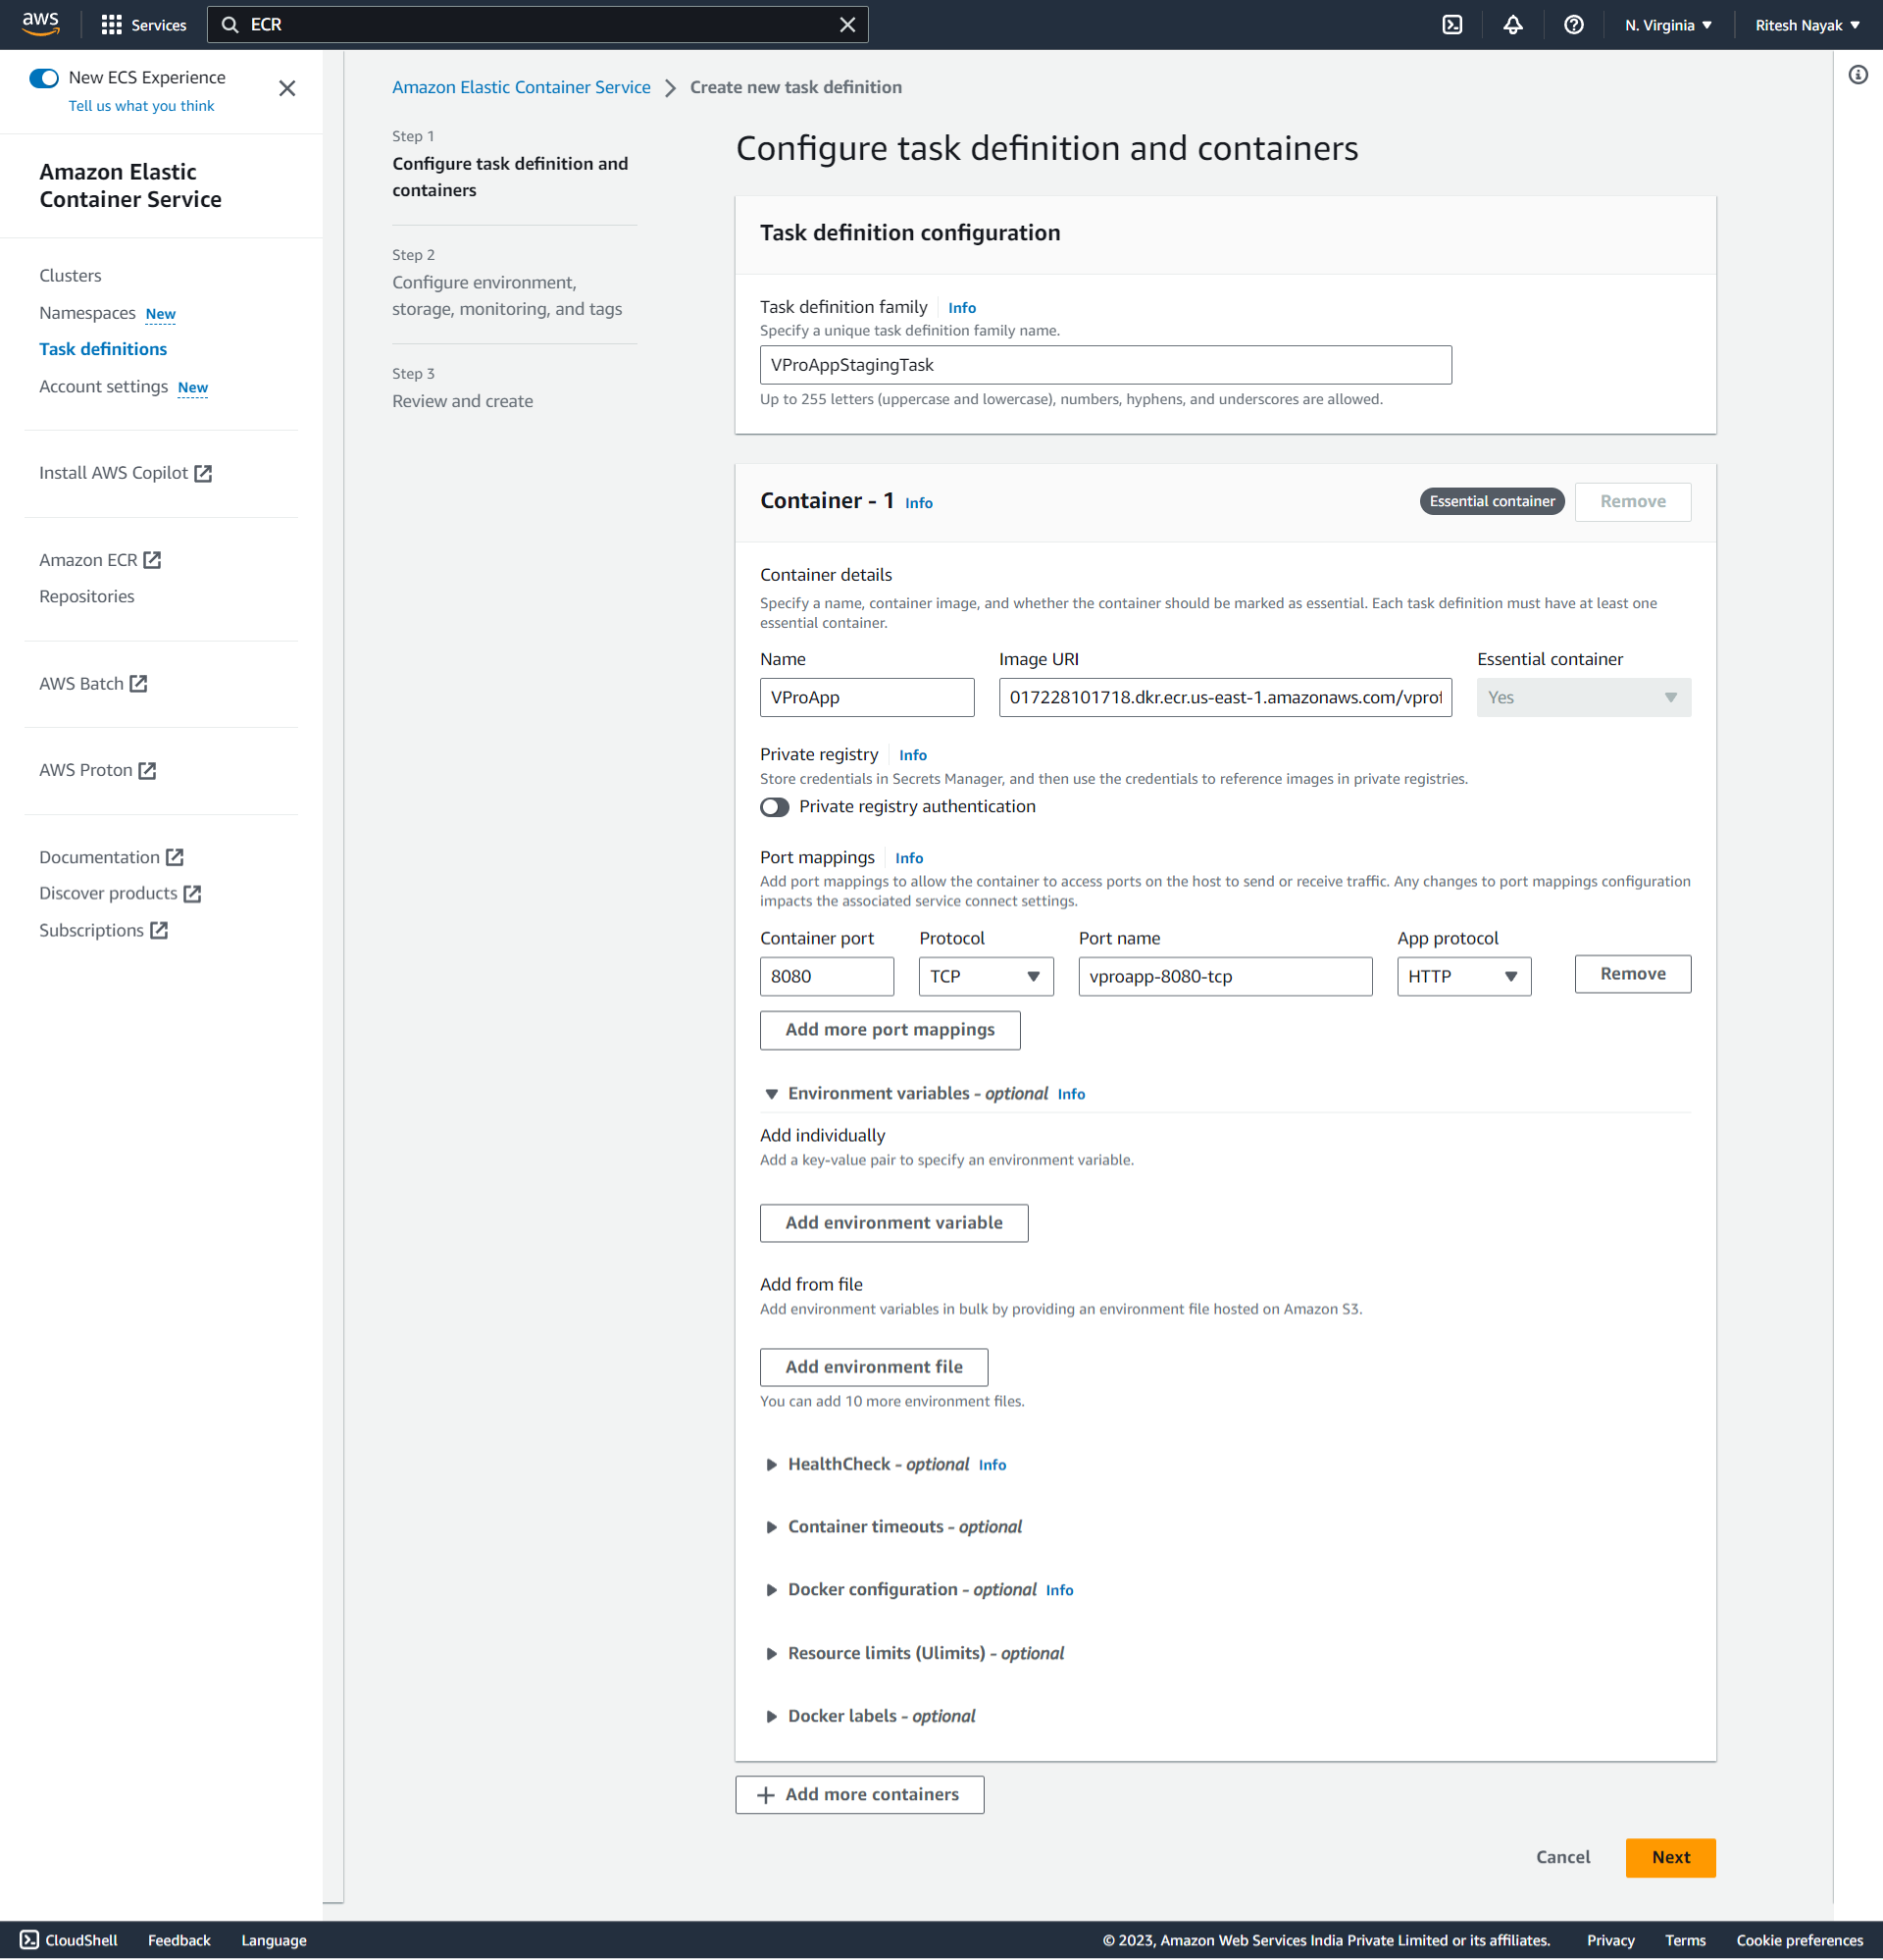
Here we have defined the name of the task followed by the container name and the registry URL in the Image URL in the Container-1 section.
We have opened the HTTP connection to port number 8080 as the Tomcat Server runs on this port.
Step-2
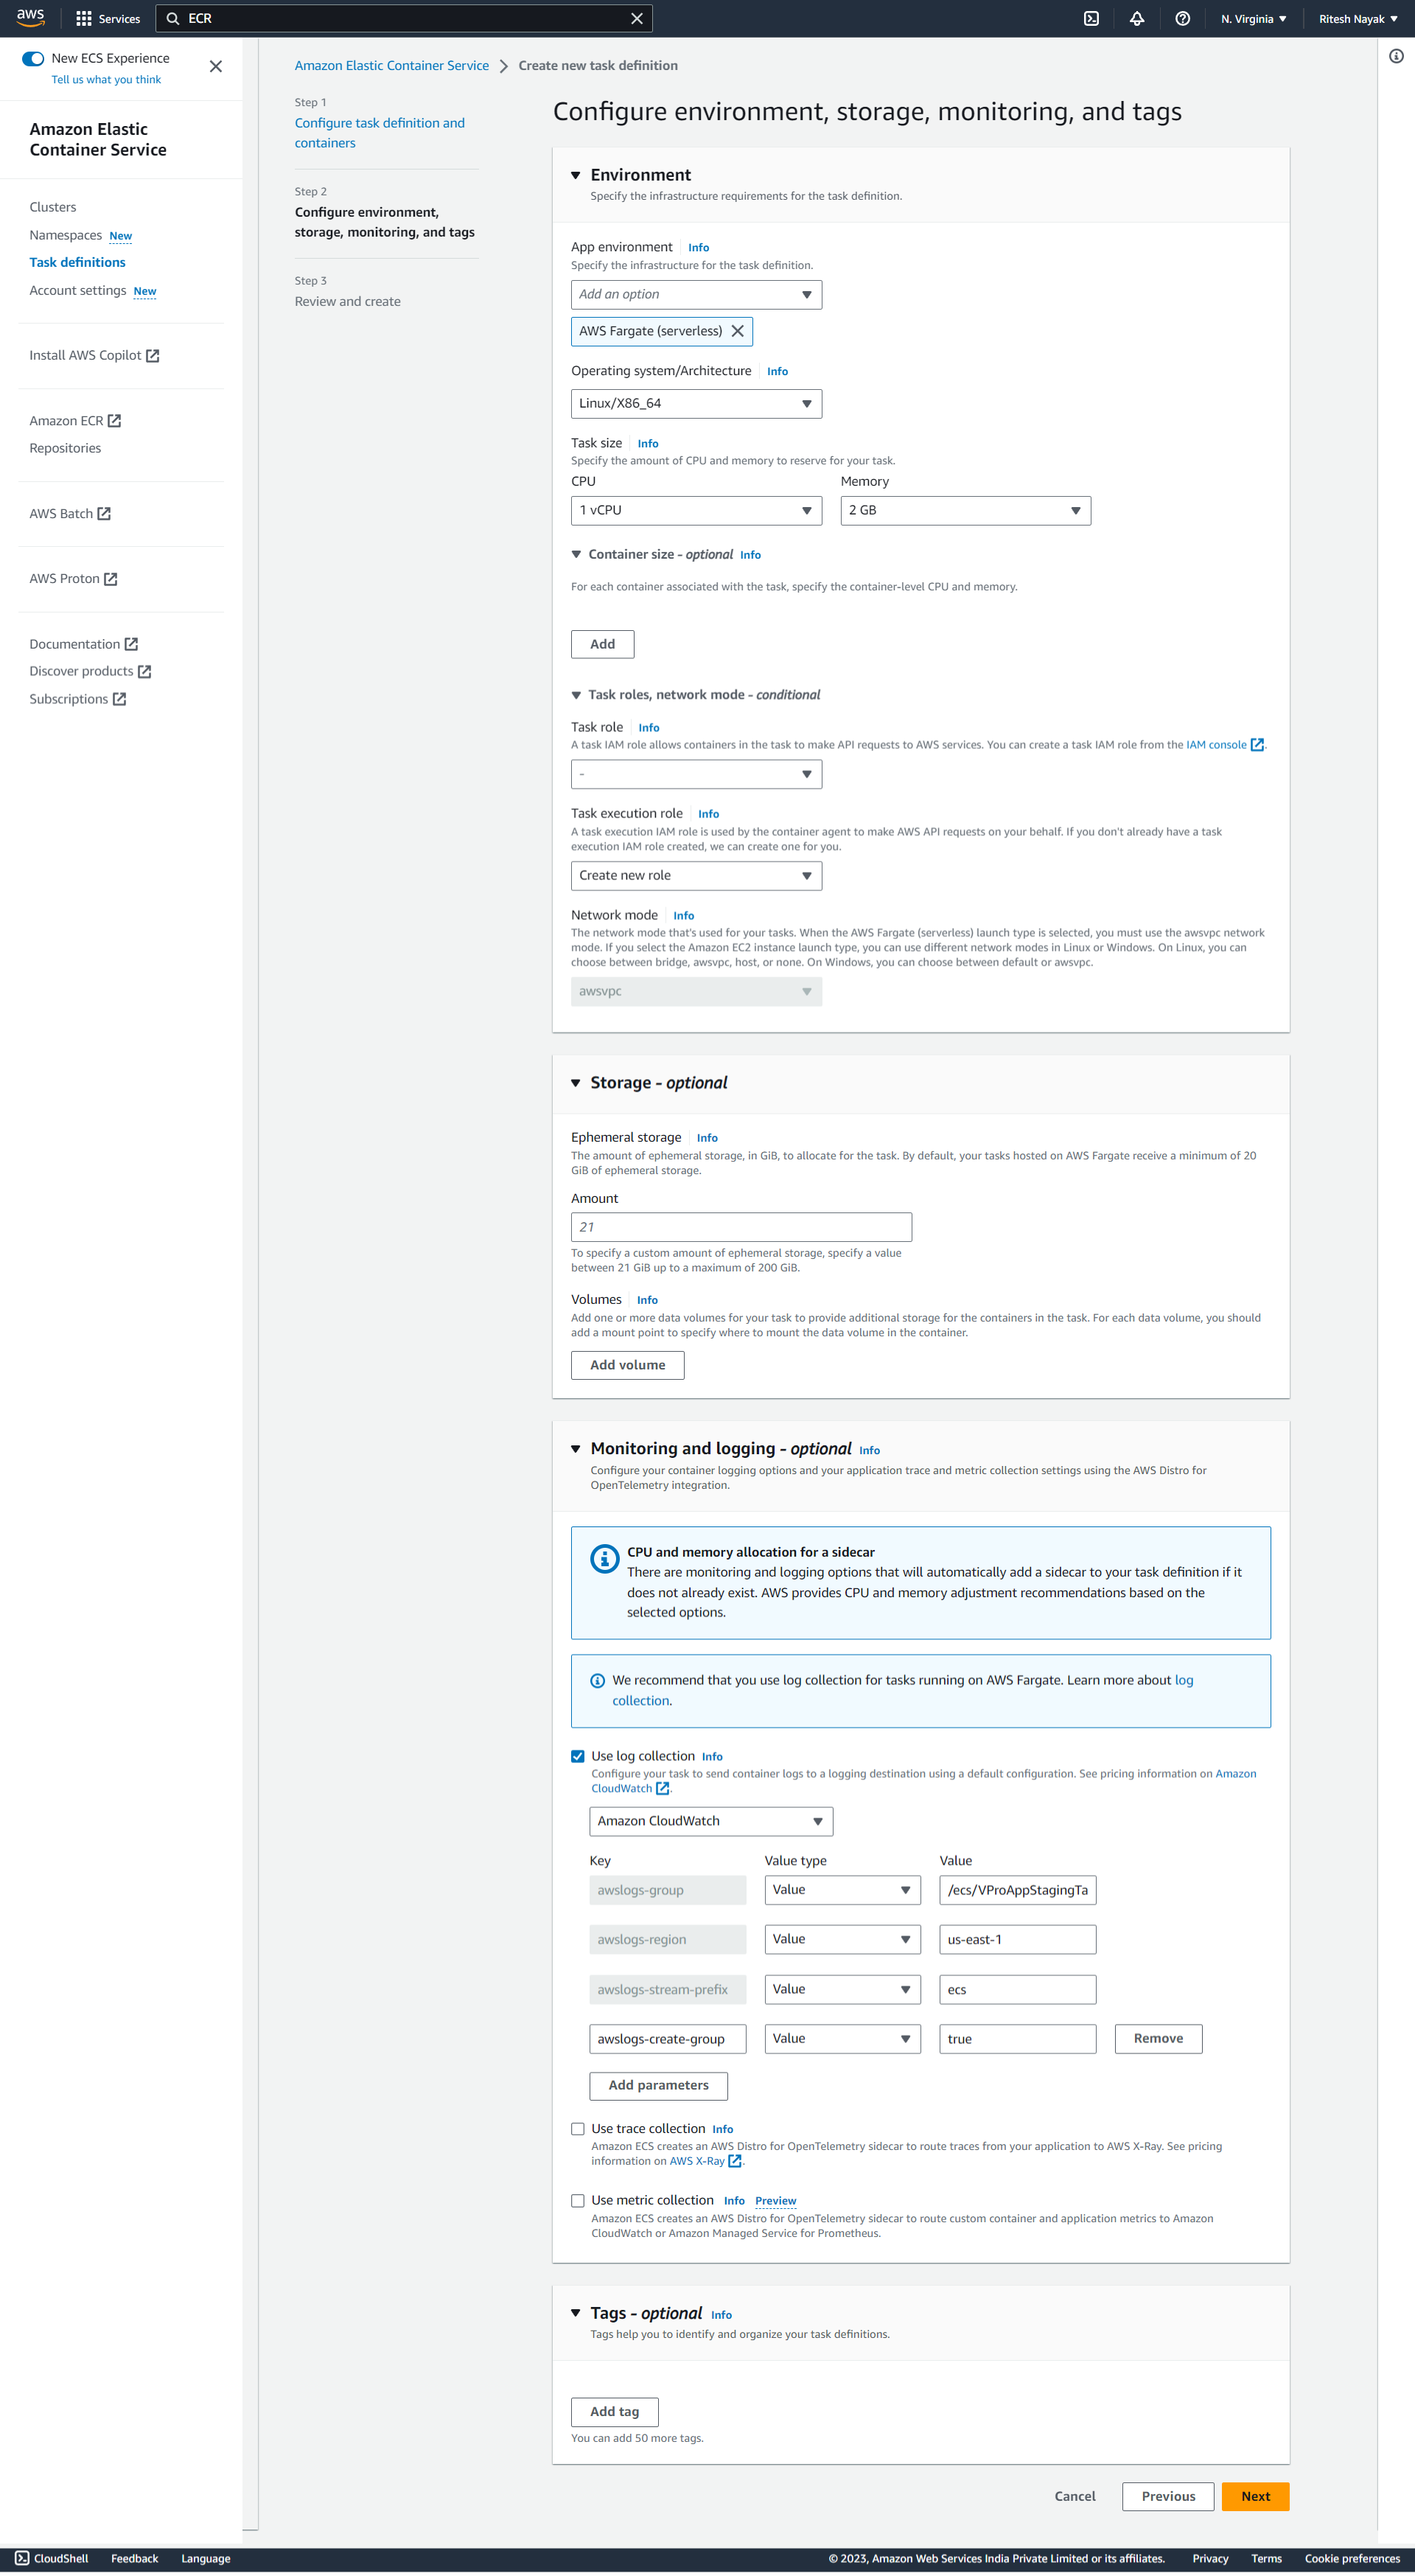
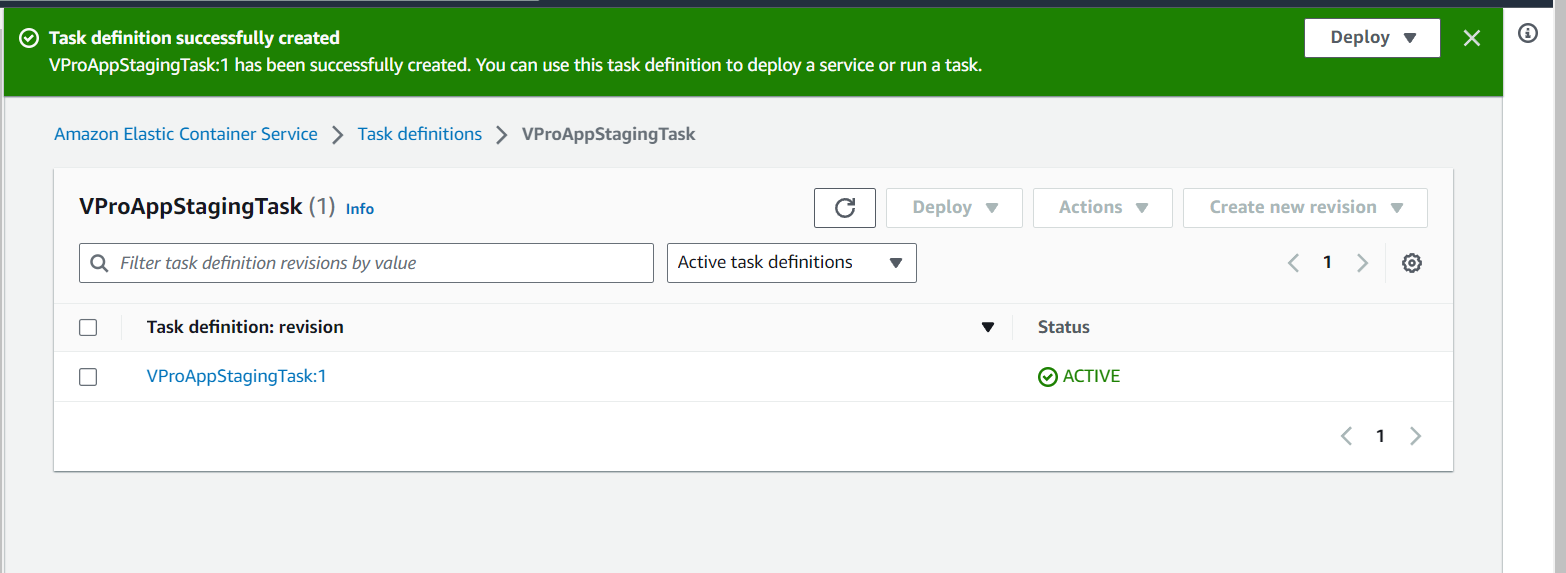
That's it. Now we have just created the task definition:
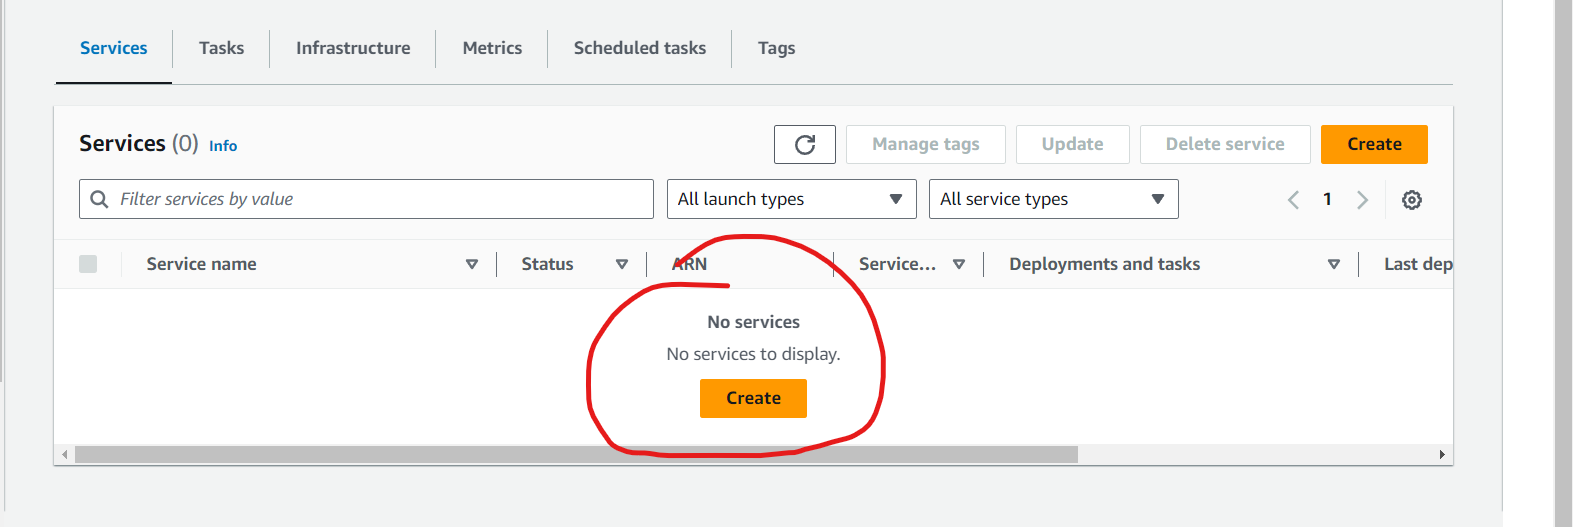
Creating Service from Task Definition
Now, we have the task definition ready and we'll create the service on the basis of the taste definition and that service will further manage our container. To achieve that click on Create in the service tab
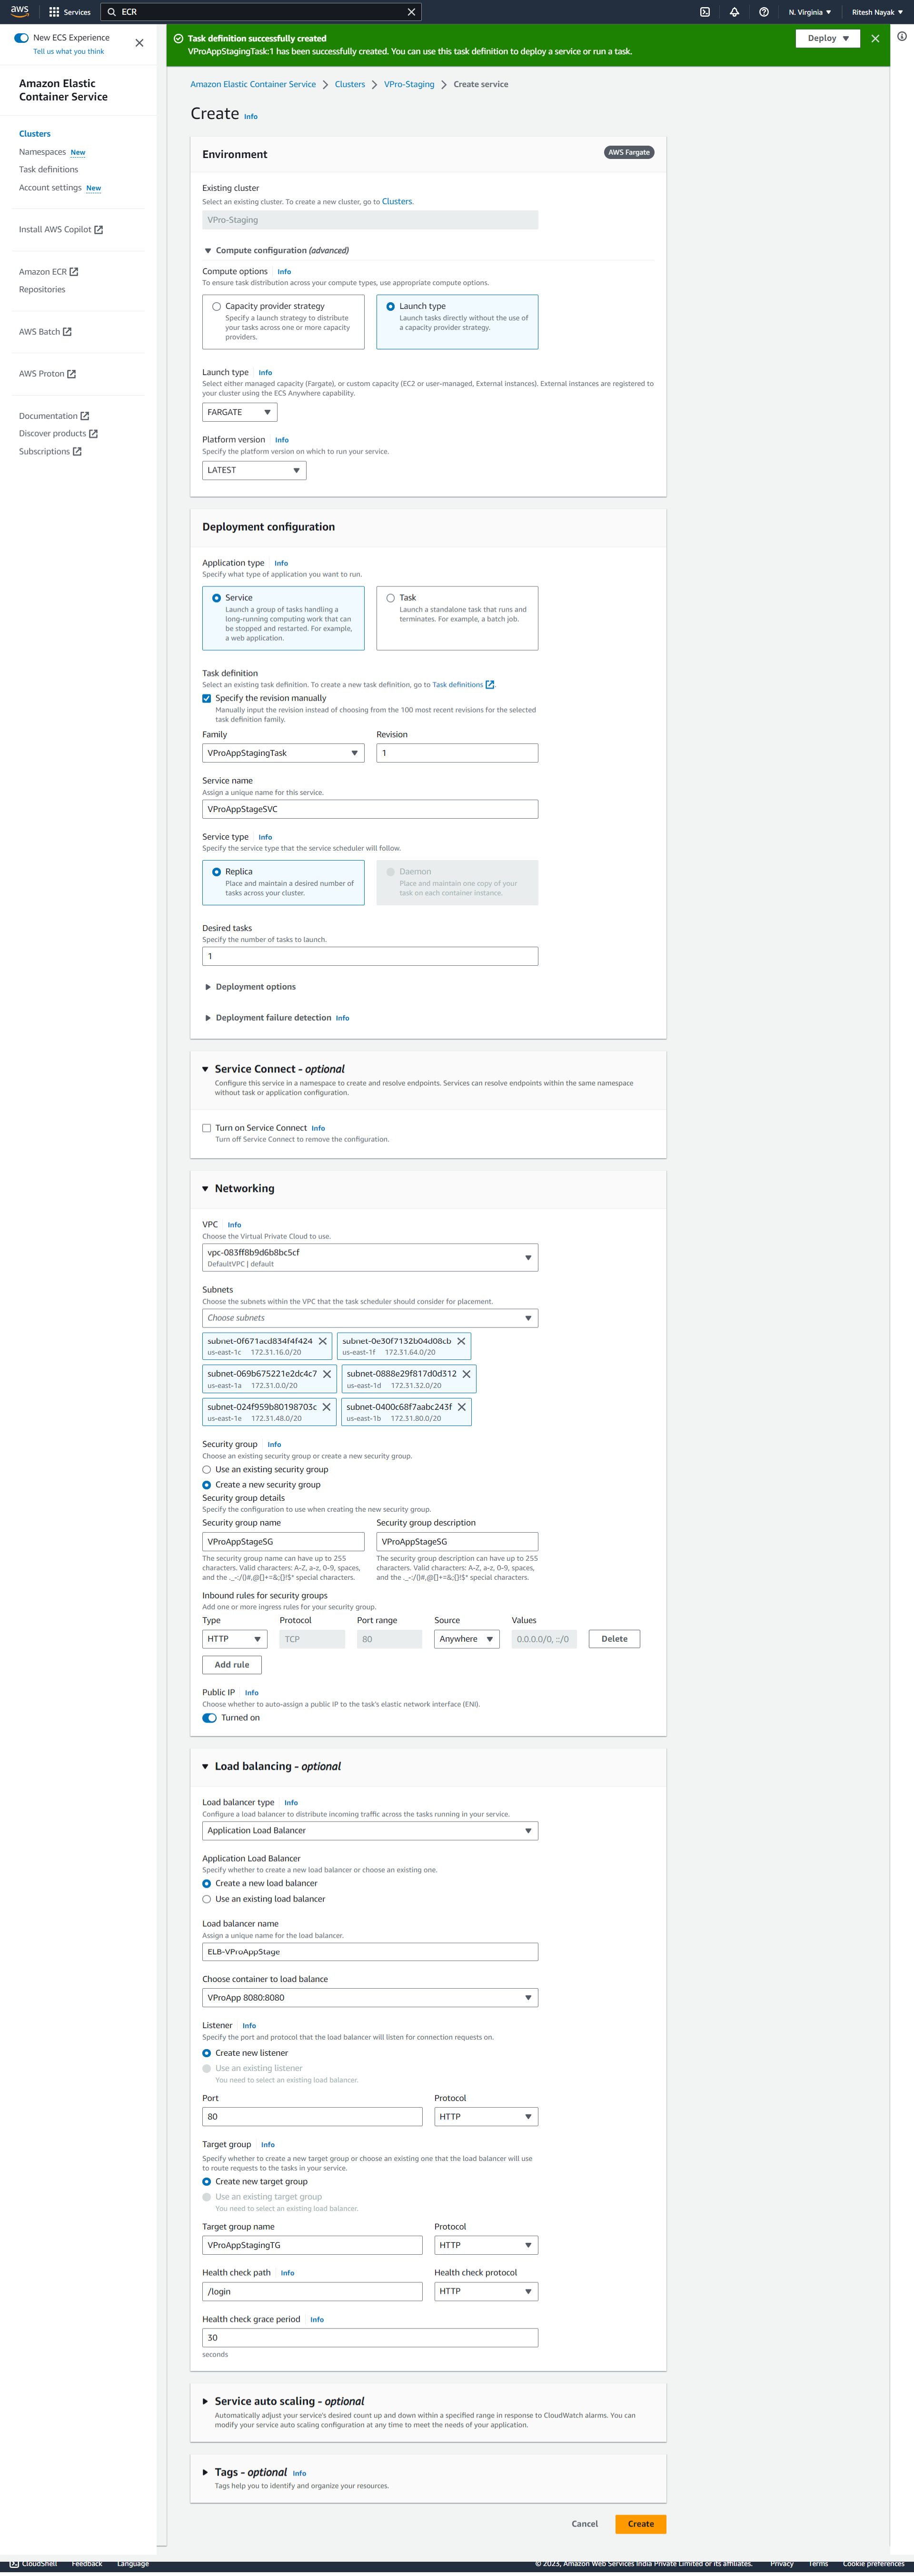
Now we have configured the Service with the below configurations:
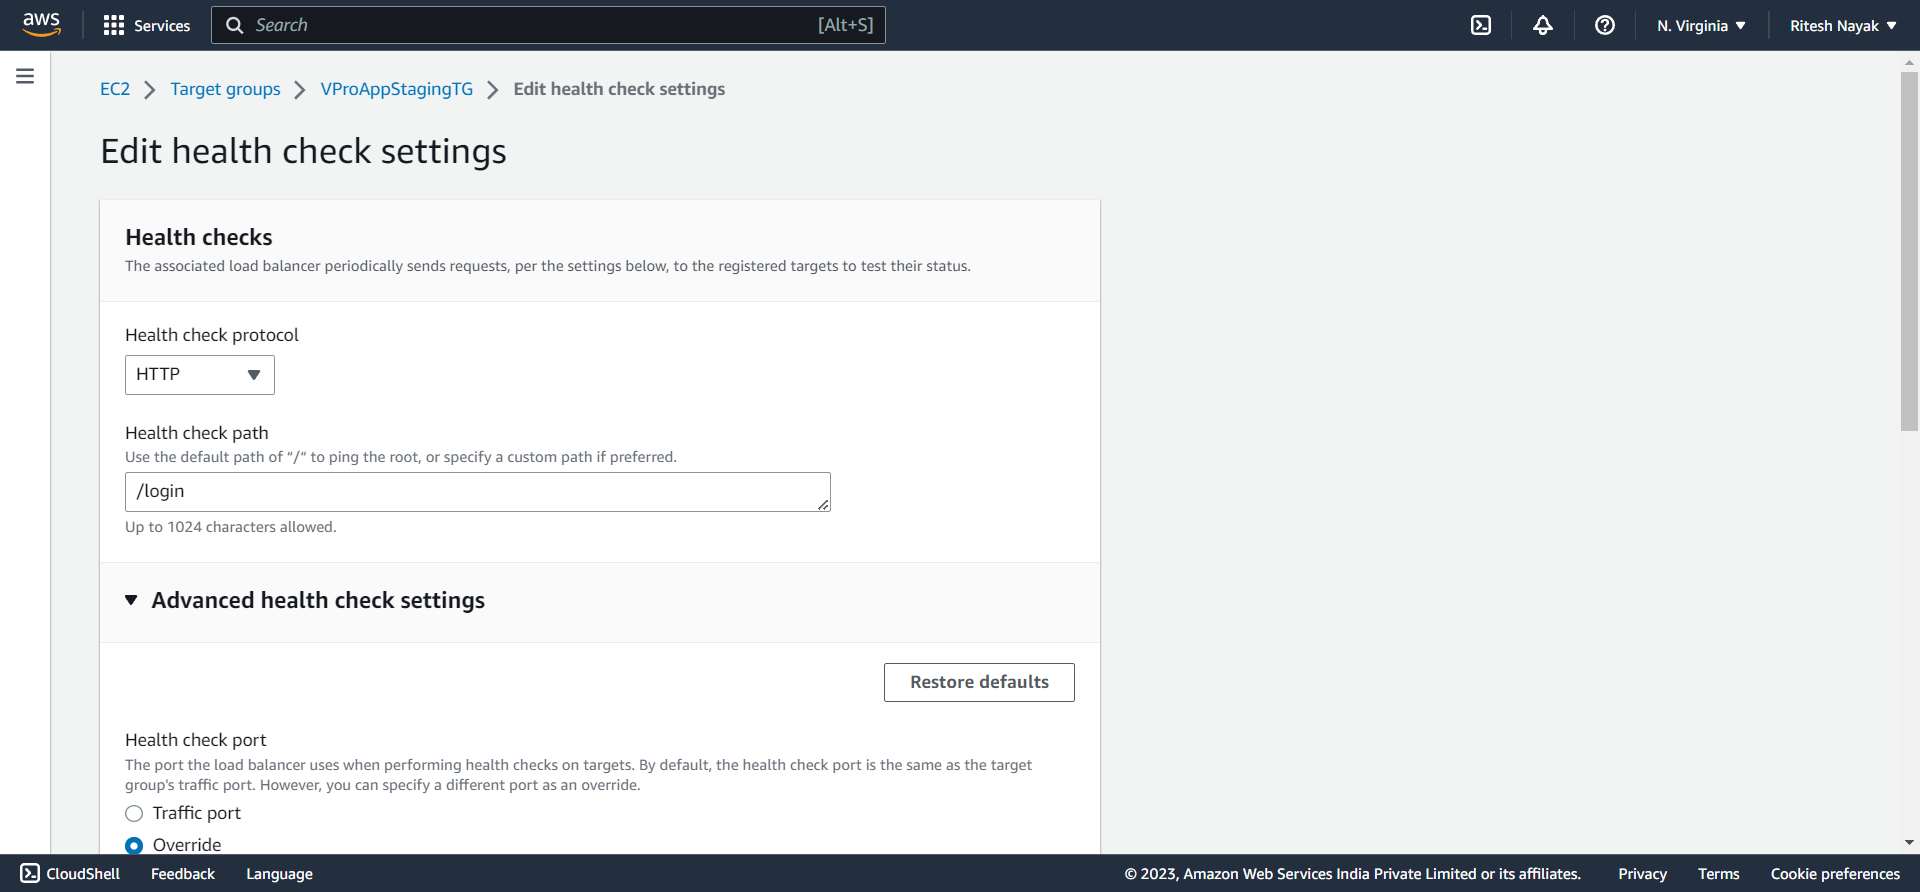
Editing target group
The container listens on port 8080 hence we have to ensure the Target Group VProAppStagingTG also does the health check at port 8080.
Editing the Security Group
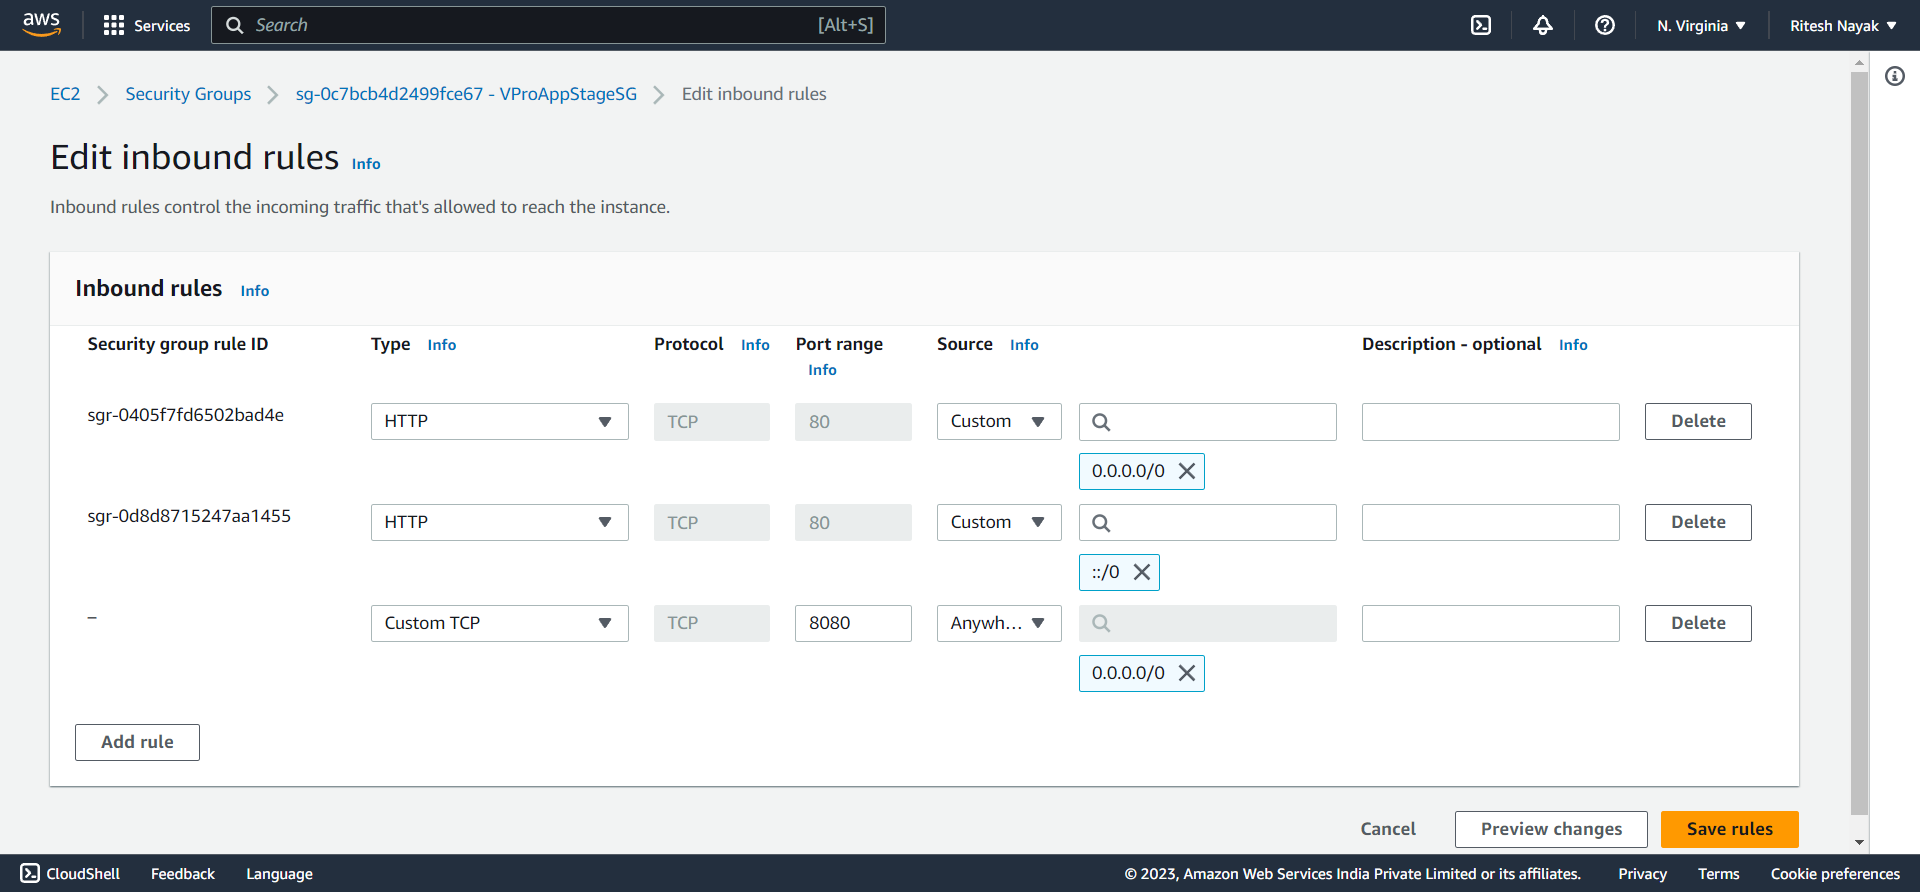
We also have to edit the security group VProAppStageSG that is associated with the service above and allow the 8080 port there:
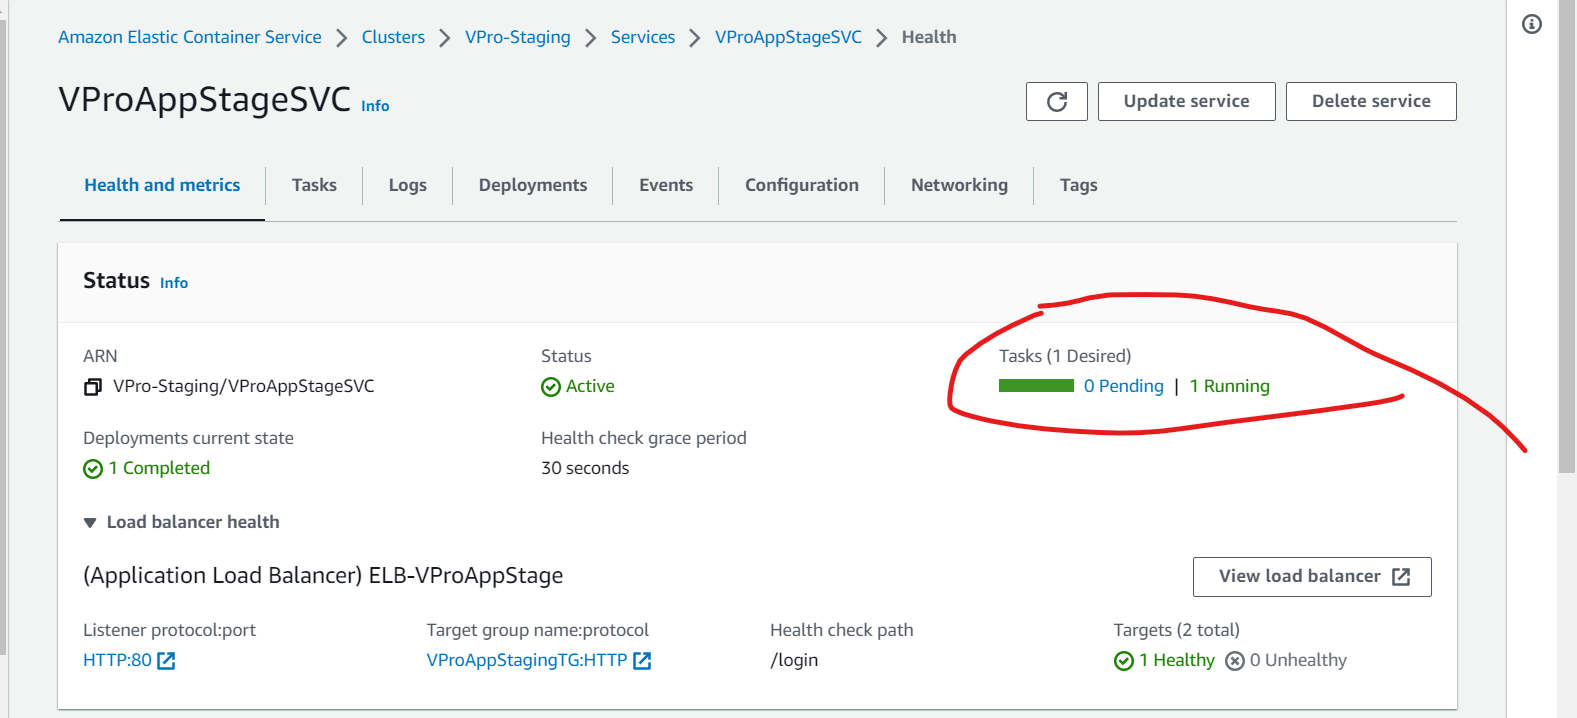
Now the service is ready:
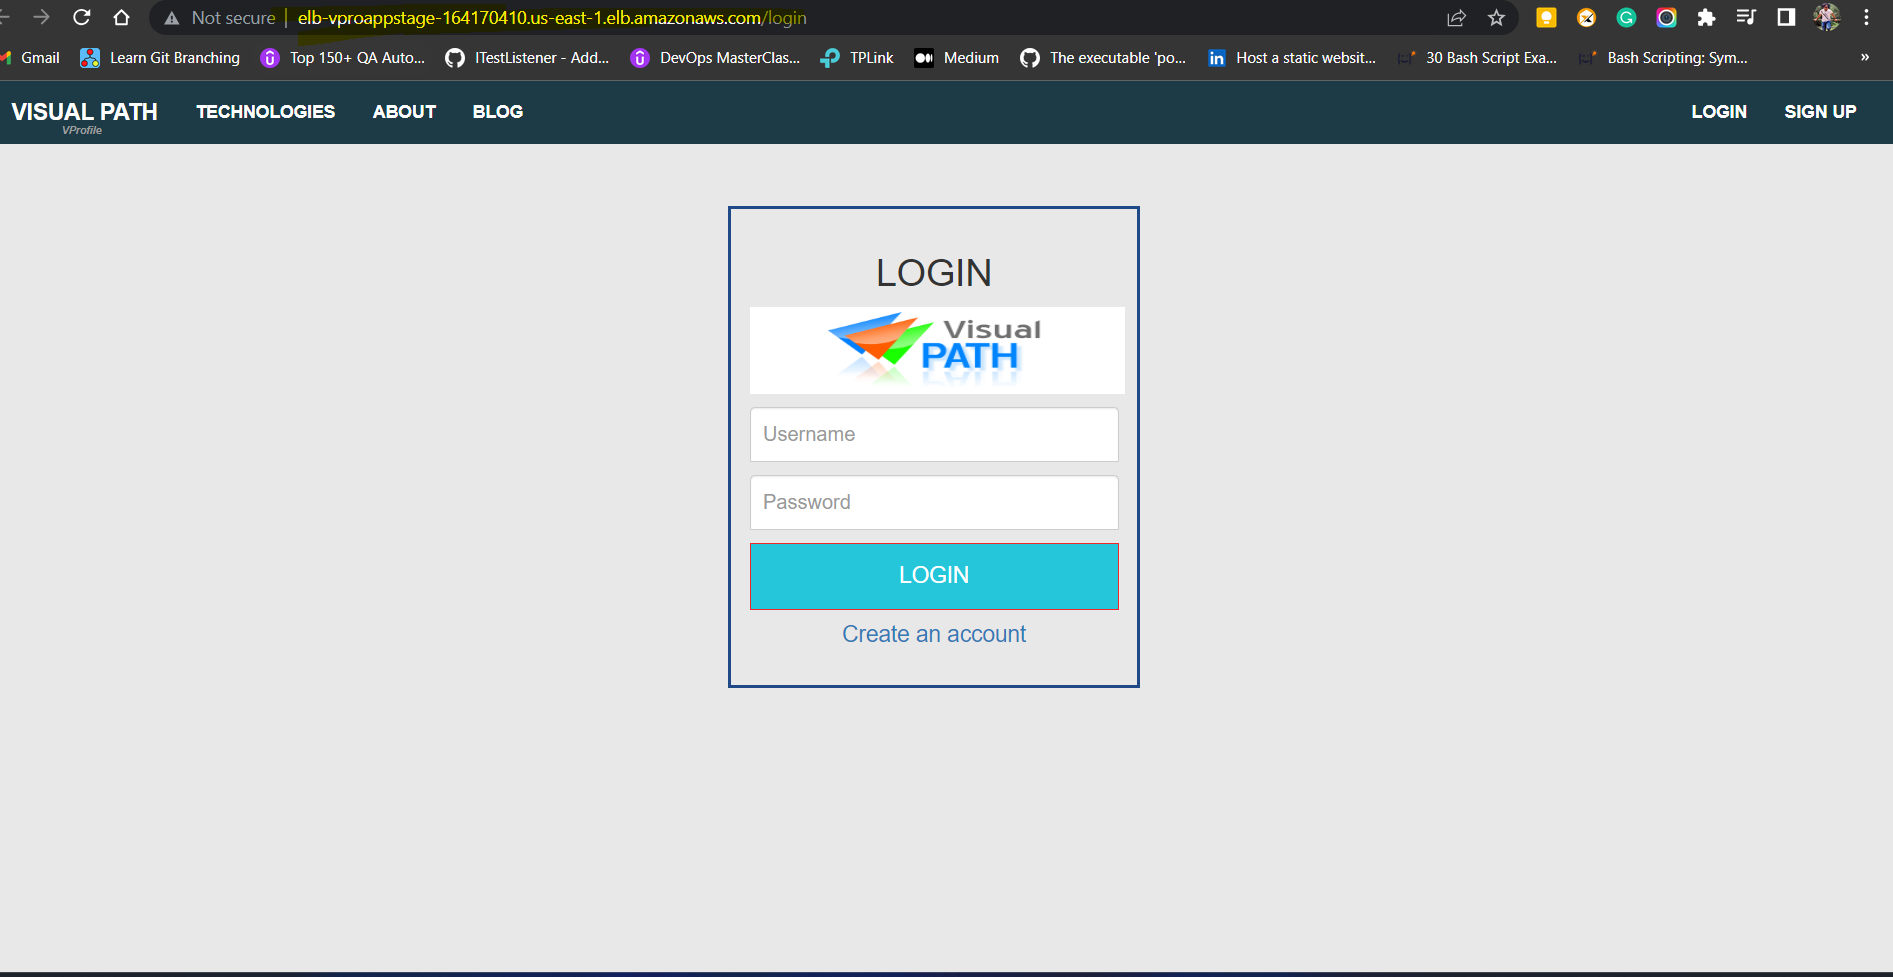
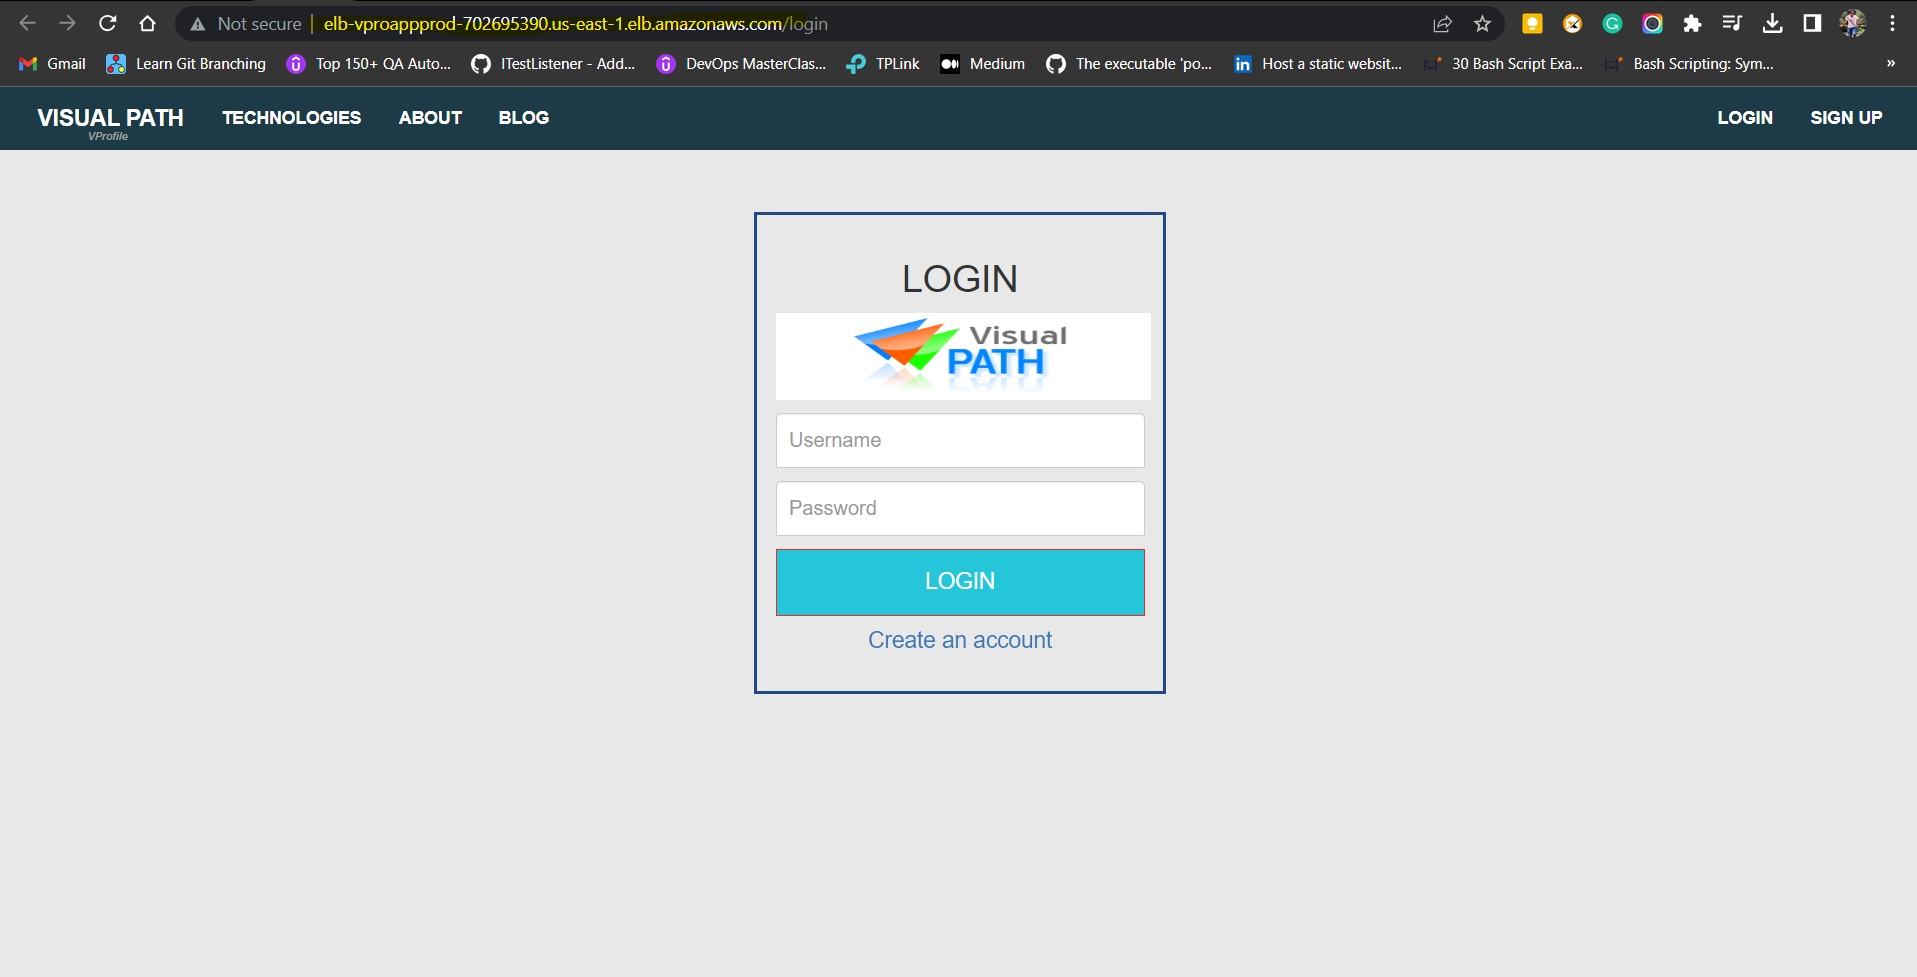
Accessing the application from ELB URL
Now the container is running with our application and we can verify it by the LoadBalancer URL:
Configuring the Pipeline with ECS
Until now we have set it up manually however, now we'll configure the ECS with Jenkins so that whenever there is a new commit or a new Image is built it will automatically deploy the newly created Image to ECS.
This will bring AWS CLI into the picture. We have already installed AWS CLI in the Jenkins server and we have also set up the user credentials awscred in Jenkins that has permission to interact with AWS ECS from CLI.
From the next code changes, this user will ask ECS to fetch the newly created image via CLI and the task definition of the cluster will be updated with a new image and the service will delete the currently running container and replace it with a new one with the latest image.
Now to achieve all these we have to update the Jenkinsfile code as below:
We'll add 2 more variables which are that contains cluster name and service name respectively:
cluster = "VPro-Staging" //this is the cluster name
service = "VProAppStageSVC" //this is the service name
Deployment Stage
Until now we had the stages till the artifact upload to ECR and here, we'll add a new stage that will deploy the artifact from ECR to ECS for which the code looks like below:
stage('Deploy to ECS staging') {
            steps {
                withAWS(credentials: 'awscreds', region: 'us-east-1') {
                    sh 'aws ecs update-service --cluster ${cluster} --service ${service} --force-new-deployment'
                }
            }
        }
Now with this, our pipeline has been set up and integrated with ECS. We don't have to create the setup manually anymore. Every time the developer makes a new code change it will automatically deploy the Image to the respective environment.
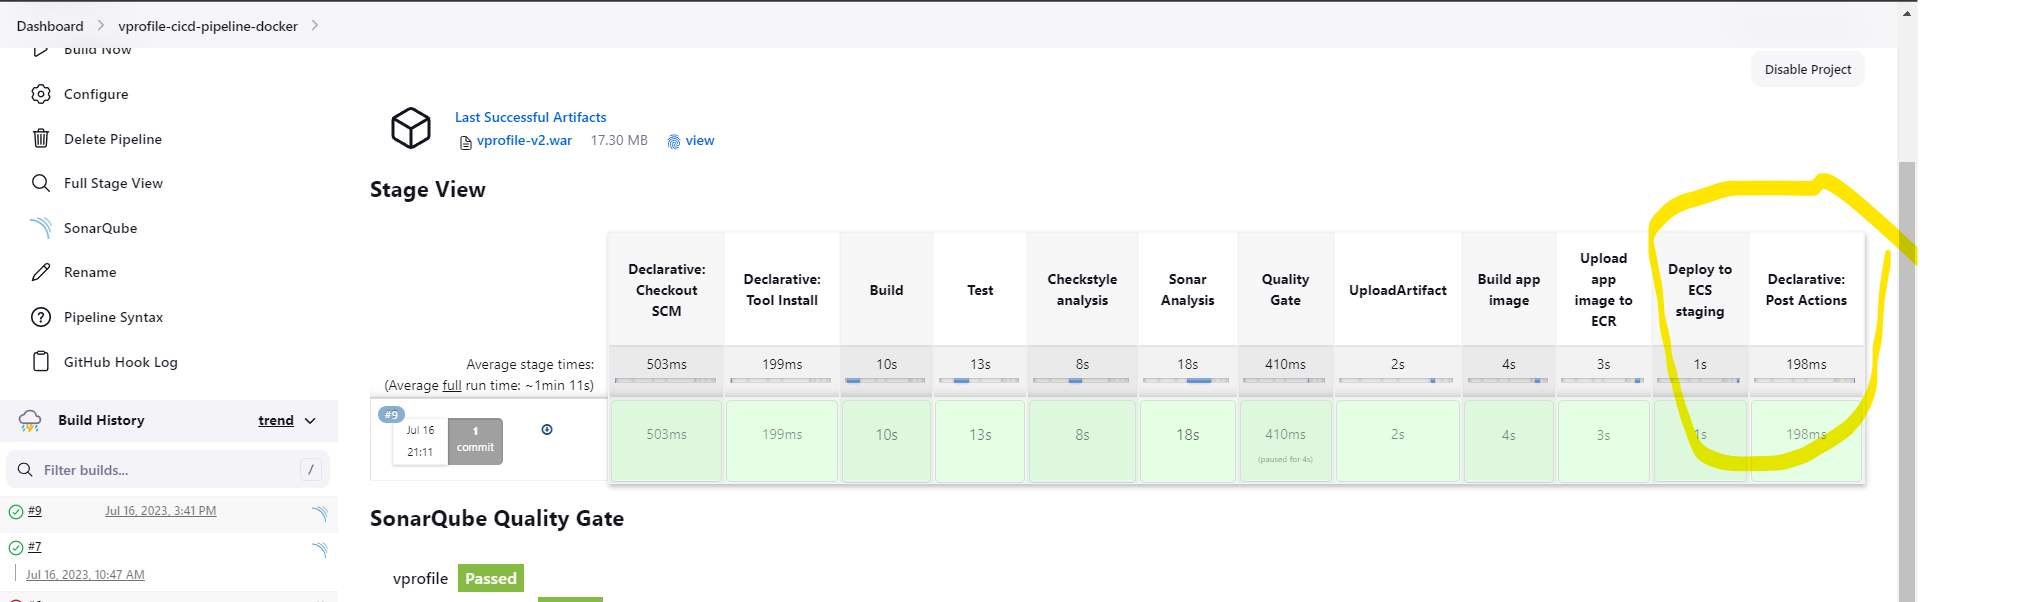
Now in the above image, you can see that 2 new stages have been created automatically and deployed to the staging environment.
Promoting the build to Production
Now our application is running in the Staging environment and ready for testing by QAs.
Once the build is tested the same build will be promoted to Production and will be made available to the end user.
The same steps will be repeated and we'll create another cluster(VProProd), task definition(VProProdTask) etc.. for Production.
Service configuration
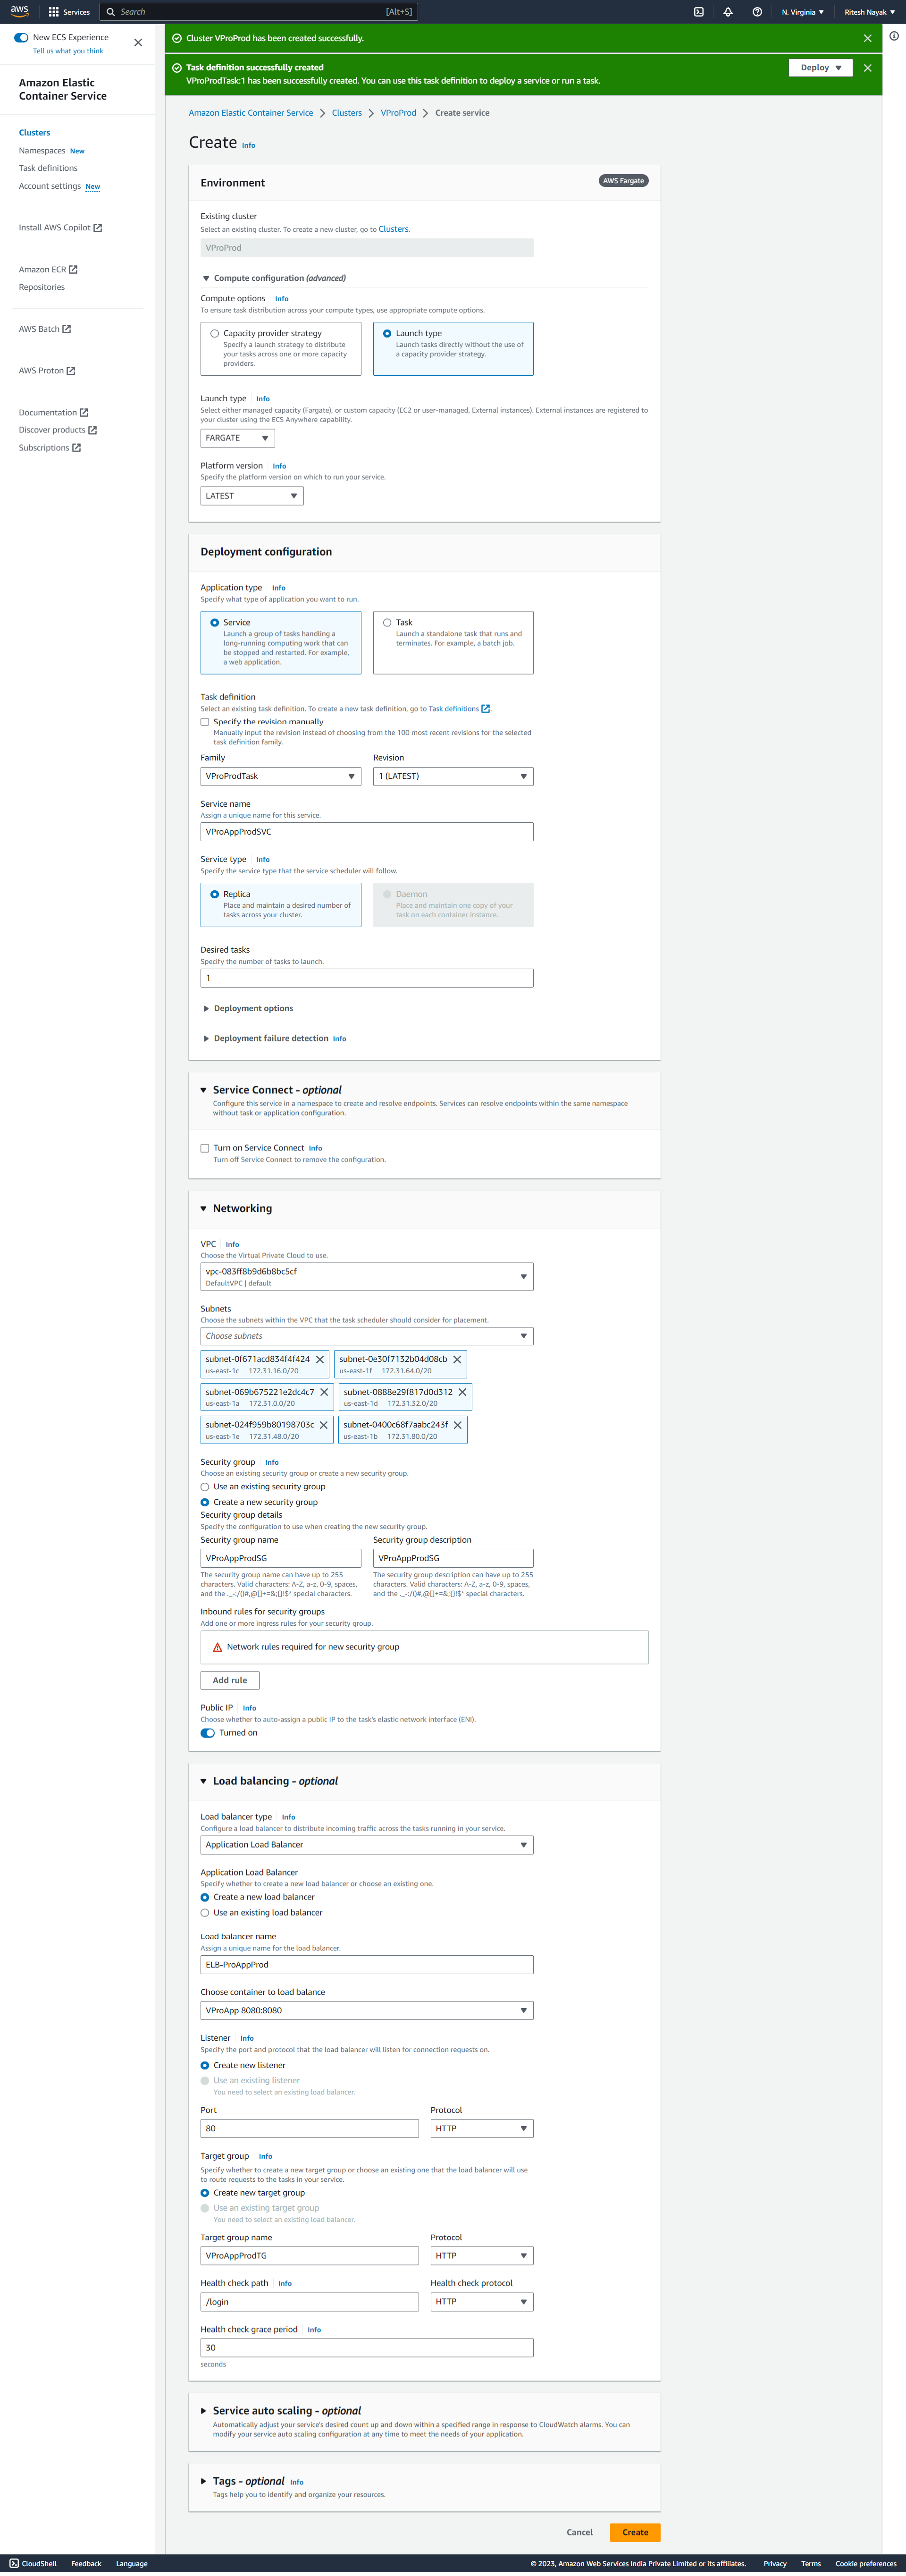
Creating a new Pipeline for Production
We have already differentiated the pipeline script for production. Now we'll add the AWS ECS credentials and variables to configure it with ECS.
Before doing that we'll create a new git branch for Production from the working branch and push it to the remote repository.
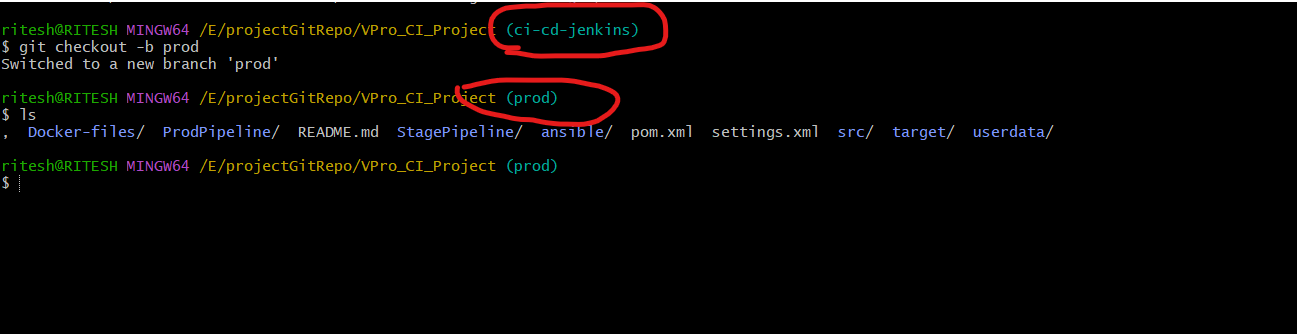
In real-time we'll have a different branch for production named Master.
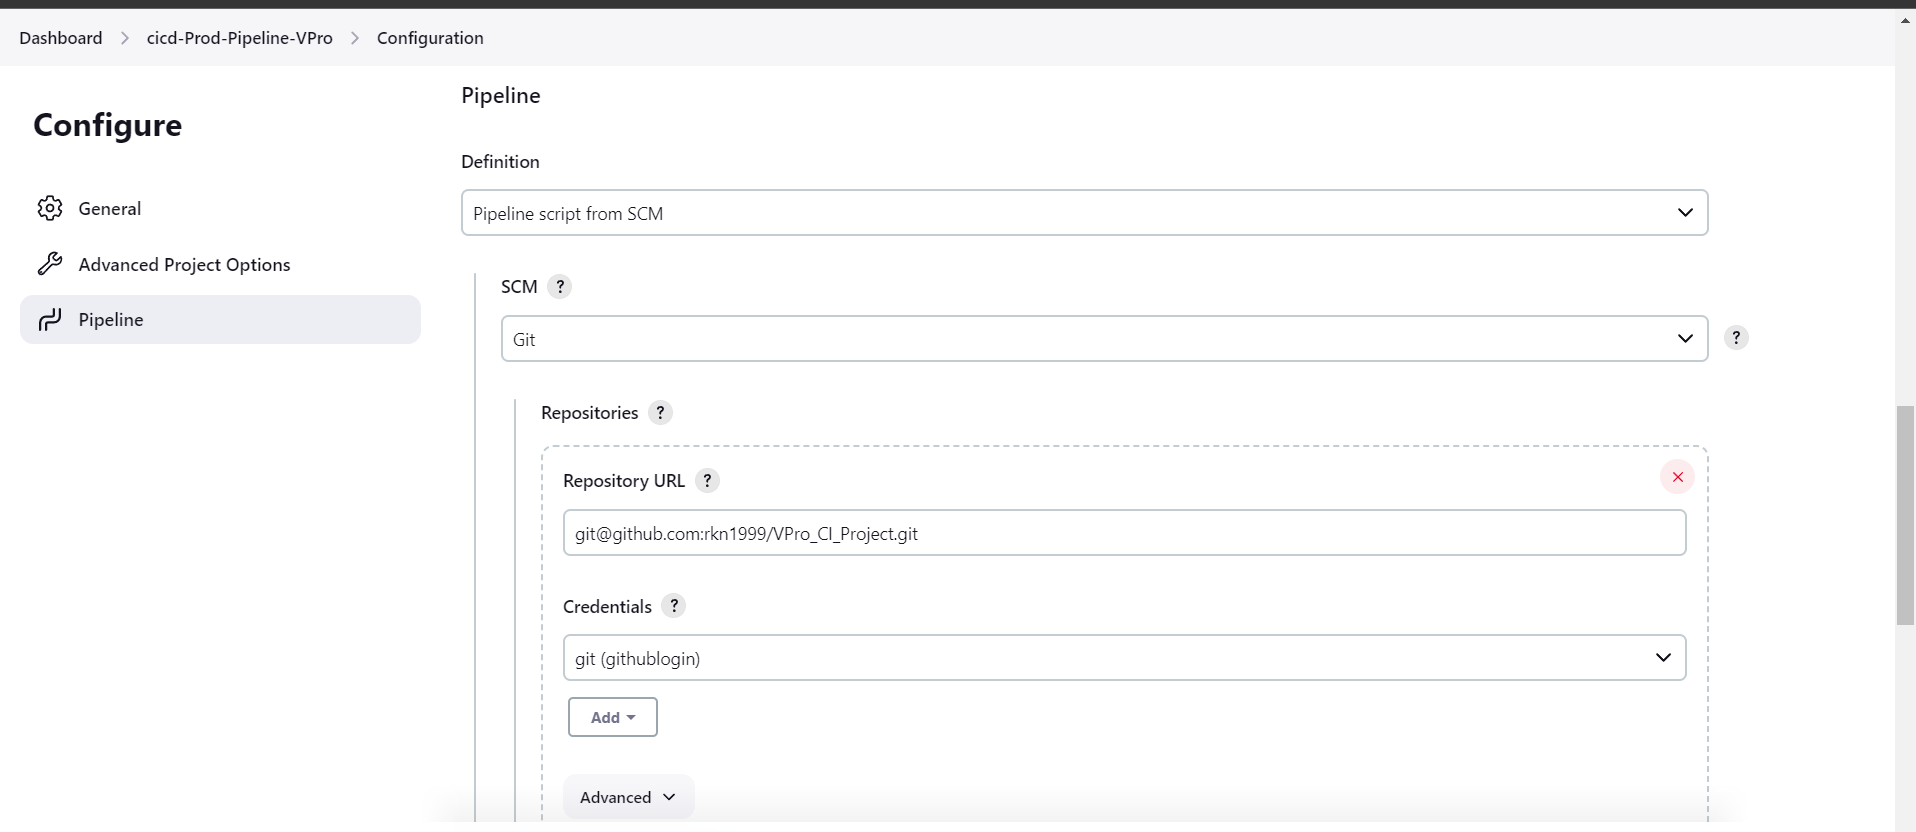
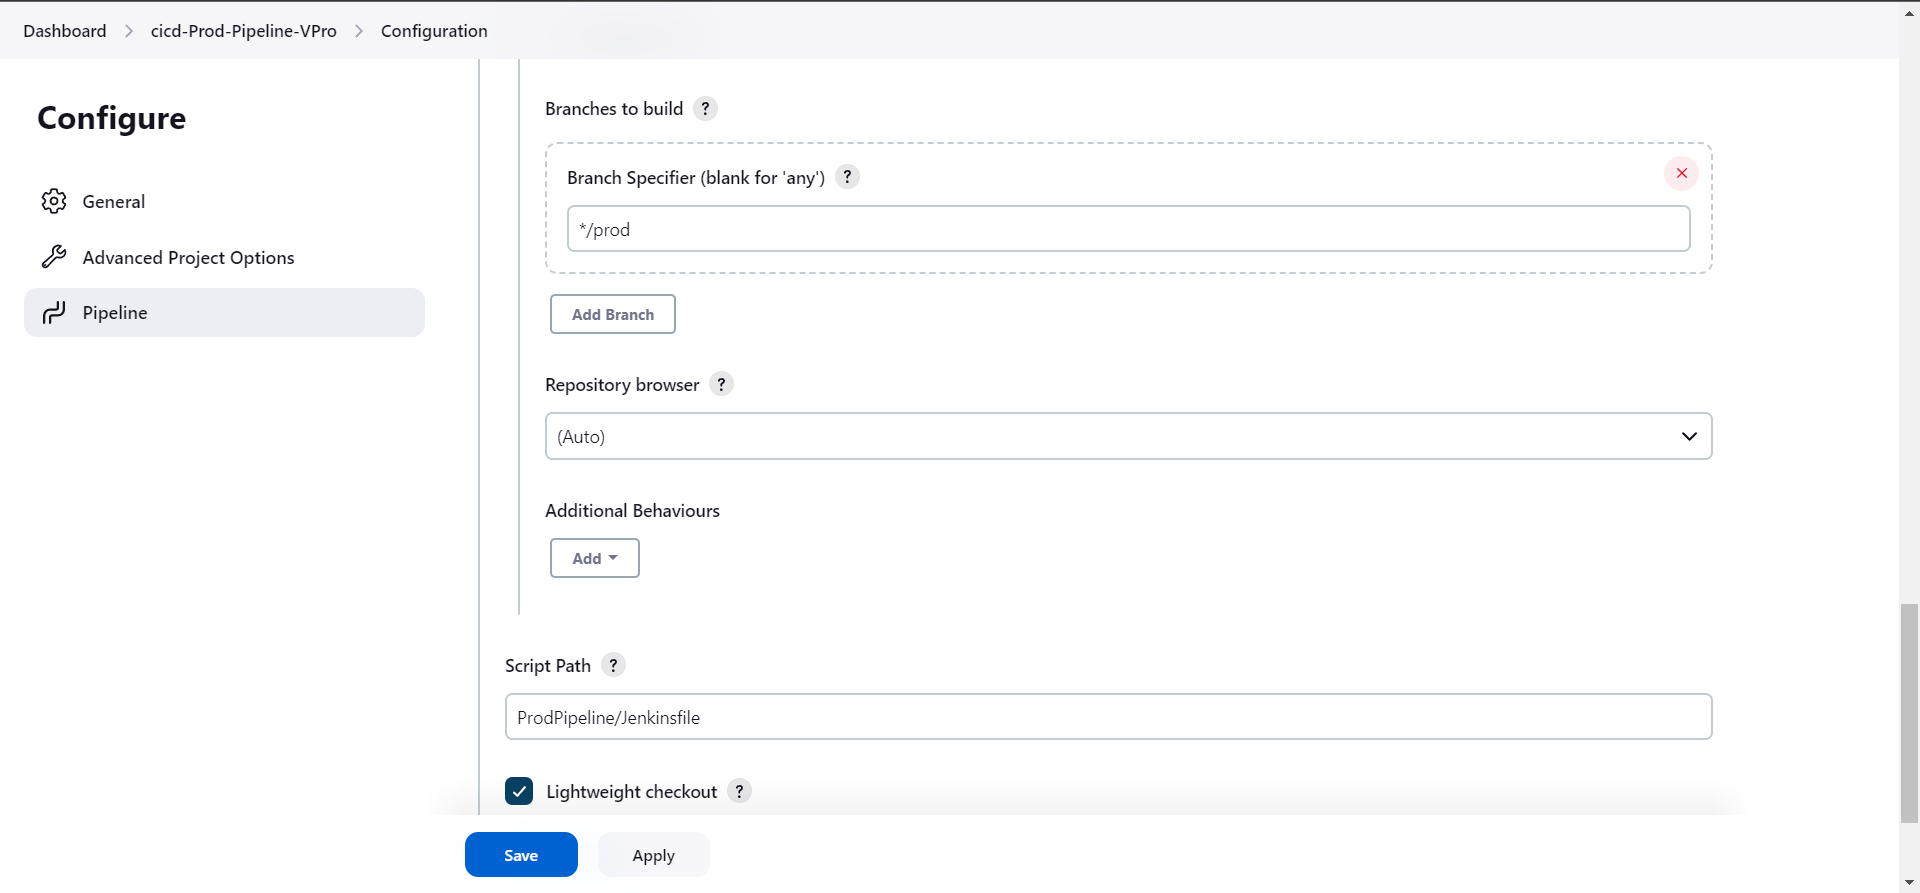
And above we have created a pipeline and configured it with the respective branch name and directory. And next we'll edit the Jenkins file and push it to the remote repository and then the pipeline will be built from the updated Jenkinsfile.
Editing Jenkinsfile
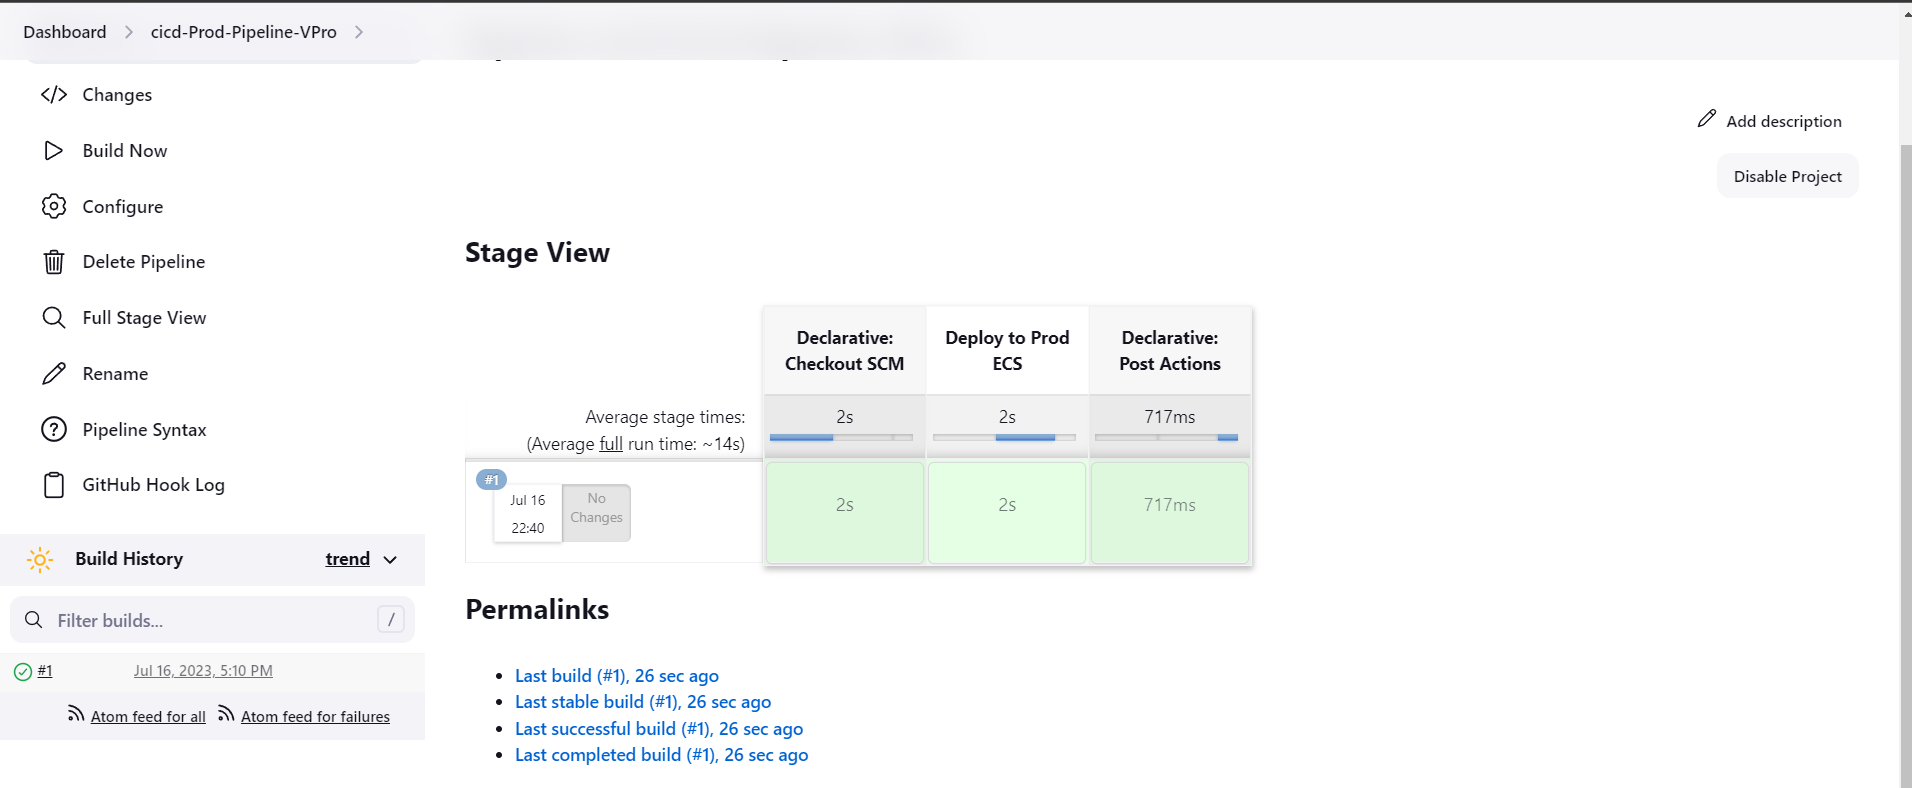
For production, we do not need all the stages such as building, code analysis, artifact generation, etc but we just need to fetch the Image and deploy so we'll clean up some of the stages and the pipeline code will be:
def COLOR_MAP = [
    'SUCCESS': 'good',
    'FAILURE': 'danger',
]

pipeline {
    agent any

    environment {
        cluster = "VProProd"
        service = "VProAppProdSVC"
    }

    stages {
        stage('Deploy to Prod ECS') {
          steps {
        withAWS(credentials: 'awscreds', region: 'us-east-1') {
          sh 'aws ecs update-service --cluster ${cluster} --service ${service} --force-new-deployment'
        }
      }
     }

    }
    post {
        always {
            echo 'Slack Notifications.'
            slackSend channel: '#jenkinscicd',
                color: COLOR_MAP[currentBuild.currentResult],
                message: "*${currentBuild.currentResult}:* Job ${env.JOB_NAME} build ${env.BUILD_NUMBER} \n More info available at: ${env.BUILD_URL}"
        }
    }
}
In this pipeline, we just have one stage and two environment variables. Here we are just deploying the image to the Prod cluster.
And right after pushing the code the pipeline started and deployed:
Accessing the application from ELB URL
Conclusion
With this am concluding the Continuous Delivery phase of the deployment process.