Cloud State Management by Terraform on AWS
Complete infra setup | VPC | Subnets | Security Groups| Keypairs | RDS, ElasticCache, ActiveMQ | Bastion Host
Passionate about helping organizations build scalable infrastructure and DevOps solutions with cloud technologies. Experienced in designing robust systems, automating processes, and driving efficiency through innovative cloud solutions. Advocate for best practices in DevOps and cloud computing, committed to enabling teams to achieve their full potential.
Cloud state management with Terraform refers to the practice of using Terraform, an open-source infrastructure as code (IaC) tool, to create, update, and maintain the infrastructure resources and configurations in a cloud environment. Terraform enables you to define your cloud infrastructure as code in a declarative manner, making it easier to manage and version control your cloud resources.
Overview
Terraform setup with backend
Setting up secure and highly available VPC.
Provision Beanstalk environment
Provision backend services such as:
-> RDS
-> Elasticache
-> ActiveMQ
Security Group
Keypairs
Bastion Host
So, it's not just about the cloud or infrastructure automation, it's about maintaining the state of the infrastructure in a file.
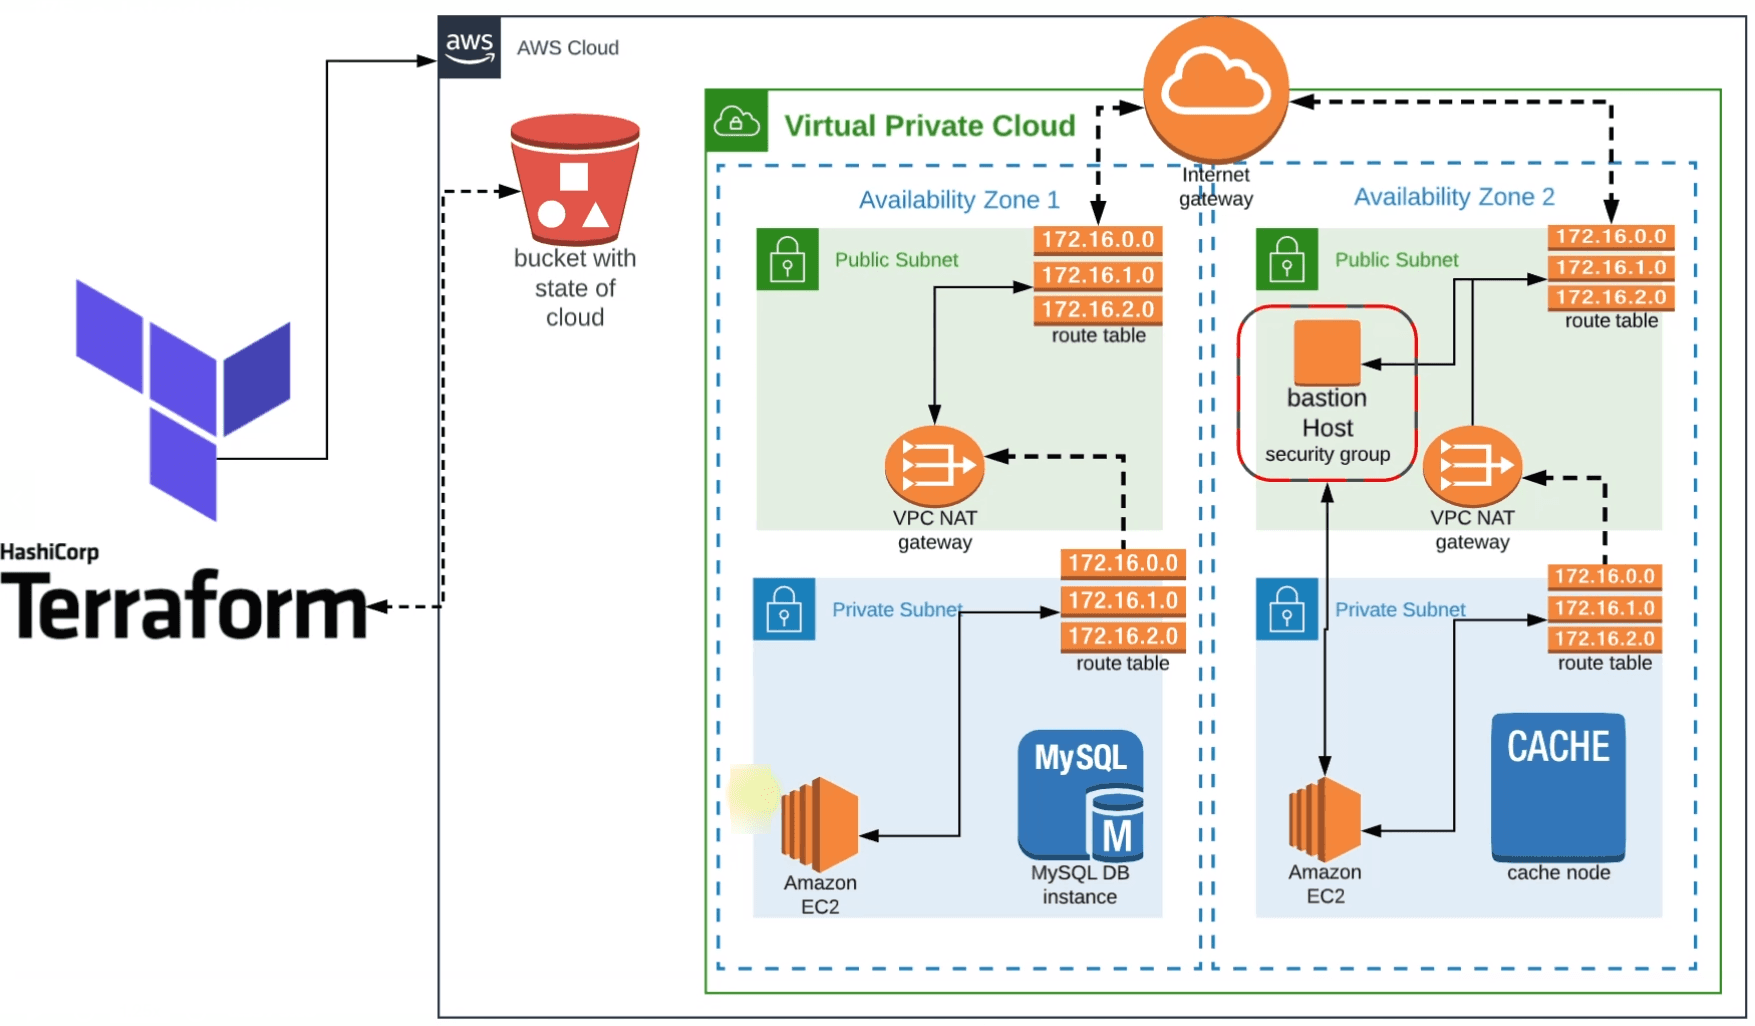
VPC Architecture
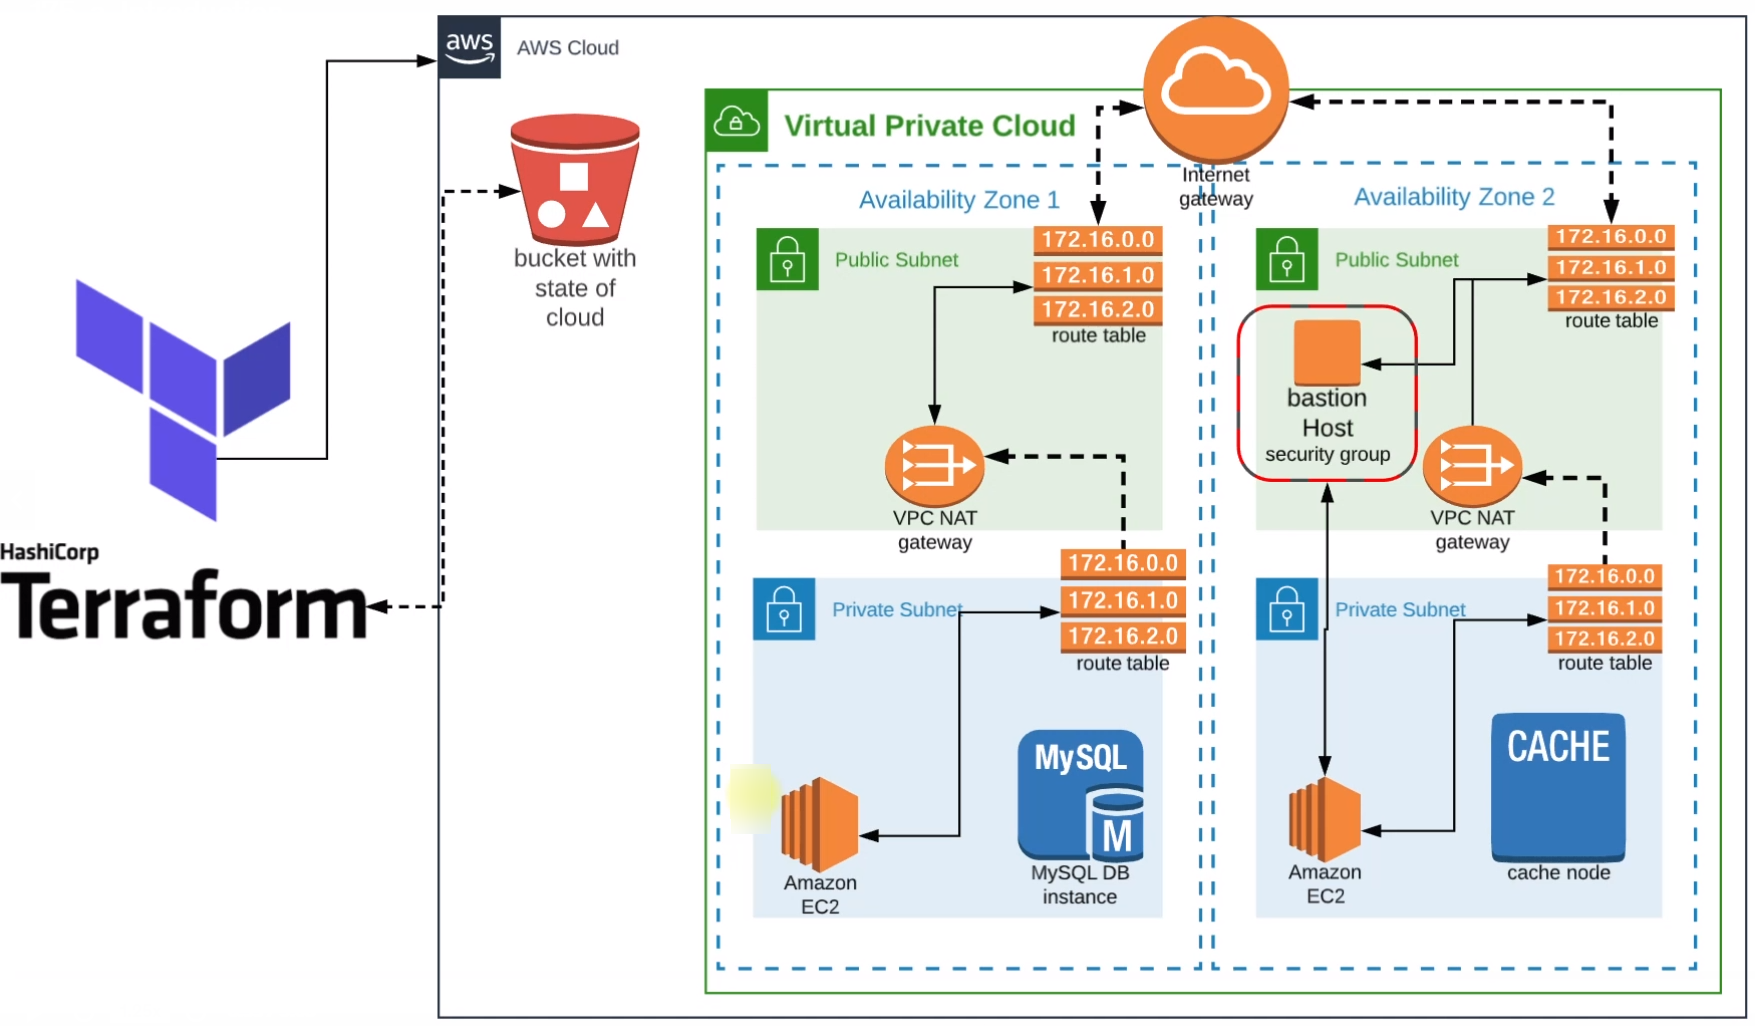
Here we'll configure Terraform and set up the complete infrastructure stack.
First, we'll create a backend with an S3 bucket to store the state files. State files are not git-ops friendly hence to make them centrally available and accessible across the team, we'll put all the state files in the S3 bucket.
We'll also create a VPC in which The public and private subnets will be distributed across multiple availability zones.
Internet Gateway will be created with route tables in the public subnets so that they can be accessible from the internet publicly.
We'll also keep our backend services in private subnets and create NAT Gateway so that, they can communicate with the route table of Internet Gateway.
A Bastion Host will be created in one of the public subnets that will help us access the private systems present in the private subnets.
Now with all these, we'll achieve a secure and highly available VPC which will be a baseline for our application stack below.
Application Stack
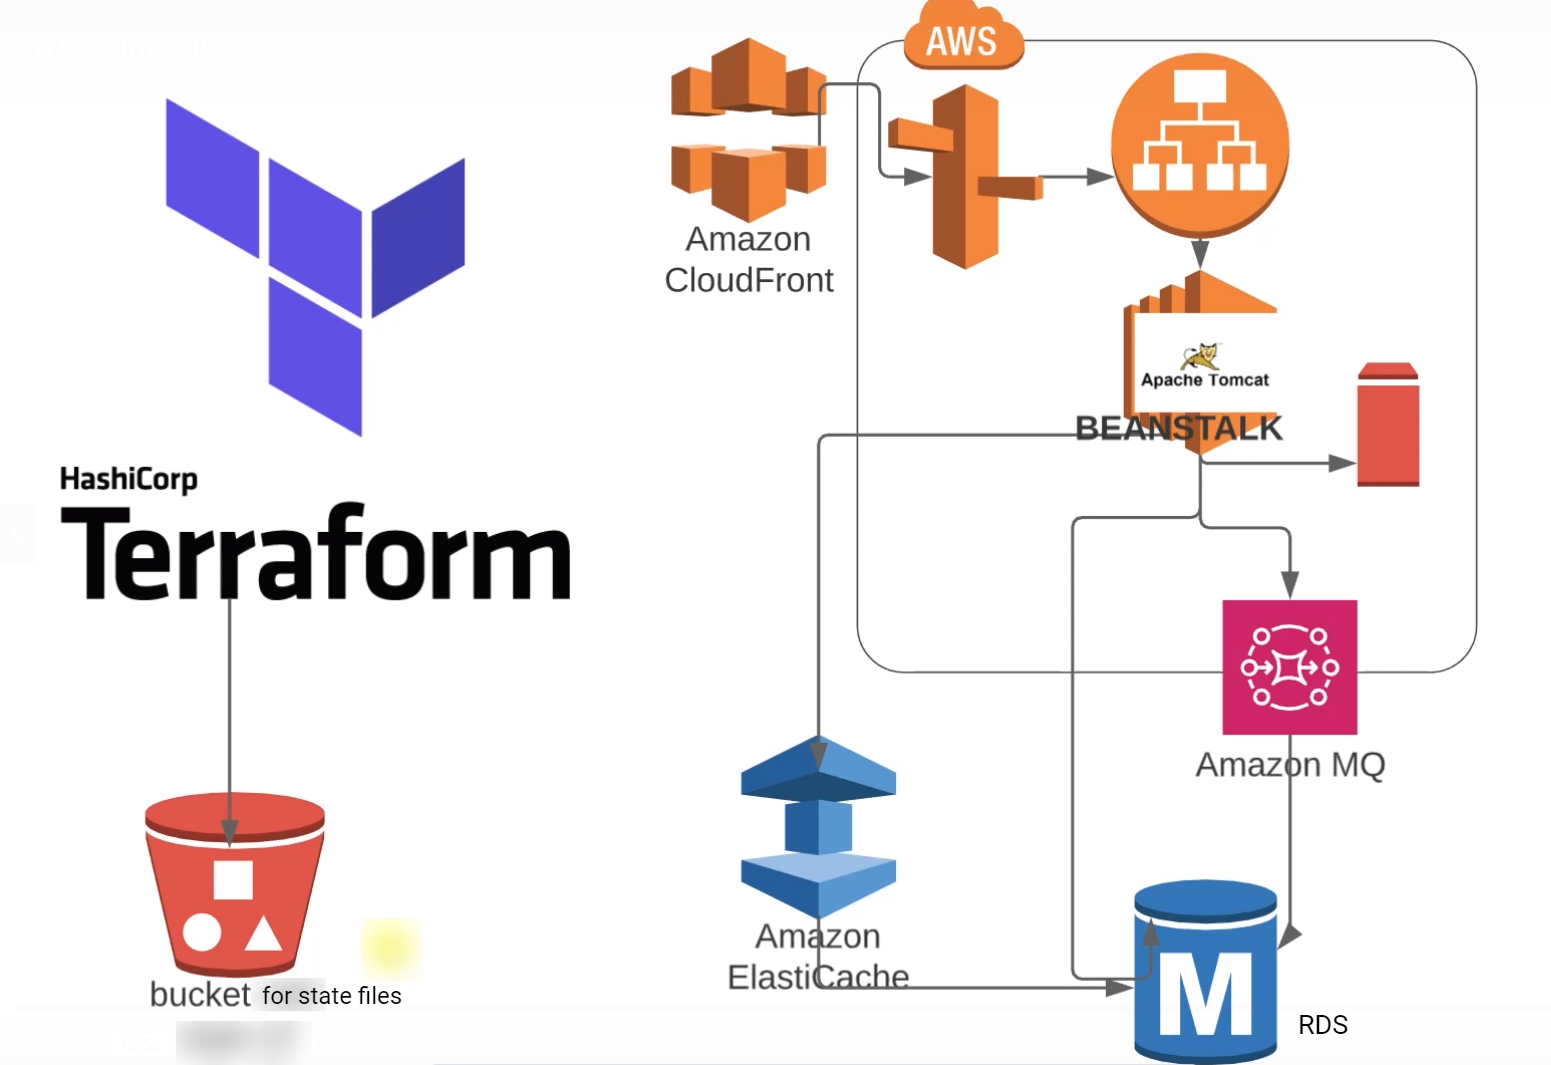
Now we'll create the stack over the VPC. Here, we are going to create another S3 bucket for terraform state files.
Terraform going to set up RDS, Elasticache, and Amazon MQ in the private subnet.
Beanstalk load balancers the Public Subnet and instances will be placed in private subnets.
To access the infrastructure we'll also take care of the Security Groups, rules and login keys.
Key-pair for AWS
In Terraform, the aws_key_pair resource is used to manage key pairs in AWS. Key pairs are used for securely logging into Amazon EC2 instances. When you launch an EC2 instance, you can specify the name of the key pair to use for SSH access (Linux instances) or RDP access (Windows instances). Key pairs consist of a public key that AWS stores, and a private key file that you store.
resource "aws_key_pair" "Vprofile-key" {

  key_name   = "VproProfile-Key-Terra"   # this will be the name of the key
  public_key = file(var.PUBLIC_KEY_PATH) #key has been created using ssh-keygen and path has been stored in variable file

}
Variable for Terraform( vars.tf )
In Terraform, variable files serve the purpose of organizing and managing the input values used in your Terraform configurations. These input values can vary from environment to environment or from deployment to deployment. Variable files provide a way to keep your main Terraform configuration clean and reusable by separating the input values into separate files.
variable "AWS_REGION" {
  default = "us-east-1"

}

variable "AMIs" {
  type = map(any)
  default = {
    us-east-1 = "ami-053b0d53c279acc90"
    us-east-2 = "ami-024e6efaf93d85776"
  }

}

variable "PRIVATE_KEY_PATH" {
  default = "vprofile-key"

}
variable "PUBLIC_KEY_PATH" {
  default = "vprofile-key.pub"
}
variable "USERNAME" {
  default = "ubuntu"

}

variable "MY_IP" {
  default = "106.221.149.15/32"

}

variable "RMQ_USER" {
  default = "rabbit"

}

variable "RMQ_PASSWORD" {
  default = "Pass@780956283"

}

variable "DB_USER" {
  default = "admin"
}

variable "DB_PASSWORD" {
  default = "admin123"

}

variable "DB_NAME" {
  default = "accounts"
}

variable "INSTANCE_COUNT" {
  default = "1"

}

variable "VPC_NAME" {
  default = "Vprofile-VPC"

}

variable "ZONE-1" {
  default = "us-east-1a"
}
variable "ZONE-2" {
  default = "us-east-1b"
}
variable "ZONE-3" {
  default = "us-east-1c"
}

variable "VPC_CIDER" {
  default = "172.21.0.0/16"


}

variable "PubSub1_CIDER" {
  default = "172.21.1.0/24"

}

variable "PubSub2_CIDER" {
  default = "172.21.7.0/24"

}

variable "PubSub3_CIDER" {
  default = "172.21.3.0/24"

}

variable "PrivSub1_CIDER" {
  default = "172.21.4.0/24"

}

variable "PrivSub2_CIDER" {
  default = "172.21.5.0/24"
}

variable "PrivSub3_CIDER" {
  default = "172.21.6.0/24"

}
Backend( backend.tf )
In Terraform, the backend.tf file is used to configure the backend where Terraform stores its state files. The state file is a crucial component in Terraform, as it keeps track of the real-world resources Terraform manages. By default, Terraform stores the state file locally in the same directory as your configuration files (terraform.tfstate). However, in a production environment or in collaboration with a team, using a remote backend is recommended. This is where backend.tf comes into play.
backend.tf allows you to specify where the Terraform state file should be stored. Common backends include Amazon S3, Azure Blob Storage, Google Cloud Storage, and HashiCorp Consul. Here we are using S3 as our backend.
terraform {
  backend "s3" {
    bucket = "terraform--vpro-27sept"
    key    = "terraform/backend"
    region = "us-east-1"
  }
}
Terraform Module vs Terraform Resource
In Terraform, both resources and modules are essential constructs, but they serve different purposes in the infrastructure-as-code paradigm. Here are the key differences between resources and modules in Terraform:
Resources:
Definition:
- Resource: A resource in Terraform represents a real-world infrastructure object, such as an AWS EC2 instance, a VPC, or a DNS record. Resources are the fundamental building blocks of Terraform configurations. Each resource block describes one or more infrastructure objects.
Use Case:
- Resource: Resources are used to create, update, and delete infrastructure components. When you define a resource, Terraform manages the lifecycle of that resource, ensuring it exists, and is configured correctly.
Example:
 hclCopy coderesource "aws_instance" "example" {
   ami           = "ami-0c55b159cbfafe1f0"
   instance_type = "t2.micro"
 }
Reusability:
- Resources are not inherently reusable on their own. However, you can create modules to encapsulate and reuse resource configurations.
Modules:
Definition:
- Module: A module in Terraform is a self-contained collection of resources and other configurations. Modules allow you to group resources together, encapsulate logic, and promote reusability. Modules can be reused across different Terraform configurations.
Use Case:
- Module: Modules are used to organize and abstract Terraform configurations. You can create modules for specific tasks, such as creating a VPC with related resources, and reuse these modules across different projects or environments.
Example:
 hclCopy codemodule "vpc" {
   source = "./modules/vpc"

   vpc_name = "my-vpc"
   subnet_cidr_blocks = ["10.0.1.0/24", "10.0.2.0/24"]
 }
Reusability:
- Modules promote reusability by allowing you to package and share configurations. You can use modules to create reusable, shareable components that can be employed across various projects.
In practice, you often use modules to structure your Terraform code, making it more manageable and facilitating collaboration. Modules help in organizing your resources and configurations in a structured and reusable manner, leading to more maintainable and scalable infrastructure-as-code projects.
Creating AWS VPC ( vpc.tf )
Now as we have already created the vars.tf and backend.tf, now it's time to create our resources using the variable. The first resource we'll create as part of our infrastructure is VPC and subnets in the VPC that create security for our infrastructure.
Here we have implemented the vpc module of Terraform from the Terraform registry.
module "vpc" {
  source = "terraform-aws-modules/vpc/aws"

  name                 = var.VPC_NAME #please refer the terraform registry of  https://github.com/terraform-aws-modules/terraform-aws-vpc/blob/v5.1.2/examples/complete/main.tf
  cidr                 = var.VPC_CIDER
  azs                  = [var.ZONE-1, var.ZONE-2, var.ZONE-3]
  public_subnets       = [var.PubSub1_CIDER, var.PubSub2_CIDER, var.PubSub3_CIDER]
  private_subnets      = [var.PrivSub1_CIDER, var.PrivSub2_CIDER, var.PrivSub3_CIDER]
  enable_nat_gateway   = true
  single_nat_gateway   = true # as we have multiple private subnet it will create multiple NAT gateway which will be expenssive so, we are adding this attribute.
  enable_dns_support   = true
  enable_dns_hostnames = true

  tags = {
    terraform   = "True"
    Environment = "Prod"
  }

  vpc_tags = {
    Name = var.VPC_NAME
  }


}
Creating Security Groups
Here we are creating the Security Groups for all the resources that we are going to create such as Beanstalk LoabBalancer, Bastion Host, instances created by Beanstalk, security groups for backend services such as RDS, ActiveMQ, Elasticache, etc..
resource "aws_security_group" "vpro-beanstalk-elb-sg" {
  name        = "vpro-beanstalk-elb-sg"
  description = "Security grup for Beanstalk Elastic Loadbalancer"
  #security group has to be a part of VPC so VPC_ID is mandatory
  vpc_id = module.vpc.vpc_id

  egress { # Outbound Rule
    from_port   = 0
    protocol    = "-1" # -1 means all the protocol
    to_port     = 0
    cidr_blocks = ["0.0.0.0/0"] # allow outbound to go anywhere
  }

  ingress {
    from_port   = 80    # Allowing access from port 80
    protocol    = "tcp" # here the protocol is only tcp
    to_port     = 80
    cidr_blocks = ["0.0.0.0/0"]
  }


}

resource "aws_security_group" "vpro-bastionHost-sg" {
  name        = "vpro-bastionHost-sg"
  vpc_id      = module.vpc.vpc_id
  description = "Security group for Bastion host"

  egress {
    from_port   = 0
    protocol    = "-1"
    to_port     = 0
    cidr_blocks = ["0.0.0.0/0"]
  }

  ingress {
    from_port   = 22
    protocol    = "tcp"
    to_port     = 22
    cidr_blocks = [var.MY_IP]
  }


}

# Now we'll create the Security Group for EC2 instance in our Beanstalk Environment
# This security group will be attached to the EC2 instances created by beanstalk3

resource "aws_security_group" "vpro-prod-sg" {
  name        = "vpro-prod-sg"
  description = "Security group for Beanstalk instances"
  vpc_id      = module.vpc.vpc_id

  egress { # Outbound Rule
    from_port   = 0
    to_port     = 0
    protocol    = "-1"
    cidr_blocks = ["0.0.0.0/0"]
  }
  # here we are allowing only the bastion Host to access the instances using port 22(SSH) so, we are allowing the traffic from bastionHost security group here

  ingress {
    from_port       = 22
    to_port         = 22
    protocol        = "tcp"
    security_groups = [aws_security_group.vpro-bastionHost-sg.id] # So, only the bastionHost has the access to beanstalk EC2 instances at private port 22 and as we know bastion host can only be accessed from "MyIP" so we are having a tight control over security
  }
}

# Now we'll create the security group for our backend services such as RDS, Elasticache, ActiveMQ

resource "aws_security_group" "vpro-backend-sg" {

  name        = "vpro-backend-sg"
  description = "Securiy group for backend services such as RDS, ActiveMQ and Elasticache "
  vpc_id      = module.vpc.vpc_id

  egress {
    from_port   = 0
    to_port     = 0
    protocol    = "-1"
    cidr_blocks = ["0.0.0.0/0"]
  }

  # Here we are allowing access to all the protocol from all the ports.
  ingress {
    from_port       = 0
    to_port         = 0
    protocol        = "-1"
    security_groups = [aws_security_group.vpro-prod-sg.id] # Beanstalk instances where our application will run can access the backends
  }

  ingress = {
    from_port = 3306
    to_port = 3306
    protocol = tcp
    security_groups = [aws_security_group.vpro-bastionHost-sg.id]
  }

}

# Now as the backend security group has been created, the bakend services should be able to interact with each other.
# To make them interact with each other, we have to allow the "vpro-backend-sg" to access itself (vpro-backend-sg)
# To make it happen we'll use "aws_security_group_rule" resource

resource "aws_security_group_rule" "security-group-allow-itself" {

  type                     = "ingress" # Updating the inbound rule so type is ingress
  from_port                = 0
  to_port                  = 65535 # To all the ports
  protocol                 = "tcp"
  security_group_id        = aws_security_group.vpro-backend-sg.id # id of the security group that you want to update
  source_security_group_id = aws_security_group.vpro-backend-sg.id # From which SG id you want to allow the access
  # Here we want to allow backend sg to acces backend sg itself hence security_group_id & source_security_group_id
}
Now, our Security Group is created and ready to be attached with it's respective Instances.
Backend Services
DB Subnet Group
First of all, we have to create a DB subnet group. A DB Subnet Group is a collection of subnets that you can choose to use when you create a DB instance in a Virtual Private Cloud (VPC).
When you launch a database instance in a VPC, you need to specify the subnets where the DB instance will be placed. A DB Subnet Group allows you to specify which subnets within your VPC the database can use. This provides you with control over the network configuration of your DB instances.
It is a way to define and manage the subnets within your VPC where your DB instances will be deployed. It provides the necessary network configuration to ensure the availability, security, and isolation of your database instances in a VPC environment.
resource "aws_db_subnet_group" "vpro-db-subnet-group" {
    name = "main"
    subnet_ids = [module.vpc.private_subnets[0], module.vpc.private_subnets[1], module.vpc.private_subnets[2]]
    # RDS will be in the subnet groups which is part of 3 subnet ids or collection of 3 subnet ids

    tags = {
        Name= "Subnet Group for RDS"
    }

}
ElastiCache Subnet Group
Amazon ElastiCache Subnet Groups are used to specify the subnets in your Amazon Virtual Private Cloud (Amazon VPC) where you want to create your Amazon ElastiCache clusters. Similar to other AWS services like RDS (Relational Database Service), Amazon ElastiCache operates within the confines of specific subnets defined by a Subnet Group.
resource "aws_elasticache_subnet_group" "vpro-elasticache-subnet-group" {
    name = "Vpro-ecache-subnetgroup"
    subnet_ids = [module.vpc.private_subnets[0], module.vpc.private_subnets[1], module.vpc.private_subnets[2]]
    tags = {
      Name= "Subnet Group for Elasticache"
    }
}
RDS DB Instance
Now, it's time to define to define and provision a new Amazon RDS database instance. Amazon RDS (Relational Database Service) is a managed database service provided by AWS that supports multiple database engines such as MySQL, PostgreSQL, MariaDB, Oracle, and Microsoft SQL Server.
resource "aws_db_instance" "vpro-rds" {

    allocated_storage = 20
    storage_type = "gp2"
    engine = "mysql"
    engine_version = "5.6.34"
    instance_class = "db.t2.micro"
    name = var.DB_NAME
    username = var.DB_USER
    password = var.DB_PASSWORD
    parameter_group_name = "default.mysql5.6"
    multi_az = false                          # keep it true for high avalability
    publicly_accessible = false               # We do not want it to be accessible from public as it will be accessible by Elastic Beanstalk
    skip_final_snapshot = true                # This will keep creating snapshots of the RDS that can be used while recovering the if deleted which will be very much expenssive for us. But it is recomended to keep it "true" for production grade infra
    db_subnet_group_name = aws_db_subnet_group.vpro-db-subnet-group.name
    vpc_security_group_ids = [aws_security_group.vpro-backend-sg.id]

}
Elastic Beanstalk
AWS Elastic Beanstalk automatically provisions and manages the underlying Amazon EC2 instances for your application. When you deploy an application to Elastic Beanstalk, it handles the details of capacity provisioning, load balancing, auto-scaling, and application health monitoring. You simply need to upload your application code and Elastic Beanstalk takes care of the deployment, scaling, and maintenance of the infrastructure for you.
Now, the final one is setting up the beanstalk. To setup beanstalk. We are going to create 2 file.
One is application.tf
Inside that, we create the environment
application.tf
resource "aws_elastic_beanstalk_application" "vpro-prod" {

    name = "Vprofile-prod"

}
resource "aws_elastic_beanstalk_application": This line declares an Elastic Beanstalk application resource in Terraform. It tells Terraform that you want to manage an Elastic Beanstalk application. When you apply this Terraform configuration using the terraform apply command, it will create an Elastic Beanstalk application named "Vprofile-prod" in your AWS account.
Beanstalk Environment Setup
Now, we are going to set the Elastic Beanstalk and we'll do all the necessary settings so that it will launch our EC2 instances
resource "aws_elastic_beanstalk_environment" "Vpro-bean-prod" {
  name                = "Vpro-bean-prod"
  application         = aws_elastic_beanstalk_application.vpro-prod.name
  solution_stack_name = "64bit Amazon Linux 2 v4.3.12 running Tomcat 8.5 Corretto 11" # There are multiple solution stacks such as Tomcat, Docker, Go, Node.JS etc. that we can find on Documentation. Our prefered is Tomcat
  cname_prefix        = "Vpro-bean-prod-domain"                                       # this will be the url

  # Elastic Beanstalk has a lot of settings for best use, now we'll define all the settings
  setting { # setting { ... }: This block is configuring a setting for the Elastic Beanstalk environment.

    name      = "VPCId"
    namespace = "aws:ec2:vpc" # We are putting the Beanstalk inside the VPC
    value     = module.vpc.vpc_id

  }

  # Creating Elastic Beanstalk Role  https://docs.aws.amazon.com/elasticbeanstalk/latest/dg/command-options-general.html#command-options-general-autoscalinglaunchconfiguration
  setting {
    namespace = "aws:autoscaling:launchconfiguration"
    name      = "IamInstanceProfile"
    value     = "aws-elasticbeanstalk-ec2-role"
  }

  # Associating public IP address https://docs.aws.amazon.com/elasticbeanstalk/latest/dg/command-options-general.html#command-options-general-ec2vpc
  setting {
    namespace = "aws:ec2:vpc"
    name      = "AssociatePublicIpAddress"
    value     = "false"
  }

  # Now we are putting the EC2 instances in private subnet but our LoabBalancers will be in Public subnet
  setting {
    namespace = "aws:ec2:vpc"
    name      = "Subnets"
    value     = join(",", [module.vpc.private_subnets[0]], [module.vpc.private_subnets[1]], [module.vpc.private_subnets[2]]) # join is a functuon that can join lists into a string
    # Here we are joining the subnets in a list separated by comma
    # There are lot of built-in terraform functions available.
  }

  # EC2 instances in private subnet but our LoabBalancers will be in Public subnet

  setting {
    namespace = "aws:ec2:vpc"
    name      = "ELBSubnets"
    value     = join(",", [module.vpc.public_subnets[0]], [module.vpc.public_subnets[1]], [module.vpc.public_subnets[2]]) # this entire thing will be converted to a string
  }

  # Defining the instance type that will be lunched by Autoscalling group
  setting {
    namespace = "aws:autoscaling:launchconfiguration" # this is to create lunch configuration that defines the template of EC2 instance
    name      = "InstanceType"
    value     = "t2.micro"
  }

  setting {
    namespace = "aws:autoscaling:launchconfiguration"
    name      = "EC2KeyName"
    value     = aws_key_pair.Vprofile-key.key_name
  }

  setting {
    namespace = "aws:autoscaling:asg" # this is to create auto scalling group
    name      = "Availability Zones"
    value     = "Any 3"
  }

  setting {
    namespace = "aws:autoscaling:asg"
    name      = "MinSize"
    value     = "1"
  }

  setting {
    namespace = "aws:autoscaling:asg"
    name      = "MaxSize" # defining maximum EC2 instance that can be launched
    value     = "8"
  }

  # Setting Environment variables
  setting {
    namespace = "aws:elasticbeanstalk:application:environment"
    name      = "environment"
    value     = "Prod"
  }

  setting {
    namespace = "aws:elasticbeanstalk:application:environment"
    name      = "LOGGING_APPENDER"
    value     = "GRAYLOG"
  }

  # Setting for monitoring the health of EC2 instance
  setting {
    namespace = "elasticbeanstalk:healthreporting:system" # https://docs.aws.amazon.com/elasticbeanstalk/latest/dg/command-options-general.html#command-options-general-elasticbeanstalkhealthreporting
    name      = "SystemType"
    value     = "enhanced"
  }

  setting {
    namespace = "aws:autoscaling:updatepolicy:rollingupdate"
    name      = "RollingUpdateEnabled"
    value     = "true"
  }

  setting {
    namespace = "aws:autoscaling:updatepolicy:rollingupdate"
    name      = "RollingUpdateType"
    value     = "Health"
  }

  setting {
    namespace = "aws:autoscaling:updatepolicy:rollingupdate"
    name      = "MaxBatchSize"
    value     = "1"
  }

  setting {
    namespace = "aws:elb:loadbalancer" # https://docs.aws.amazon.com/elasticbeanstalk/latest/dg/command-options-general.html#command-options-general-elbloadbalancer
    name      = "CrossZone"
    value     = "true"
  }

  setting {
    namespace = "aws:elasticbeanstalk:environment:process:default"
    name      = "StickinessEnabled" #This option is only applicable to environments with an application load balancer.
    value     = "true"
  }

  setting {
    namespace = "aws:elasticbeanstalk:command"
    name      = "BatchSizeType"
    value     = "Fixed"
  }

  setting {
    namespace = "aws:elasticbeanstalk:command"
    name      = "BatchSize"
    value     = "1"
  }

  setting {
    namespace = "aws:elasticbeanstalk:command"
    name      = "DeploymentPolicy"
    value     = "Rolling"
  }

  setting {
    namespace = "aws:autoscaling:launchconfiguration"
    name      = "SecurityGroups"
    value     = aws_security_group.vpro-prod-sg.id
  }

  setting {
    namespace = "aws:elbv2:loadbalancer"
    name      = "SecurityGroups"
    value     = aws_security_group.vpro-beanstalk-elb-sg.id
  }

  # So now we are done with the settings but, the beanstalk depends on the security groups where it can attach them. So the priority is to create the Secruity group first.
  #  All the resources that are placed in depends_on will be created first then only it will move to other resources.

  depends_on = [aws_security_group.vpro-beanstalk-elb-sg, aws_security_group.vpro-prod-sg]

}
Here we have done all the configurations required to launch EC2 instances through Elastic Beanstalk.
Bastion Host Setup & DB Initialization
Now only two things are pending one is initializing the database, we have the SQL queries and we have to run them in the RDS instance which is in a private subnet, and secondly Bastion host setup which is nothing like a simple EC2 instance available in public instance.
To set up the database we have to run the SQL queries which is not possible directly as the RDS instance is in a private subnet and here comes the role of Bastion Host or Jump server.
Once we launch the bastion host we can run the SQL file on the RDS instance from there itself.
Bastion Host
resource "aws_instance" "vpro-bastion" {

    ami = lookup(var.AMIs, var.AWS_REGION)  # this lookup function will look for the map variable "AMI" and in that it will look for a key region name
                                            # var.aws_REGION will return the region name and accrodingly it will search for the AMI
    instance_type = "t2.micro"
    key_name = aws_key_pair.Vprofile-key.key_name

    subnet_id = module.vpc.public_subnets[0]        # Bastion host will be created in the "first public subnet of VPC"
    count = var.INSTANCE_COUNT
    vpc_security_group_ids = [aws_security_group.vpro-bastionHost-sg.id]
    tags = {
        name = "vpro-bastion host"
    }

    # file provisioned is used to send the template file or any othe type of file to the server(Here bastion host)

    provisioner "file" {
      content = templatefile("db-deploy.tmpl", { rds-endpoint = aws_db_instance.vpro-rds.address, dbuser = var.DB_USER, dbpass = var.DB_PASSWORD })
      # we have already created the db-deploy.tmpl which contains the shell script. Now using file provsioned and templatefile() function we are sending the file to bastion host
      # Here templatefile is used because the file that we are sending is not a normal text file, its a template file abd it also requires some environment variable to be passed at the run time


      destination = "/tmp/vprofile-dbdeploy.sh"  # we are renaming the db-deoliy file as vprofile-dbdeoloy and placing it in the tmp directory

    }

    # remote-exec is used to execute an executable file remotely in the server(Here bastion host)

    provisioner "remote-exec" {
        inline = [
            "chmod +x /tmp/vprofile-dbdeploy.sh",       # Giving the executable permission
            "sudo /tmp/vprofile-dbdeploy.sh"            # this will execute the db-deploy template
         ]

    }

    # Letting terraform know about on which server it has to perform the above actions

    connection {
      user = var.USERNAME
      private_key = file(var.PRIVATE_KEY_PATH)
      host = self.public_ip # Here self means the server that is launched itself( here Bastion Host )
    }

    # RDS instance has to be ready before the SQL schema is run. Hence we are using depends_on to create a dependancy on the aws_db_instance.vpro-rds where the SQL schema will run

    depends_on = [ aws_db_instance.vpro-rds ]

}
With this we can create the bastion host however, we also have to provision the RDS instance which is already created and empty as of now via this bastion host.
Now the Bastion host is also empty and it has no information about the RDS. So, we'll write a shell script that will fetch the RDS instance endpoint, username and password.
Terraform already maintains the state of the infrastructure we just need to extract the RDS endpoint from there.
Now to extract the file we need a template. There is a templatefile(path, vars ) function in Terraform using which we can pass any text file. We'll send a file to the Bastion Host using this templatefile() function.
db-deploy.tmpl
Here is the shell script that will import the SQL file from the repository, will execute it on the RDS instance via its RDS Endpoint
sudo apt update
sudo apt install git mysql-client -y
git clone -b vp-rem https://github.com/ritesh-kumar-nayak/vprofile-project-forked.git   # Cloning the source code to the home directory of ubuntu user
mysql -h ${rds-endpoint} -u ${dbuser} --password=${dbpass} accounts < /home/ubuntu/vprofile-project-forked/src/main/resources/db_backup.sql   # this will import the backup.sql file from the project source code
This shell script is also being passed using provisioners such as file and remote-exec
CIDR Block
CIDR, which stands for Classless Inter-Domain Routing, is a standard syntax for specifying IP addresses and their associated routing prefix. CIDR notation allows network administrators to specify IP address ranges more flexibly than the older system of traditional IP address classes (Class A, Class B, and Class C networks).
In CIDR notation:
An IP address is represented as a series of four groups of numbers, each separated by a period (e.g., 192.168.1.1).
A routing prefix is specified by appending a forward slash ("/") and a number, indicating how many bits of the IP address are fixed, leaving the remaining bits for the network to assign to individual devices.
For example, in the CIDR block 192.168.1.0/24:
192.168.1.0is the base IP address./24indicates that the first 24 bits are fixed as the network portion of the address, leaving 8 bits for device addresses (2^8 = 256 addresses).
CIDR notation allows for more efficient use of IP addresses and enables the creation of subnets within larger networks. Here are a few common CIDR block examples:
/32: Single IP address (e.g.,192.168.1.1/32)./24: A typical subnet in a local network, allowing for 256 addresses (e.g.,192.168.1.0/24)./16: A larger network, allowing for 65,536 addresses (e.g.,192.168.0.0/16)./8: An even larger network, allowing for over 16 million addresses (e.g.,10.0.0.0/8).
When creating subnets or defining IP address ranges, you typically use CIDR notation to specify the desired range. For example, in AWS when creating a VPC, you would define the CIDR block for the entire VPC (e.g., 10.0.0.0/16) and then create subnets within that VPC using CIDR notation (e.g., 10.0.1.0/24).
Remember that CIDR blocks must be chosen carefully to avoid overlaps with existing networks. Planning your IP address space using CIDR notation is crucial to ensure efficient use of addresses and prevent conflicts in your network infrastructure.
Conclusion
With this, we can establish the complete infrastructure for a 3-tier application. And deploy the artifact to the beanstalk.