Cloud Automation with Ansible-VPC Setup
Automating the setup of VPC using Ansible | Playbooks | Ansible Modules | Python Boto | Bastion Host | Internet Gateway | NAT Gateway
Passionate about helping organizations build scalable infrastructure and DevOps solutions with cloud technologies. Experienced in designing robust systems, automating processes, and driving efficiency through innovative cloud solutions. Advocate for best practices in DevOps and cloud computing, committed to enabling teams to achieve their full potential.
Problem with Manual Configuration
While setting up infra for any project on the cloud, VPC(Virtual Private Cloud) is one of the most vital setups we need to do. VPC consists of many moving parts such as Subnet, NAT gateway, Internet Gateway, Route Tables, NACL, Security Group, etc.
Most importantly Bastion Host it's also called Jump Server and used to have an SSH connection to the servers in private VPC or RDP connection so we can say it is a single point of entry from the public network into the private network.
Setting all the above things manually is very much error-prone resulting in a non-functional or exposed VPC. Also managing all these setups and regular changes is a hectic and unsafe task.
Solution
To solve the above problem that comes with manual intervention or setup we can bring Configuration Management into the picture.
Configuration management gives the benefit of Automatic Setup so that there is no human error.
Centralized management and version control [IAAC].
And here, we'll be using Ansible as our configuration management tool that matches all the above requirements. Ansible provides centralized management with ansible-playbook and ansible-galaxy and we can prepare playbooks with YAML as configuration language. We can also version control all the ansible configuration files with Git.
Tools & Cloud
AWS could service
Ansible as Configuration Management tool
Bastion Host for connection
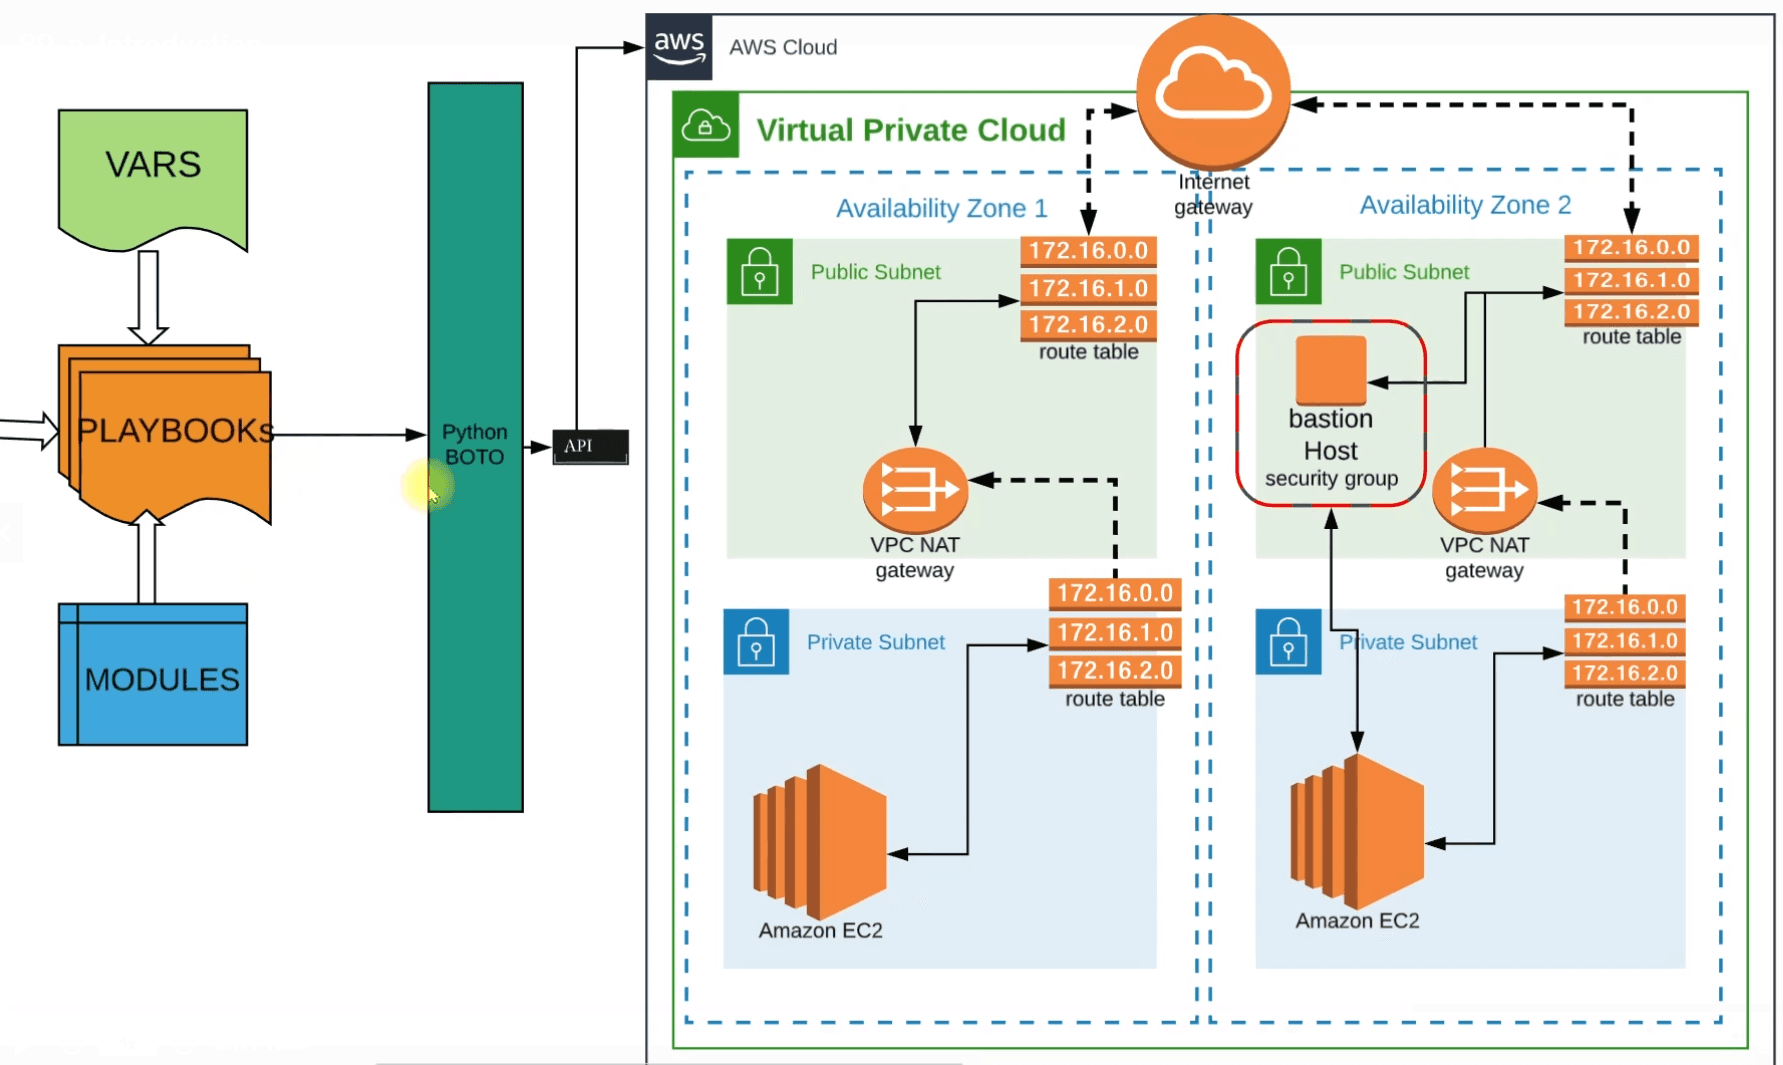
Architecture
Our configuration begins with Playbooks, these playbooks will be using variables that we are going to define in the Vars file and some Ansible Configurations.
These playbooks will be powered by some Ansible Modules.
These modules are going to use Python Boto which will make API calls to our AWS Account
The first thing this Python Boto is going to do is establish a VPC(Virtual Private Cloud) and in VPC we'll be using two Availability Zones.
We'll have public subnets in both zones and these public subnets will route their requests to Internet Gateway via Route Tables. Each public subnet will have its route tables.
We'll also have Private subnets in both zones and private subnets also have their respective route table which routes the request to the NAT gateway. And NAT gateway further takes it back to the Internet Gateway route table of the public subnet.
We'll also have Bastion Host in the Public Subnet which will connect to private EC2 instances that are placed in Private Subnet.
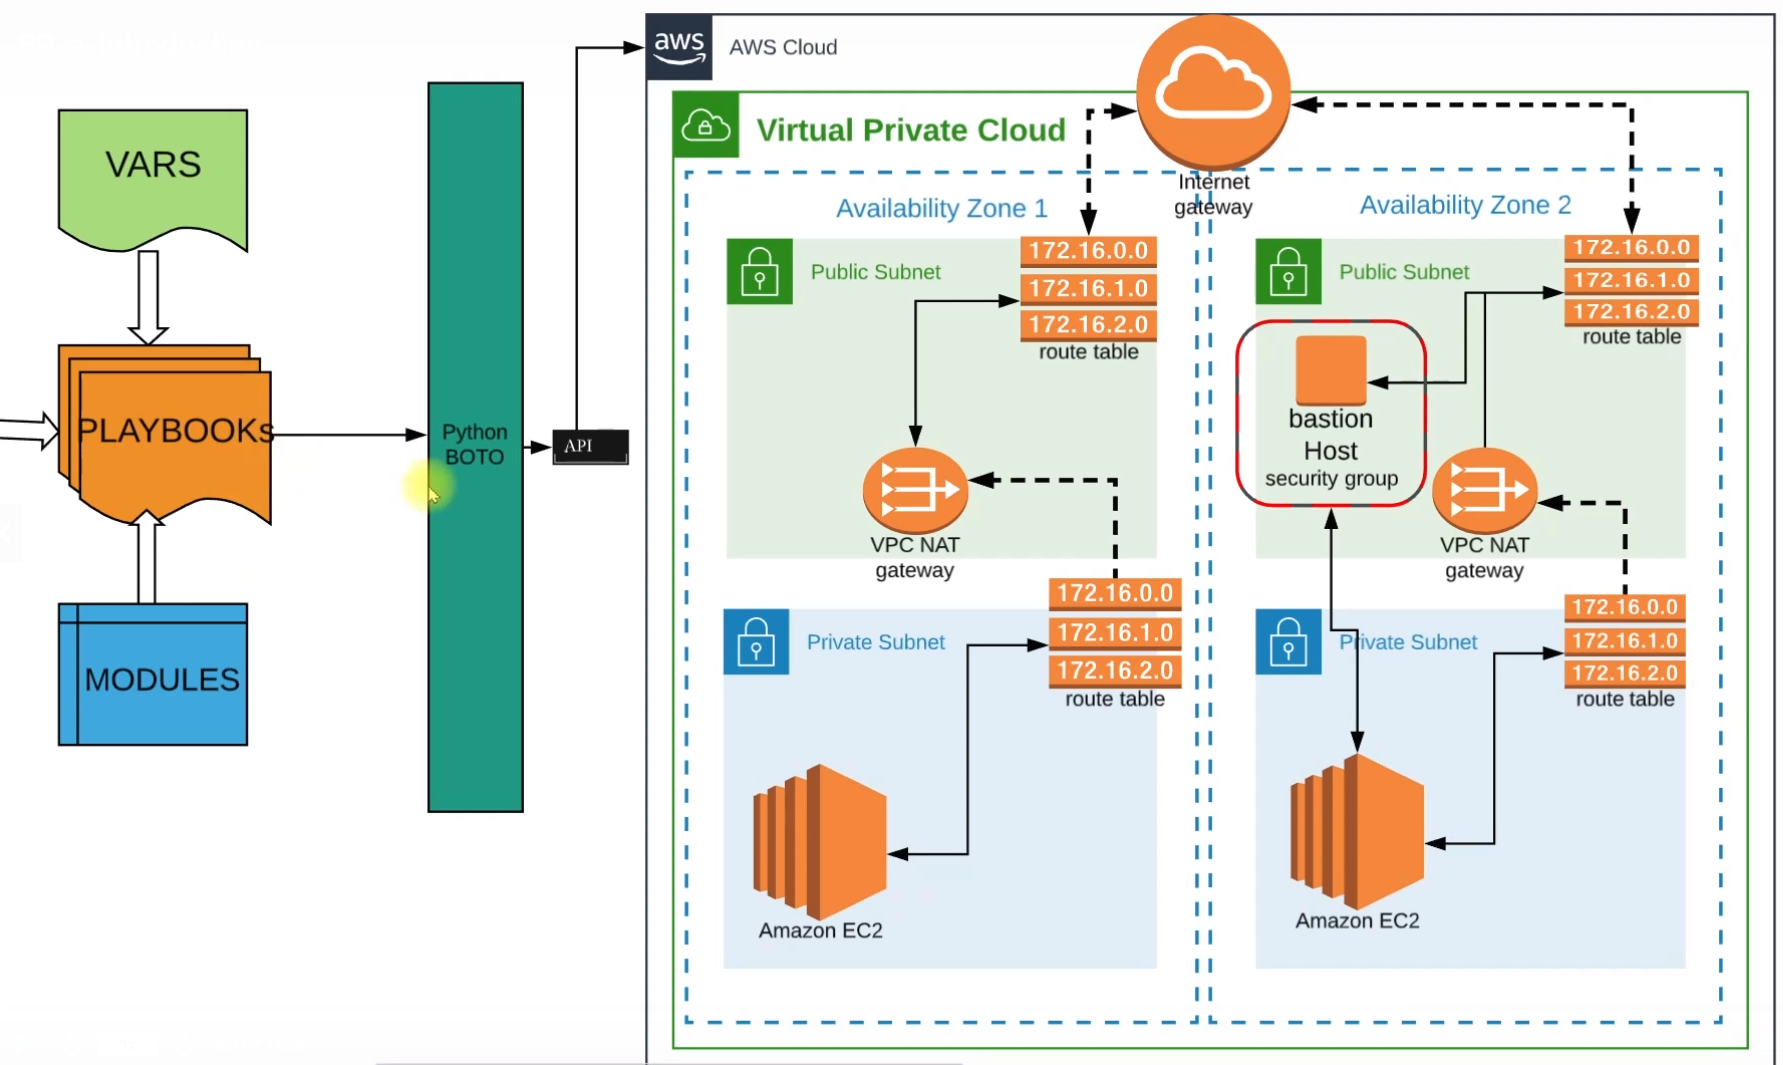
We'll do the entire setup using Ansible.
Flow of Execution
Create an EC2 instance to run Ansible playbooks
Install Ansible
Install Boto
Setup EC2 role for Ansible
Create a project directory
Sample task of creating key-pair to test
Create Variables File for VPC and bastion host
Create a VPC setup playbook
Create a Bastion setup playbook
Create a site.yaml to call both playbooks at once.
Ansible Setup
This is the very first step where we'll install ansible in an EC2 instance which will act just as a controller. We are not going to run any service here so, any lightweight t2.micro will be fine. Here we'll install Ansible and the required dependencies to create and run playbooks for our cloud automation.
We need Python Boto installed in our system to make API calls to our AWS account and create resources accordingly.
Ansible Dry Run
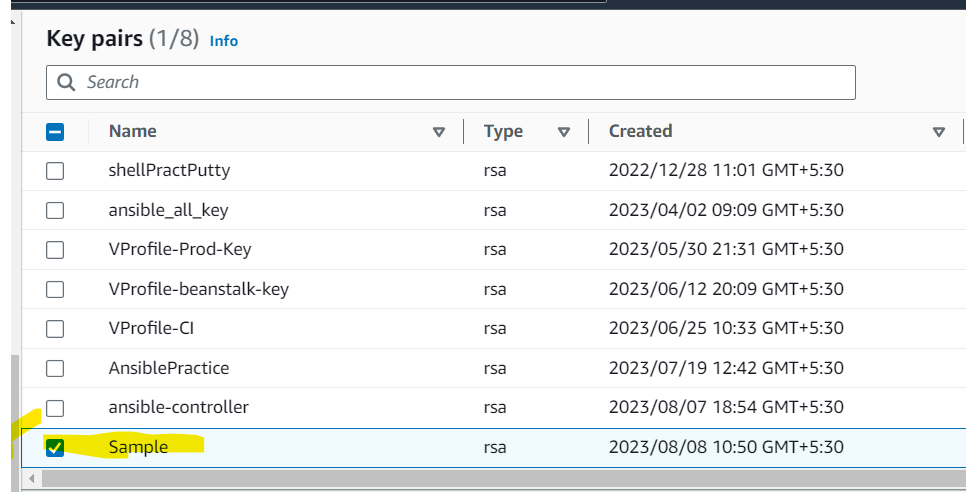
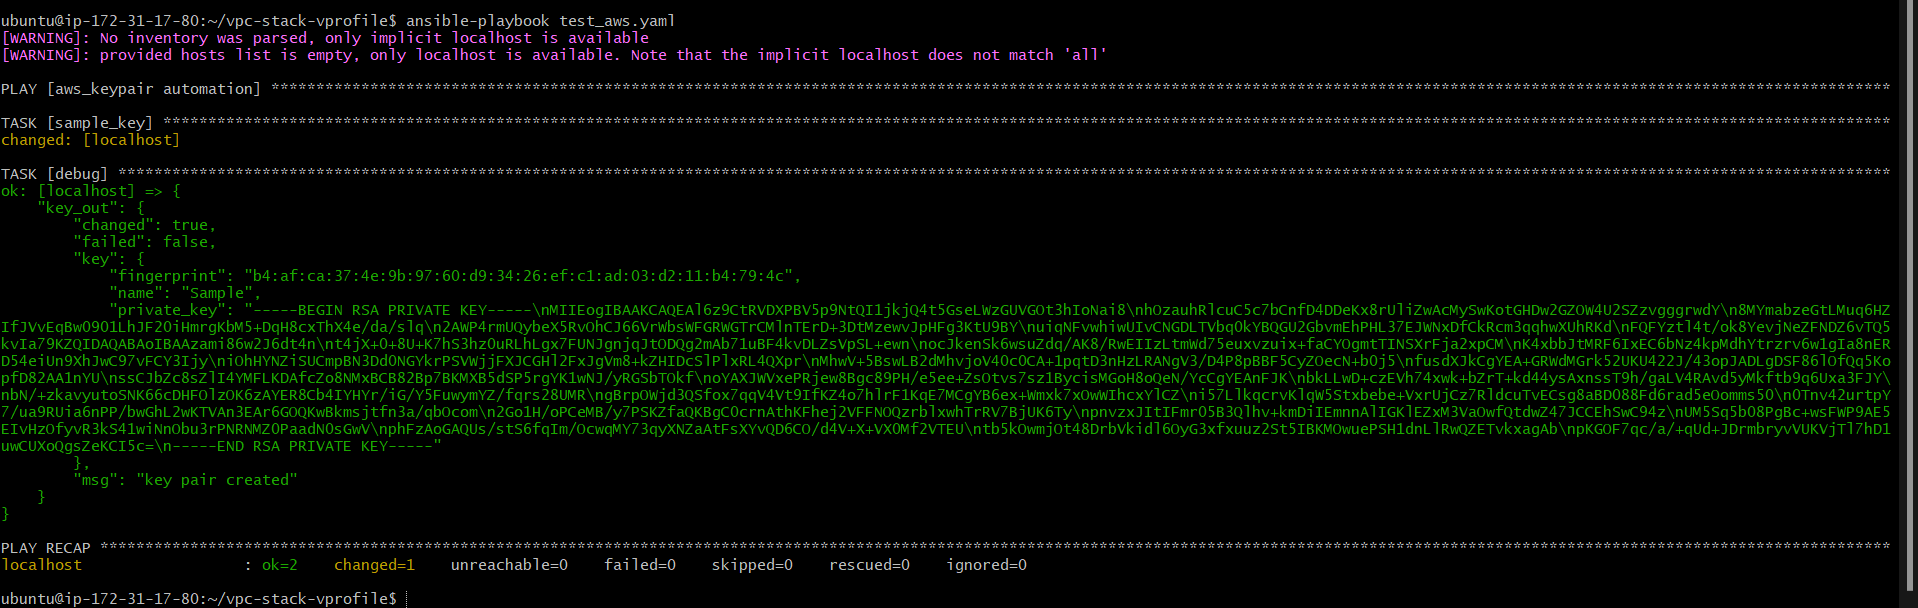
Here, we'll create a key pair for AWS using the Ansible playbook to test if our setup and dependencies are working fine or not.
---

- name: aws_keypair automation
  hosts: localhost
  connection: local
  gather_facts: False
  tasks:
    - name: sample_key
      ec2_key:
        name: Sample
        region: us-east-1

      register: key_out

    - name: opening the output in debug mode
      debug:
        var: key_out

    - name: store login key
      copy:
        content: "{{key_out.key.private_key}}"
        dest: ./sample-key.pem
      when: key_out.changed
The above is a sample playbook that will create key pair in our AWS account. We can get the modules for creating anything in AWS or any other cloud provider from Ansible Module Documentation.
NB: we need to install the required python-boto dependency for the module which is python3-boto3.
Authentication
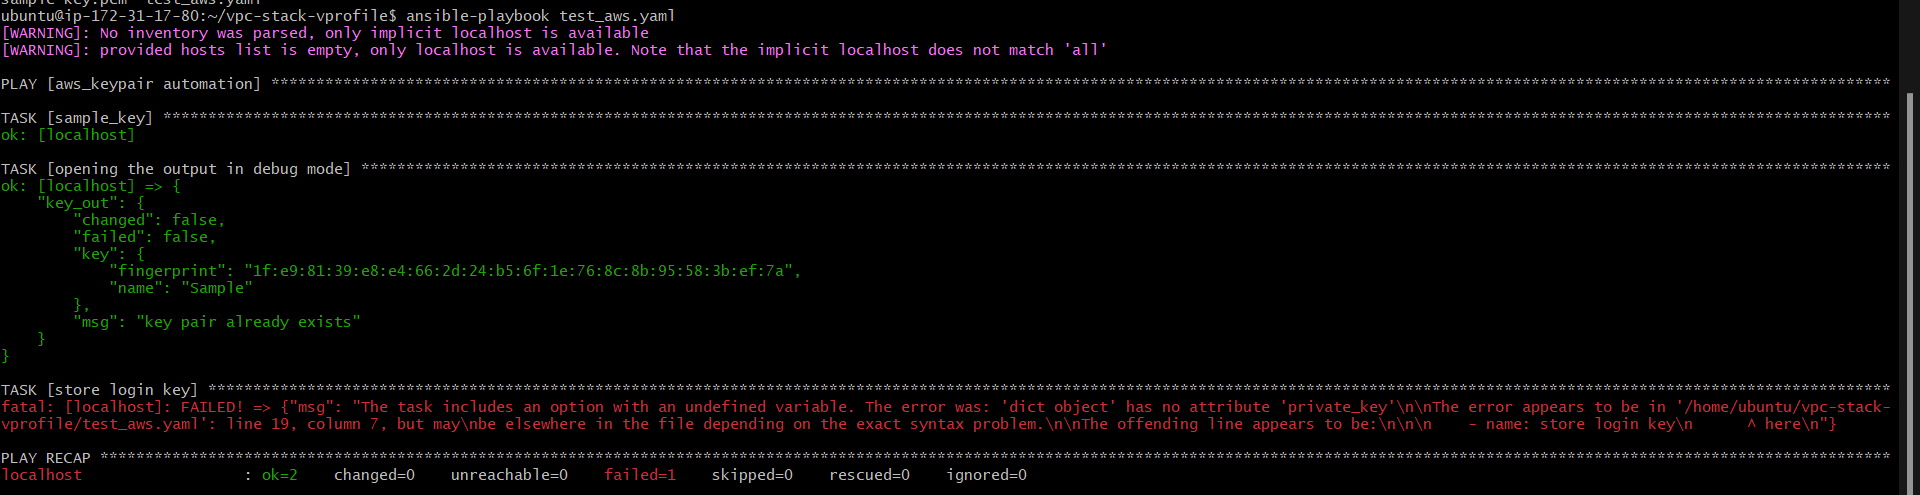
While running the playbook with ansible-playbook test-aws.yaml the command we encountered the below error which is an authentication error that implies, currently, the Ansible host machine doesn't have the privilege to create resources in the AWS account.

To overcome this error we can either give the authentication keys in the playbook which is not a safer choice or we can create a role with the necessary permissions and attach the role to the Ansible Host.
And after doing the same we can run the playbook and validate that our setup is done:

We are now able to automate tasks on the cloud using Ansible
Retrieval Operations
register and debug
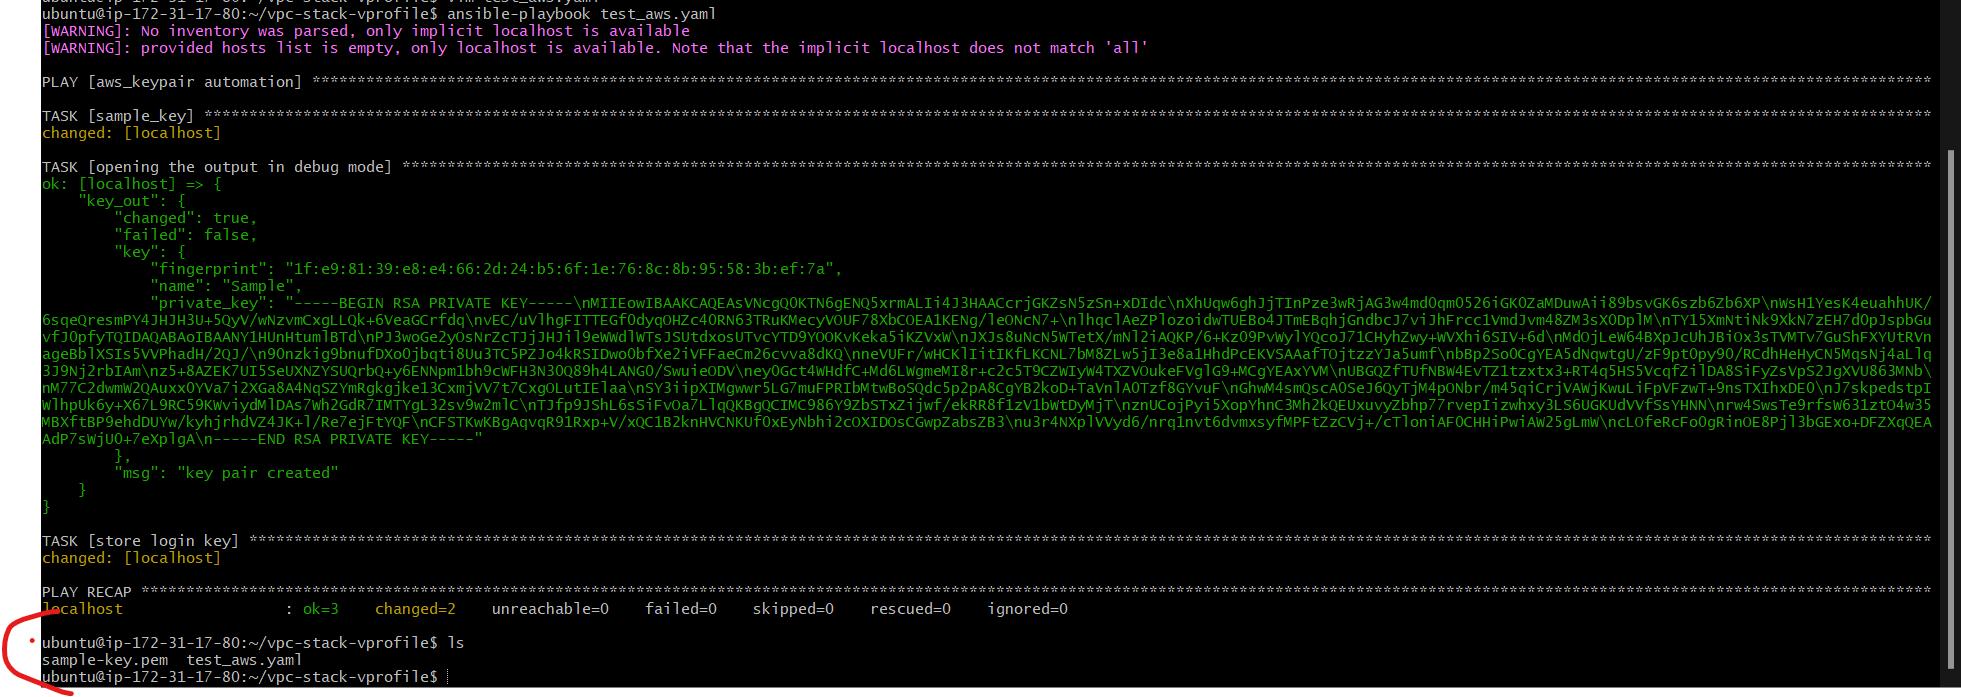
We can also hold the output from a task to a variable and use it further in the playbook using the register attribute. While creating a keypair we do get a public key and a private key, we can hold that in a variable.
 tasks:
    - name: sample_key
      ec2_key:
        name: Sample
        region: us-east-1

      register: key_out #this is the variable that will store the output that is a key-pair
We can print the variable in the terminal using debug module
- debug:
        var: key_out
copy
we can also store that output in a file using the copy module
- name: store login key
      copy:
        content: "{{key_out.key.private_key}}" #this is the json path to fetch the key from the variable key_out
        dest: ./sample-key.pem #path where the key will be stored as pem file
Now you can see key is created and stored:
Error Handling with Conditions
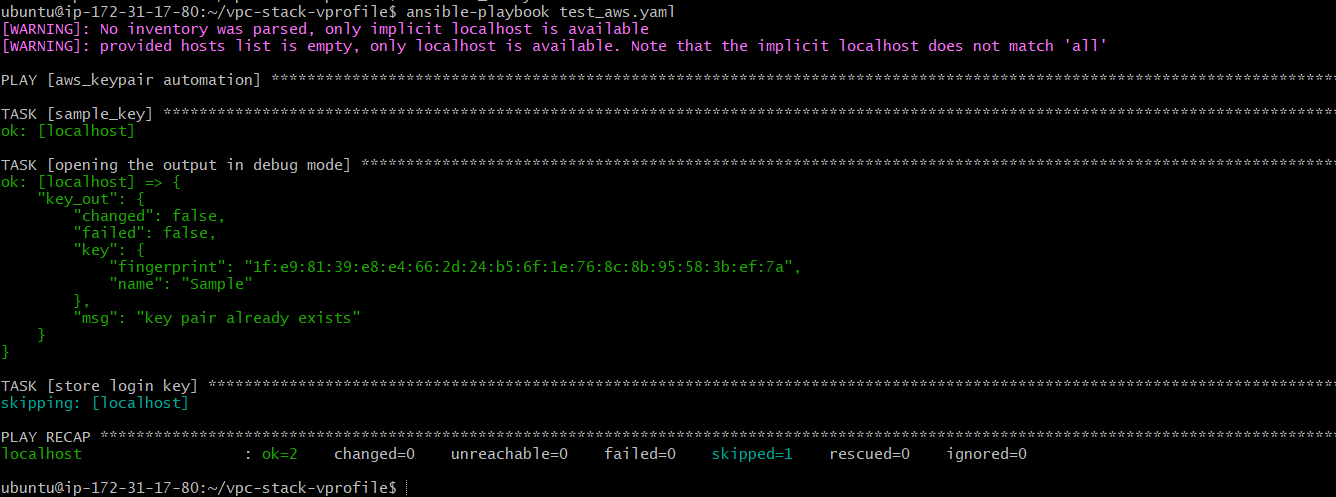
Now, consider a scenario where we have a lot of tasks and we need to run the same playbook multiple times. In that case, with our first task key-pair will be created and when running the second time we'll be encountered with below error as key pair has already been created
To handle this error we can use the condition in our playbook:
- name: store login key
      copy:
        content: "{{key_out.key.private_key}}"
        dest: ./sample-key.pem
      when: key_out.changed
#key will be saved only when jey_out.changed is true
Key-takeaways
While doing cloud automation it uses Python boto for API calls
Every module gives output after the API call in JSON format so it's always necessary to save the output using register so that we can use it for further tasks.
Variables for VPC & Bastion
In this section, we'll create all the necessary variables that will further be used in playbooks.
Variables make the code reusable and organized. Whenever there are any changes we do not need to change the playbook configurations, we just need to edit the variables.
Here we'll create variables for VPC and Bastion host. A bastion host is nothing but our single entry point for our VPC from the public network.
Variable file for VPC
#This is the variable file for VPC setup

vpc_name: "Vprofile-vpc"

#vpc range
vpcCider: '172.20.0.0/16'

#subnets range
PubSub1Cider: 172.20.1.0/24
PubSub2Cider: 172.20.2.0/24
PubSub3Cider: 172.20.3.0/24
PrivSub1Cider: 172.20.4.0/24
PrivSub2Cider: 172.20.5.0/24
PrivSub3Cider: 172.20.6.0/24

#these zones will be created in 3 zones

#region name

region: "us-east-1"

#Availability Zones

zone1: us-east-1a
zone2: us-east-1b
zone3: us-east-1c

state: present
Variable file for Bastion Host
bastion_ami: ami-09538990a0c4fe9be
region: us-east-1
MYIP: 117.99.44.80/32
you can refer to my repository for the entire code: https://github.com/ritesh-kumar-nayak/Ansible-aws-vpc
Playbook for VPC
---
- name: vpc setup vprofile
  hosts: localhost
  connection: local
  gather_facts: False
  tasks:
    - name: Import variables from vpc_setup
      include_vars: Variables/vpc_setup

    - name: Creating vprofile VPC
      ec2_vpc_net:
        name: "{{vpc_name}}"
        #The vpc_name variable is referenced using Jinja2 templating ({{ ... }}). This means that the actual n
        #ame will be provided by the value of the vpc_name variable.

        cider_block: "{{vpcCider}}"
        region: "{{region}}"
        dns_support: yes
        dns_hostnames: yes
        tenancy: default
        state: "{{state}}"
      register: vpc_out

    - name: debug mode
      debug:
        var: vpc_out
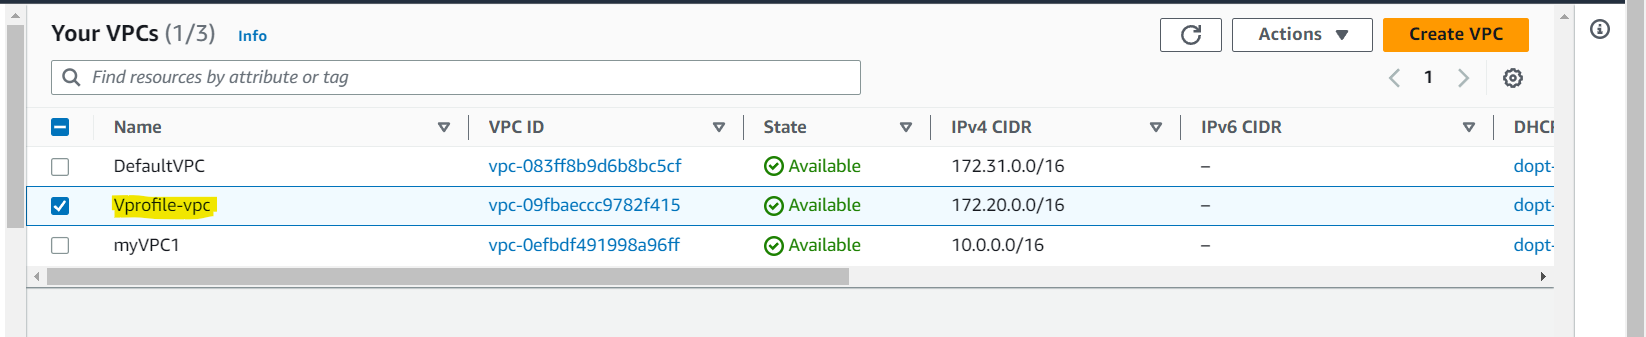
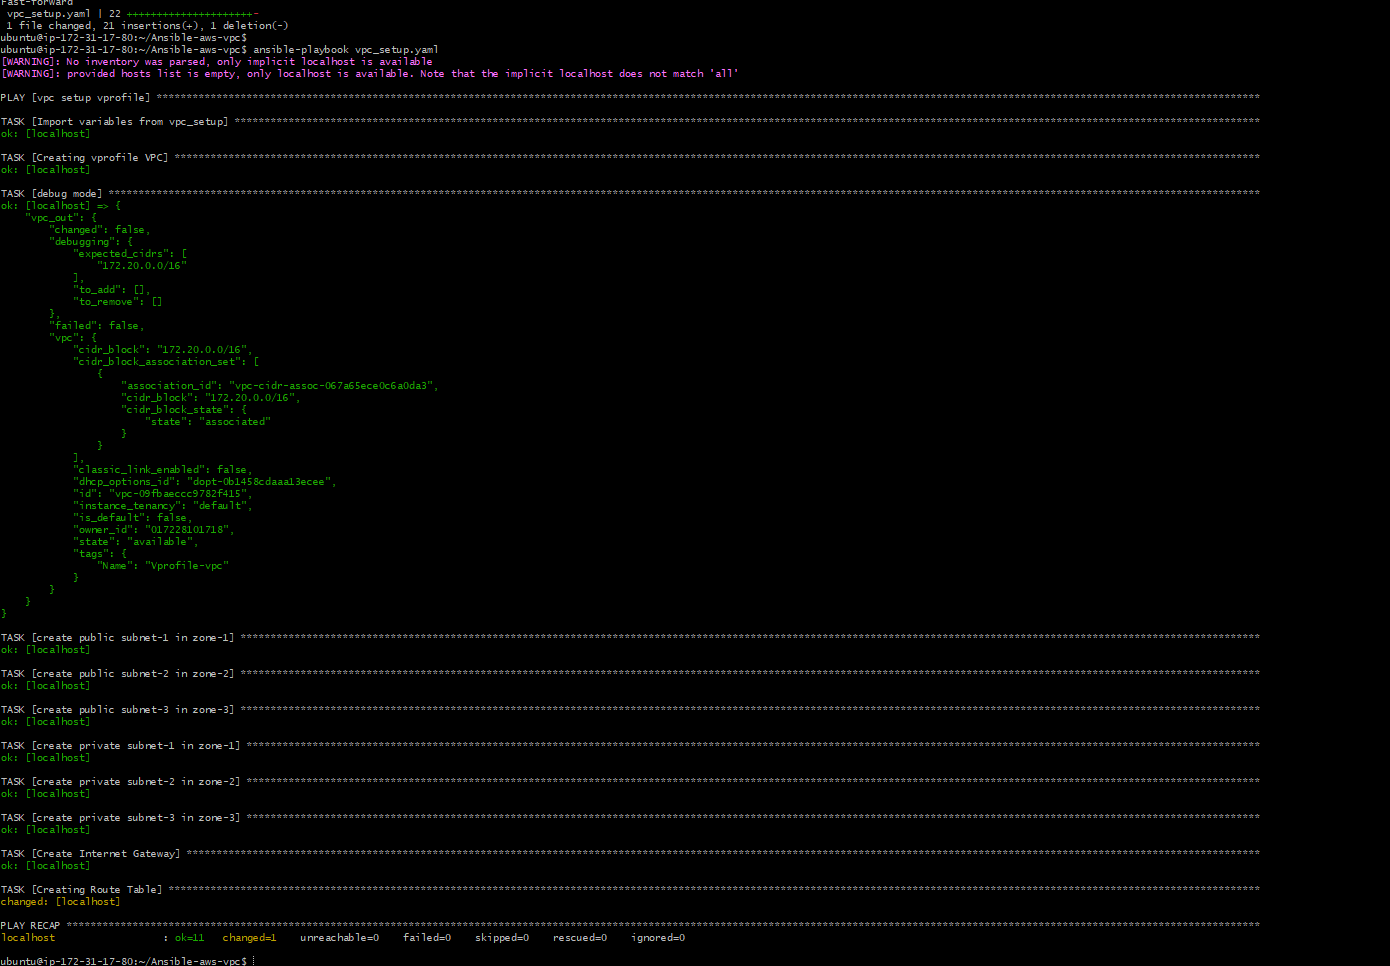
After executing the above playbook, it has created the VPC
Playbook for Subnets
We'll be creating 1 public and 1 private subnet each, in 3 different zones. And below is the playbook for the same:
Public Subnet
    - name: create public subnet-1 in zone-1
      ec2_vpc_subnet:

        vpc_id: "{{vpc_out.vpc.id}}" #id will be fetched from the json that is stored in vpc_out variable
        cidr: "{{PubSub1Cidr}}"
        state: "{{state}}"
        region: "{{region}}"
        az: "{{zone1}}"
        map_public: yes
        resource_tags:
          Name: vprofile-pubsub1

      register: pubsub1_out

    - name: create public subnet-2 in zone-2
      ec2_vpc_subnet:

        vpc_id: "{{vpc_out.vpc.id}}" #id will be fetched from the json that is stored in vpc_out variable
        cidr: "{{PubSub2Cidr}}"
        state: "{{state}}"
        region: "{{region}}"
        az: "{{zone2}}"
        map_public: yes
        resource_tags:
          Name: vprofile-pubsub2

      register: pubsub2_out

    - name: create public subnet-3 in zone-3
      ec2_vpc_subnet:

        vpc_id: "{{vpc_out.vpc.id}}" #id will be fetched from the json that is stored in vpc_out variable
        cidr: "{{PubSub3Cidr}}"
        state: "{{state}}"
        region: "{{region}}"
        az: "{{zone3}}"
        map_public: yes
        resource_tags:
          Name: vprofile-pubsub3

      register: pubsub3_out
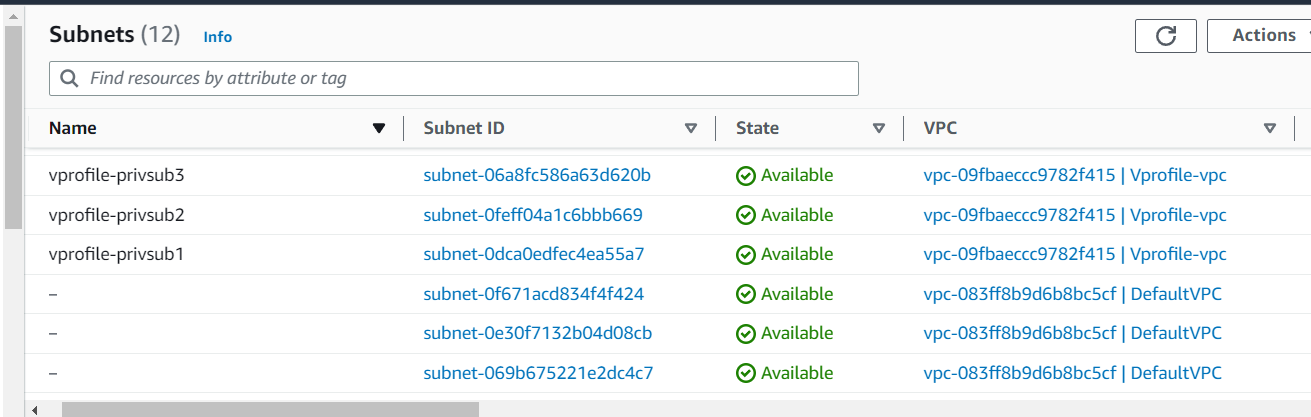
And finally, all 3 public subnets are created

Private Subnet
  #creating private subnets
    - name: create private subnet-1 in zone-1
      ec2_vpc_subnet:

        vpc_id: "{{vpc_out.vpc.id}}" #id will be fetched from the json that is stored in vpc_out variable
        cidr: "{{PrivSub1Cidr}}"
        state: "{{state}}"
        region: "{{region}}"
        az: "{{zone1}}"
        map_public: yes
        resource_tags:
          Name: vprofile-privsub1

      register: privsub1_out

    - name: create private subnet-2 in zone-2
      ec2_vpc_subnet:

        vpc_id: "{{vpc_out.vpc.id}}" #id will be fetched from the json that is stored in vpc_out variable
        cidr: "{{PrivSub2Cidr}}"
        state: "{{state}}"
        region: "{{region}}"
        az: "{{zone2}}"
        map_public: yes
        resource_tags:
          Name: vprofile-privsub2

      register: privsub2_out

    - name: create private subnet-3 in zone-3
      ec2_vpc_subnet:

        vpc_id: "{{vpc_out.vpc.id}}" #id will be fetched from the json that is stored in vpc_out variable
        cidr: "{{PrivSub3Cidr}}"
        state: "{{state}}"
        region: "{{region}}"
        az: "{{zone3}}"
        map_public: yes
        resource_tags:
          Name: vprofile-privsub3

      register: privsub3_out
Now with this, we have created 3 private subnets in the same vpc
Creating Internet Gateway
Now, we need an Internet Gateway for our public subnets. And to do so below is the Ansible task:
  #Creating Internet Gateway for Public Subnets

    - name: Create Internet Gateway
      #this is the module name for Internet gateway
      ec2_vpc_igw:
        vpc_id: "{{vpc_out.vpc.id}}"
        state: "{{state}}"
        region: "{{region}}"
        resource_tags:
          Name: vprofile-IGW
      register: igw_out
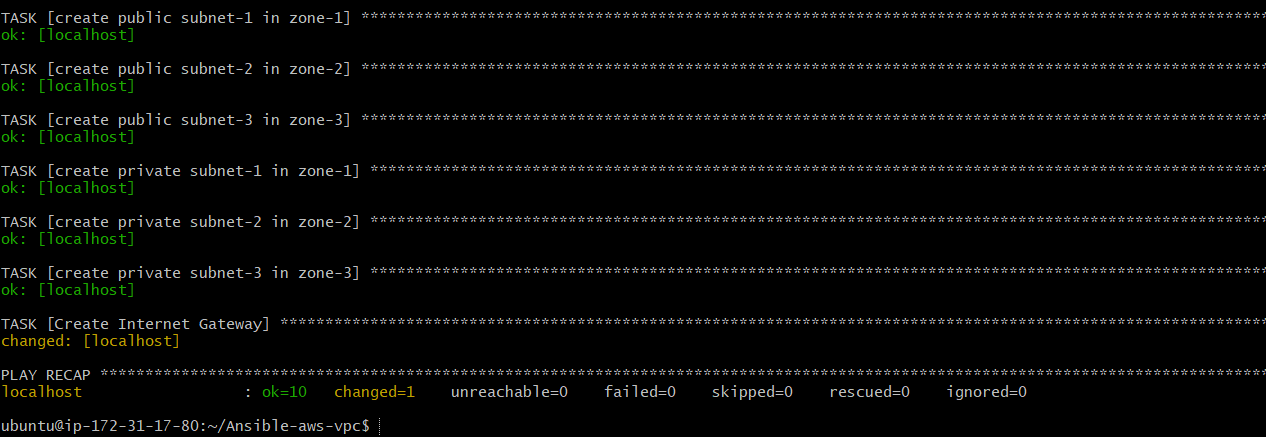
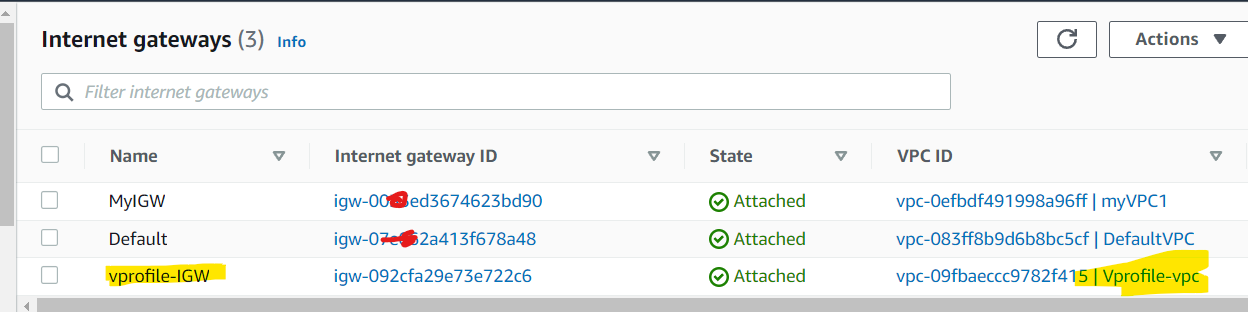
Now Internet Gateway has been created:
Playbook for Route Table
As we have already created Public Subnets and Internet Gateway for the same, now we'll be creating Route Table which will tell the public subnet to go and access this internet gateway and vice-versa. All the traffic coming to and from the Internet Gateway will be routed through this route table.
This route table will be mapped to the public subnets so that it can route the traffic to the Internet gateway and the traffic from the Internet gateway will be routed back to the subnets.
  #Creating Route Table for Public Subnets that will route traffic to the above IGW

    - name: Creating Route Table
      ec2_vpc_route_table:
        vpc_id: "{{vpc_out.vpc.id}}"
        region: "{{region}}"
        tags:
          Name: VProfile-PubRT
        # it takes all the subnets that will be attached to this route table as List
        subnets:
          - "{{pubsub1_out.subnet.id}}"
          - "{{pubsub2_out.subnet.id}}"
          - "{{pubsub3_out.subnet.id}}"

        routes:
          - dest: 0.0.0.0/0
            gateway_id: "{{igw_out.gateway_id}}"

      register: pub_RT_out
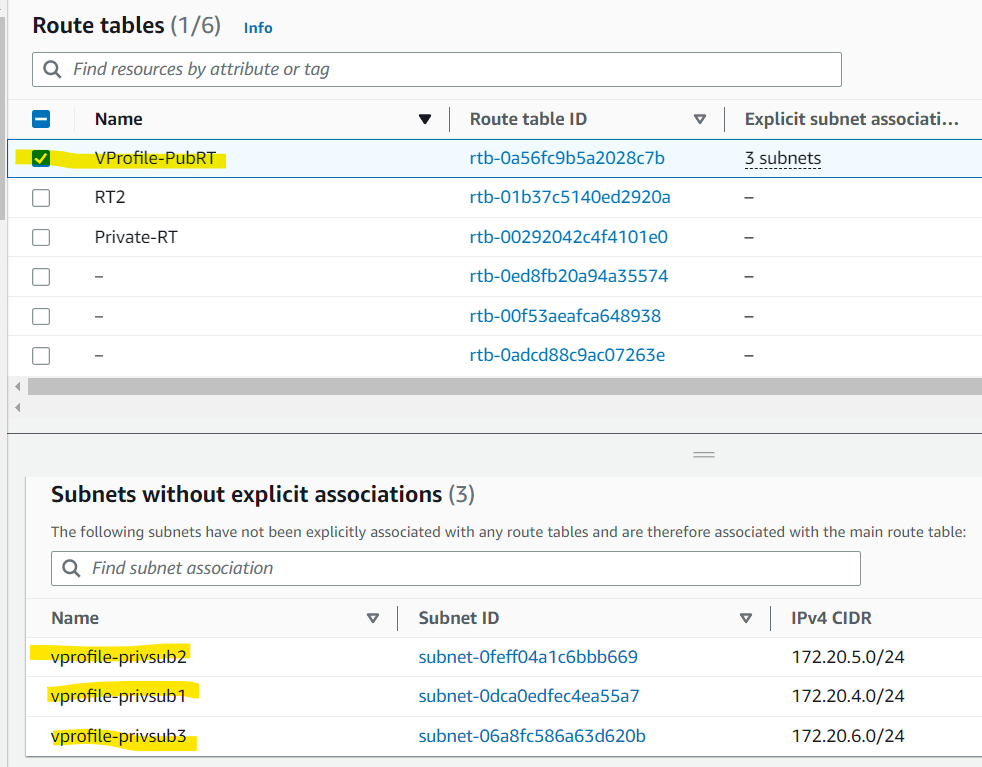
Route Table has been created and associated with the public subnets
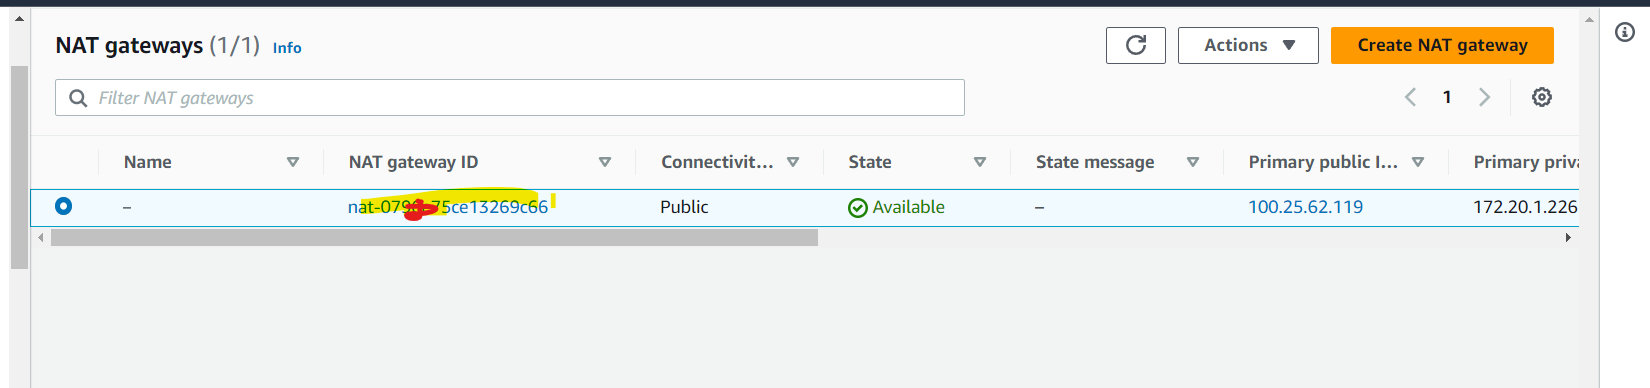
Creating NAT Gateway
We have created 3 private subnets and now we aim to create NAT gateways for those private subnets.
NAT gateway lives in a public subnet however, we have 3 private subnets so ideally we have to create 3 NAT gateways but to save cost we'll create 1 NAT gateway in any one of the public subnets.
  #Creating NAT Gateway
    - name: Creating NAT Gateway and allocate elastic IP if a nat gateway doesnt yet exist in the
      ec2_vpc_nat_gateway:
        state: "{{state}}"
        subnet_id: "{{pubsub1_out.subnet.id}}"
        wait: yes
        region: "{{region}}"
        if_exist_do_not_create: true # this is very important. It won't allwo to create multiple NAT GW if one is already created

      register: nat_out
    - name: Printing NAT Gateway Details
      debug:
        var: nat_out
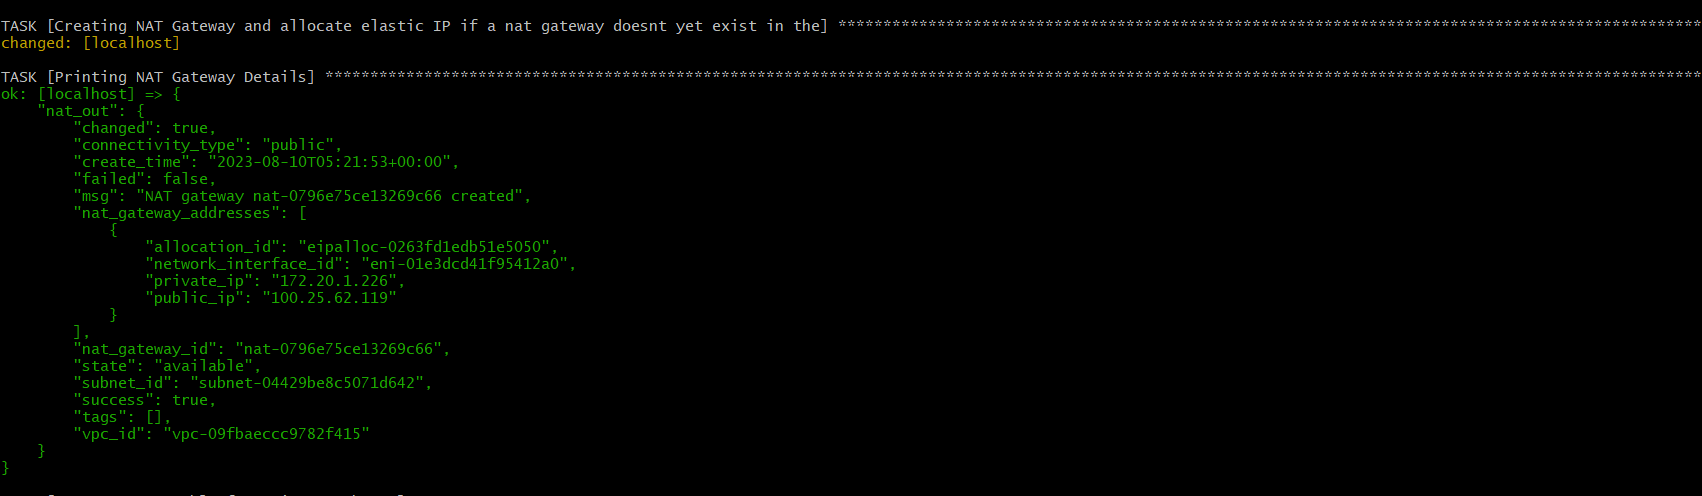
Now NAT gateway is ready.
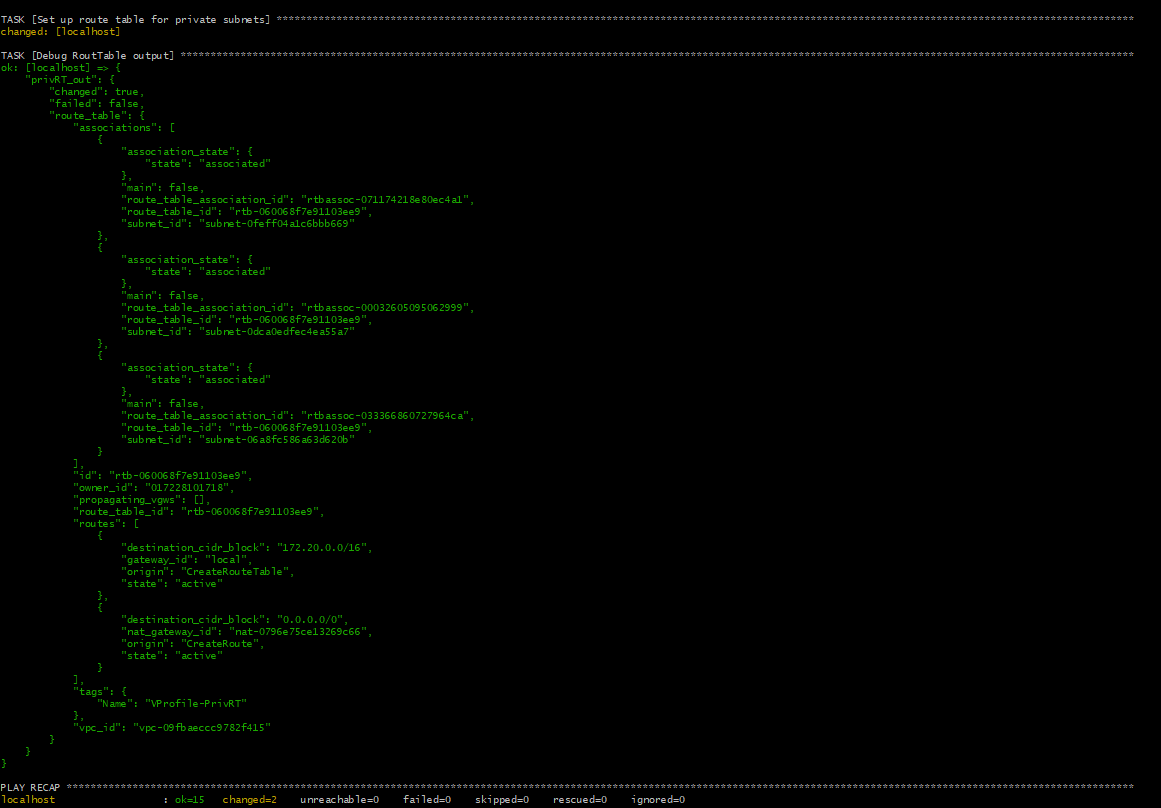
Creating Route Table for Private Subnet
As we have created NAT Gateway for private subnets now it needs a routing table that will route the traffic to and from the sunset and NAT gateway.
  #Creating Route Table for private subnet which will route the traffic to NAT GW

    - name: Set up route table for private subnets
      ec2_vpc_route_table:
        vpc_id: "{{vpc_out.vpc.id}}"
        region: "{{region}}"
        tags:
          Name: VProfile-PrivRT
        # it takes all the private subnets that will be attached to this route table as List
        subnets:
          - "{{privsub1_out.subnet.id}}"
          - "{{privsub2_out.subnet.id}}"
          - "{{privsub3_out.subnet.id}}"

        routes:
          - dest: 0.0.0.0/0
            gateway_id: "{{nat_out.nat_gateway_id}}"
      register: privRT_out

    - name: Debug RoutTable output
      debug:
        var: privRT_out
And now the route table has been created and associated with private subnets redirecting traffic to the NAT gateway.

Retrieve all the Required Ids in a Variable File
Now, we'll store all the IDs of VPCs, Route Tables, Internet Gateway, and NAT Gateway for further use in setting up Bastion Host.
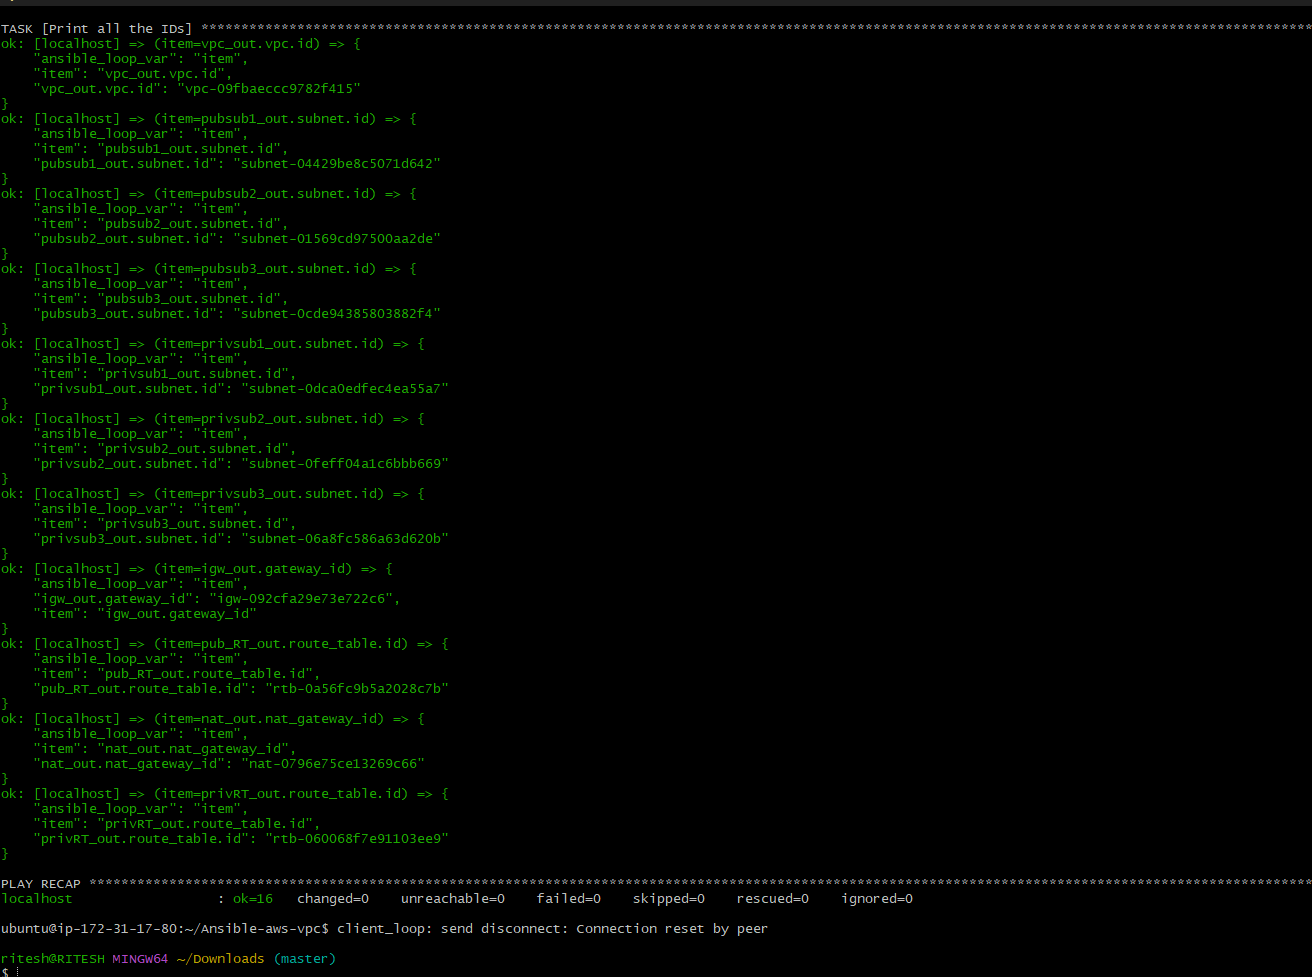
Print IDs on terminal
We can use debug module for this operation with looping as below:
    - name: Print all the IDs
      debug:
        var: "{{item}}"
      loop:
        - vpc_out.vpc.id
        - pubsub1_out.subnet.id
        - pubsub2_out.subnet.id
        - pubsub3_out.subnet.id
        - privsub1_out.subnet.id
        - privsub2_out.subnet.id
        - privsub3_out.subnet.id
        - igw_out.gateway_id
        - pub_RT_out.route_table.id
        - nat_out.nat_gateway_id
        - privRT_out.route_table.id
Now we can see all the ids are printed by looping each variable:
Using IDs at run time
Instead of printing, we can also store the id values in variables and use them at the runtime going forward in the same playbook.
To do so, we'll be using the set_fact module that allows you to dynamically create or update variables based on the results of tasks or other data sources. This is particularly useful when you need to store and use intermediate values or dynamically generated information throughout your playbook.
    - name: set facts
      set_fact:
        vpcid: "{{vpc_out.vpc.id}}"
        pubsub1id: "{{pubsub1_out.subnet.id}}"
        pubsub2id: "{{pubsub2_out.subnet.id}}"
        pubsub3id: "{{pubsub3_out.subnet.id}}"
        privsub1id: "{{privsub1_out.subnet.id}}"
        privsub2id: "{{privsub2_out.subnet.id}}"
        privsub3id: "{{privsub3_out.subnet.id}}"
        igwid: "{{igw_out.gateway_id}}"
        pubRTid: "{{pub_RT_out.route_table.id}}"
        natgwid: "{{nat_out.nat_gateway_id}}"
        privRTid: "{{privRT_out.route_table.id}}"
        cacheable: yes #This can improve the efficiency of playbook runs by reusing the cached results instead of re-executing tasks that have already been run with the same parameters.
Storing variables in an external file
We can also store all the variables in an external variable text file using the copy module so that we can use it in other playbooks instead of limiting it to its native playbook.
We'll use this variable file while creating the Bastion host.
    - name: Copying variable to a file for further use
      copy:
        content: "vpcid: {{vpc_out.vpc.id}}\npubsub1id: {{pubsub1_out.subnet.id}}\npubsub2id: {{pubsub2_out.subnet.id}}\npubsub3id: {{pubsub3_out.subnet.id}}\nprivsub1id: {{privsub1_out.subnet.id}}\nprivsub2id: {{privsub2_out.subnet.id}}\nprivsub3id: {{privsub3_out.subnet.id}}\nigwid: {{igw_out.gateway_id}}\npubRTid: {{pub_RT_out.route_table.id}}\nnatgwid: {{nat_out.nat_gateway_id}}\nprivRTid: {{privRT_out.route_table.id}}\n"
        dest: Variables/output_vars
Bastion Host
A bastion host, also known as a jump host or jump server, is a specialized computer on a network that is specifically designed and configured to provide a secure gateway for accessing other systems in a private network. It acts as an intermediary or a point of entry for administrators to securely access servers and devices within a private network from an external or less trusted network, such as the Internet.
The primary purpose of a bastion host is to enhance security by minimizing direct access to critical servers and systems in the private network. Instead of exposing every server to the public internet, administrators connect to the bastion host first and then use it as a gateway to access other resources within the private network.
Setting up Bastion Host
---
- name: Bastion setup
  hosts: localhost
  connection: local
  gather_facts: no
  tasks:
    - name: bastion setup variables
      include_vars: Variables/bastion_setup

    - name: import vpc setup variable
      include_vars: Variables/output_vars

    - name: create vpro ec2 key pair
      ec2_key:
        name: vpro_key
        region: "{{region}}"
      register: vprokey_out
    - debug:
        var: vprokey_out

    - name: save private key into file named bastion_key.pem
      copy:
        content: "{{vprokey_out.key.private_key}}"
        dest: "./bastion_key.pem"
        mode: 0600
      when: vprokey_out.changed

    - name: Create Security group for bastion host
      ec2_group:
        name: bastion_host_SG
        description: Alow port 22 from everywhere and all port within SG
        region: "{{region}}"
        vpc_id: "{{vpcid}}"
        rules:
          - proto: tcp
            from_port: 22
            to_port: 22
            cidr_ip: "{{MYIP}}"
      register: BastionSG_out

    - name: creating EC2 instance
      ec2:
        key_name: vpro_key
        region: "{{region}}"
        instance_type: t2.micro
        image: "{{bastion_ami}}"
        wait: yes
        wait_timeout: 300
        instance_tags:
          Name: "Bastion Host"
          Project: Vpro-WebApp
          Owner: Ritesh
        exact_count: 1     # this determine the number of EC2 instance we want with the given configuration
        count_tag:
          Name: "Bastion Host"
          Project: Vpro-WebApp
          Owner: Ritesh
        group_id: "{{BastionSG_out.group_id}}"
        vpc_subnet_id: "{{pubsub1id}}"
      register: bastionhost_out
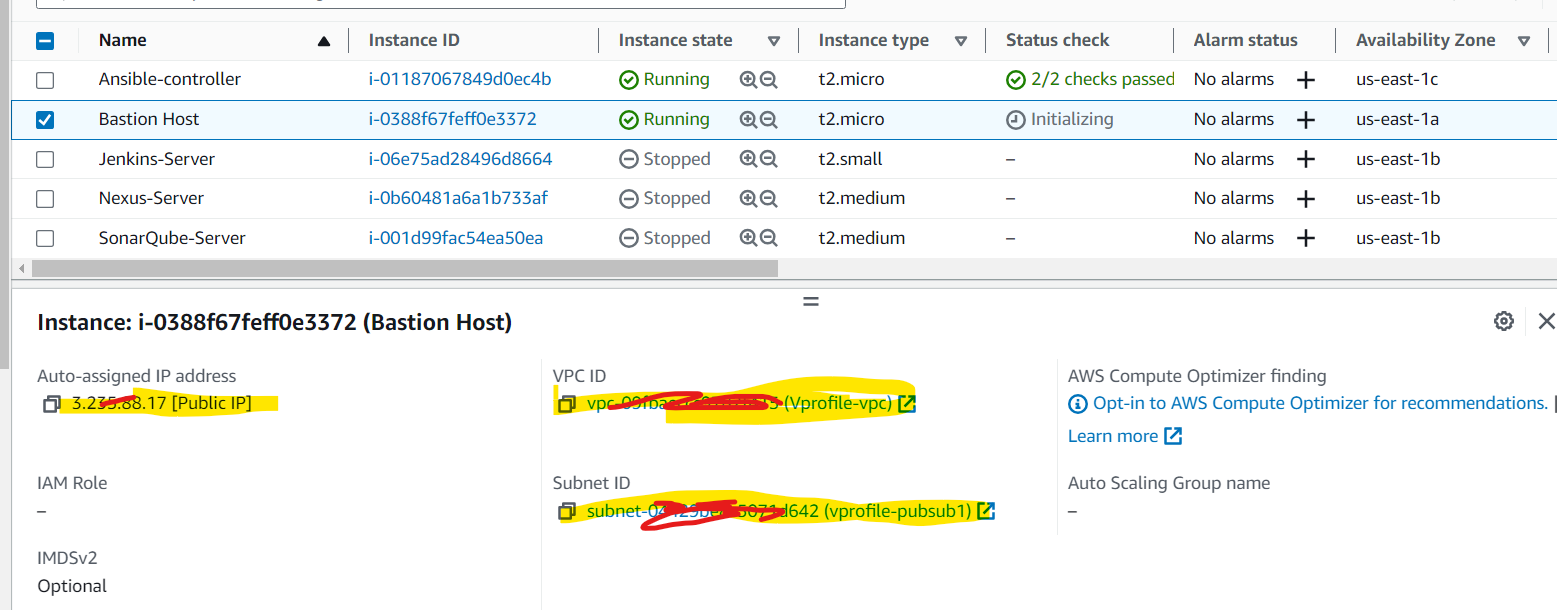
Now with the above playbook, we have successfully created a jump server/bastion server

And also you can see it is associated with the respective subnet and VPC :