Cloud Automation with Ansible-Complete 3-tier WebApp Stack
Playbooks for creating VPC, EC2, Elastic Load Balancer, Security Groups, MVN, MySQL, Tomcat, Nginx, Memcached, Inventory File, Site.yaml
Passionate about helping organizations build scalable infrastructure and DevOps solutions with cloud technologies. Experienced in designing robust systems, automating processes, and driving efficiency through innovative cloud solutions. Advocate for best practices in DevOps and cloud computing, committed to enabling teams to achieve their full potential.
Previously we have automated the VPC setup in AWS and now this project is a continuation of the same. We'll be automating a complete 3-tier web application deployment using Ansible on AWS.
Now our aim is to automate the complete provisioning of services such as RabbitMQ, MySQL, Memcached, Tomcat, etc with a load balancer on AWS implementing complete automation via Ansible.
Steps to Achieve the Automation
Set up VPC: we'll reuse the code and setup from the VPC setup project
Provisioning EC2 Instance, ELB, Security Group: write playbooks to automate the provisioning.
Provision multi-tier web app stack on EC2 instances:
Build artifacts
MySQL
Memcached
RabbitMQ
Tomcat
Nginx
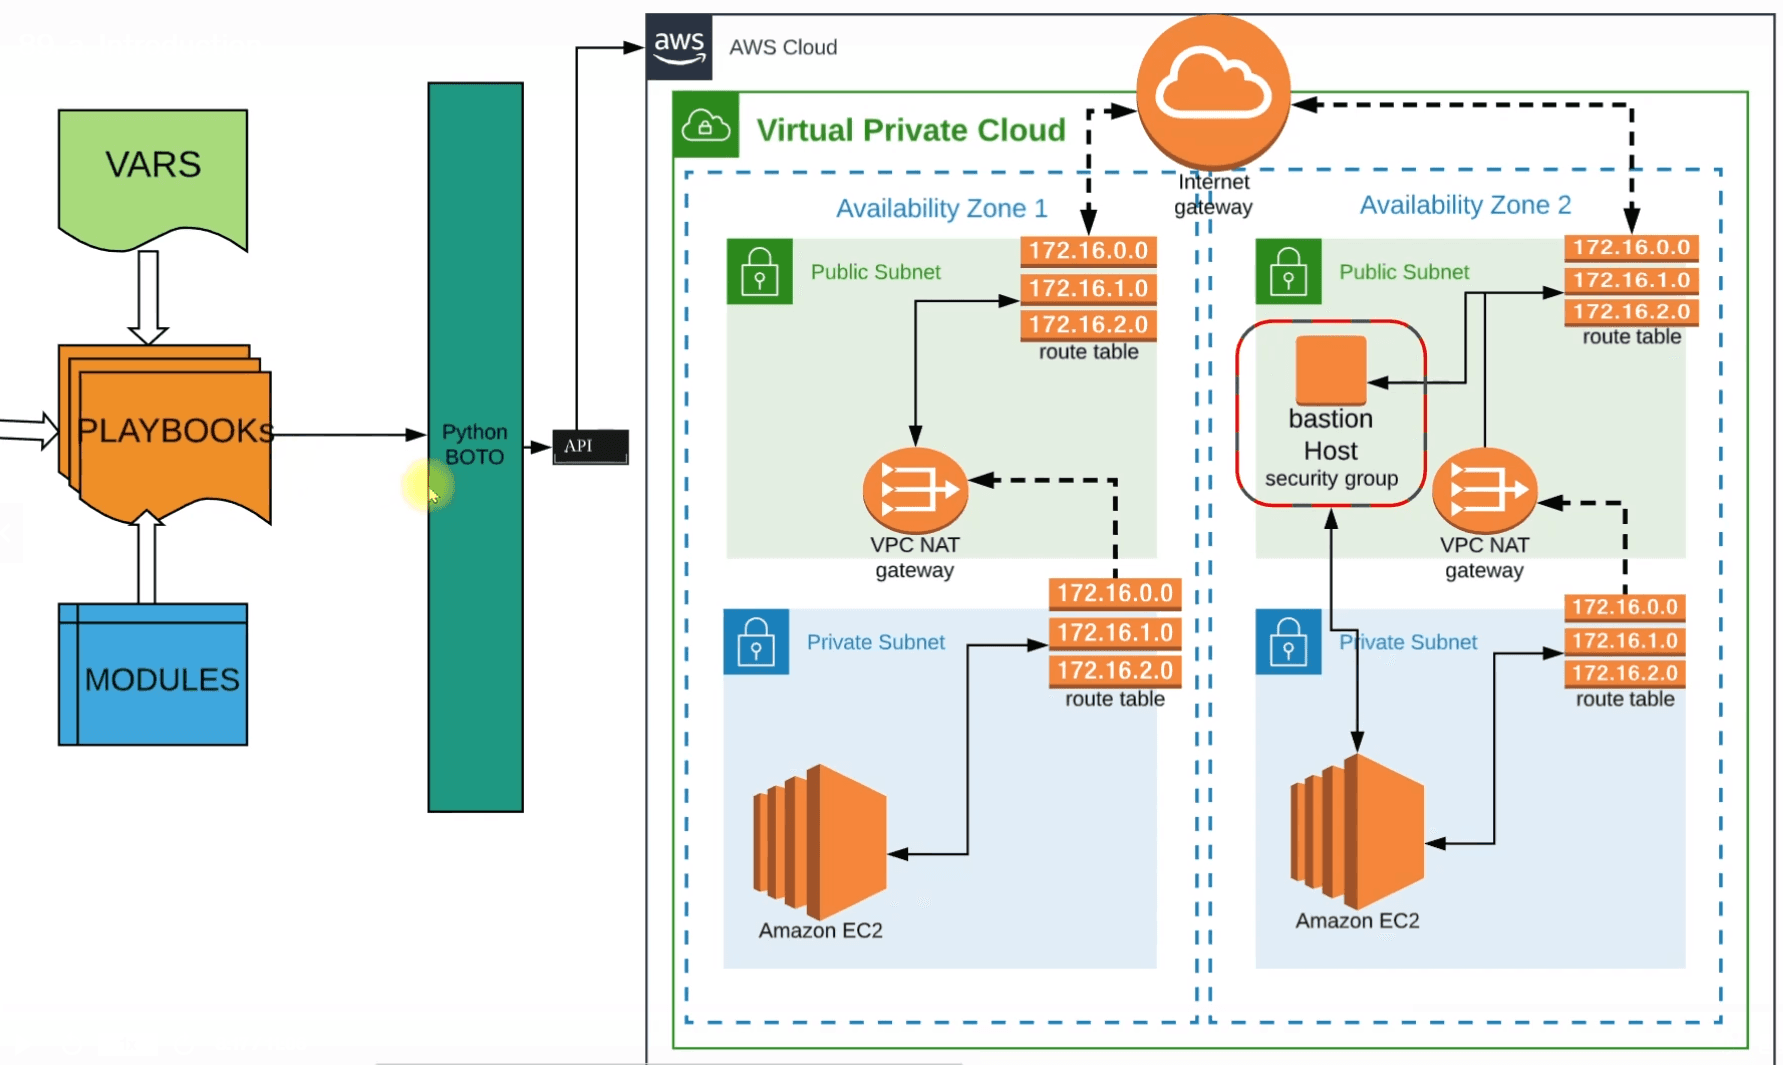
Architecture
Here we'll have 3 architectural designs:
Architecture for VPC setup that you can view on VPC architecture
Architecture for services
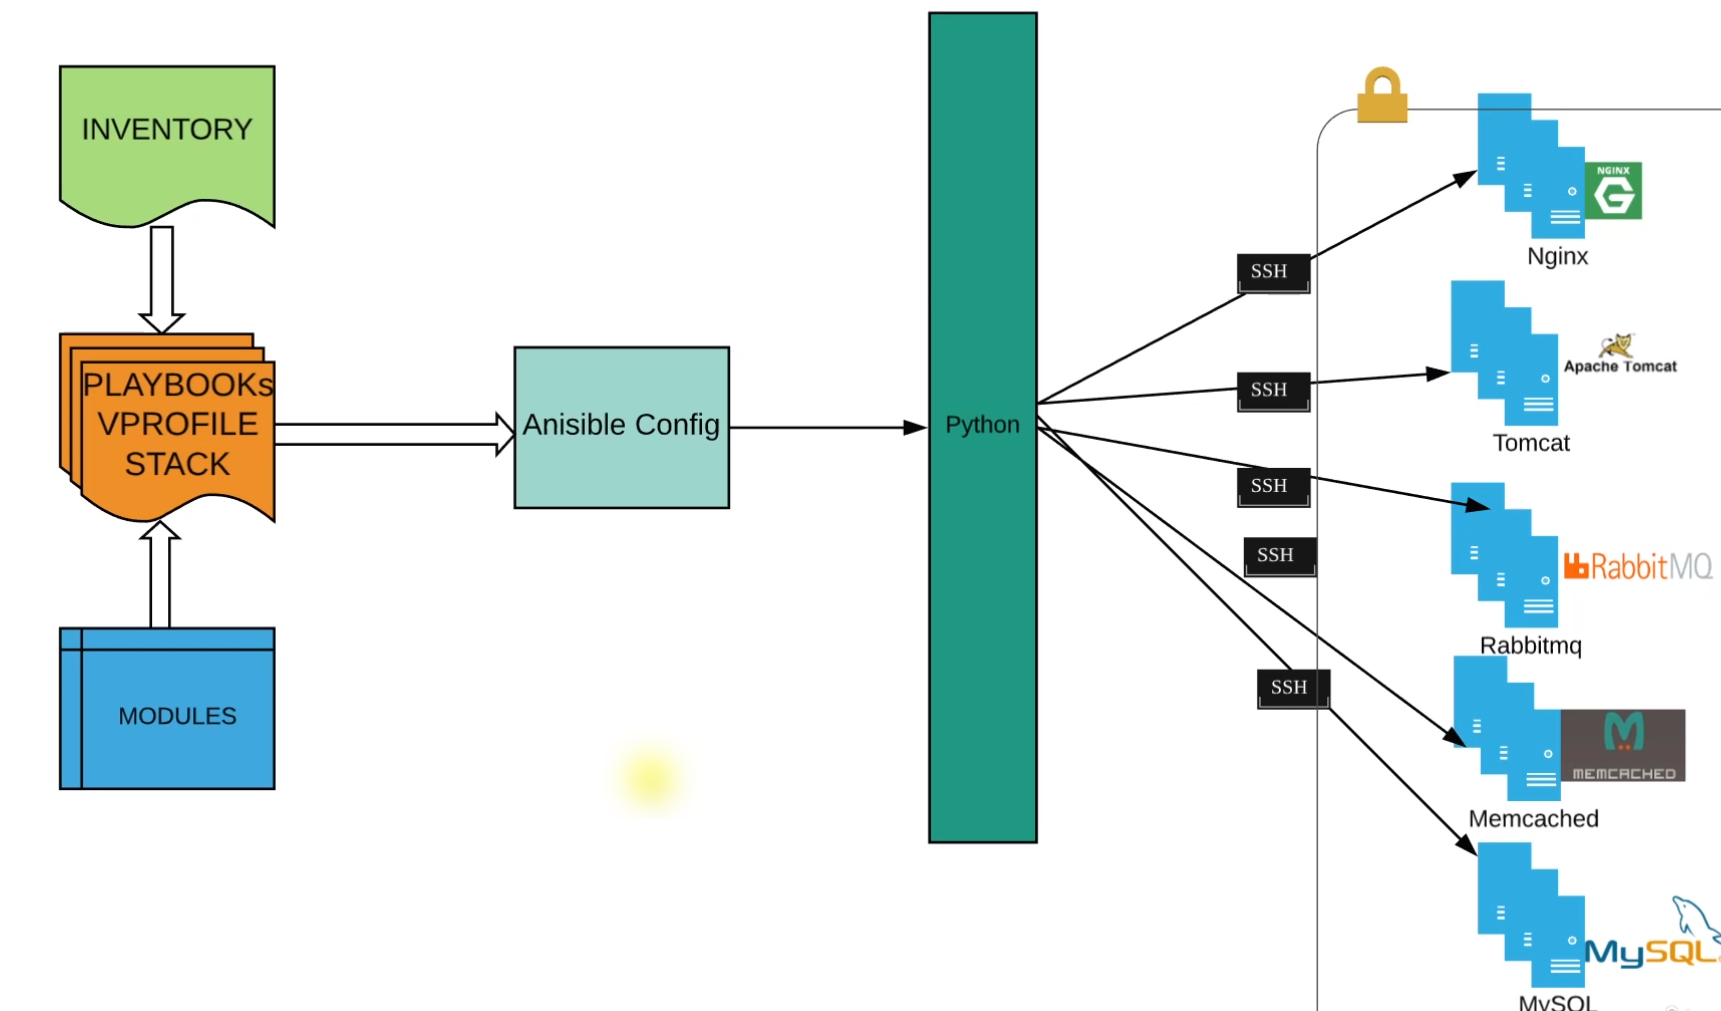
Here we'll write playbooks that will include variables from the VPC setup and create a playbook involving required modules. Then it will make API calls using Python boto to our AWS cloud and VPC we have created.
The VPC public subnet already contains the Bastion Host as defined in the VPC setup and we'll additionally create an Application Load Balancer inside the public subnet.
The private subnet will have EC2 instances for all the backend services such as MYSQL, Memcached, tomcat, etc. And these will be distributed in 2 private zones. And respective security groups will be created.
Our instances will be distributed in 2 private subnets.
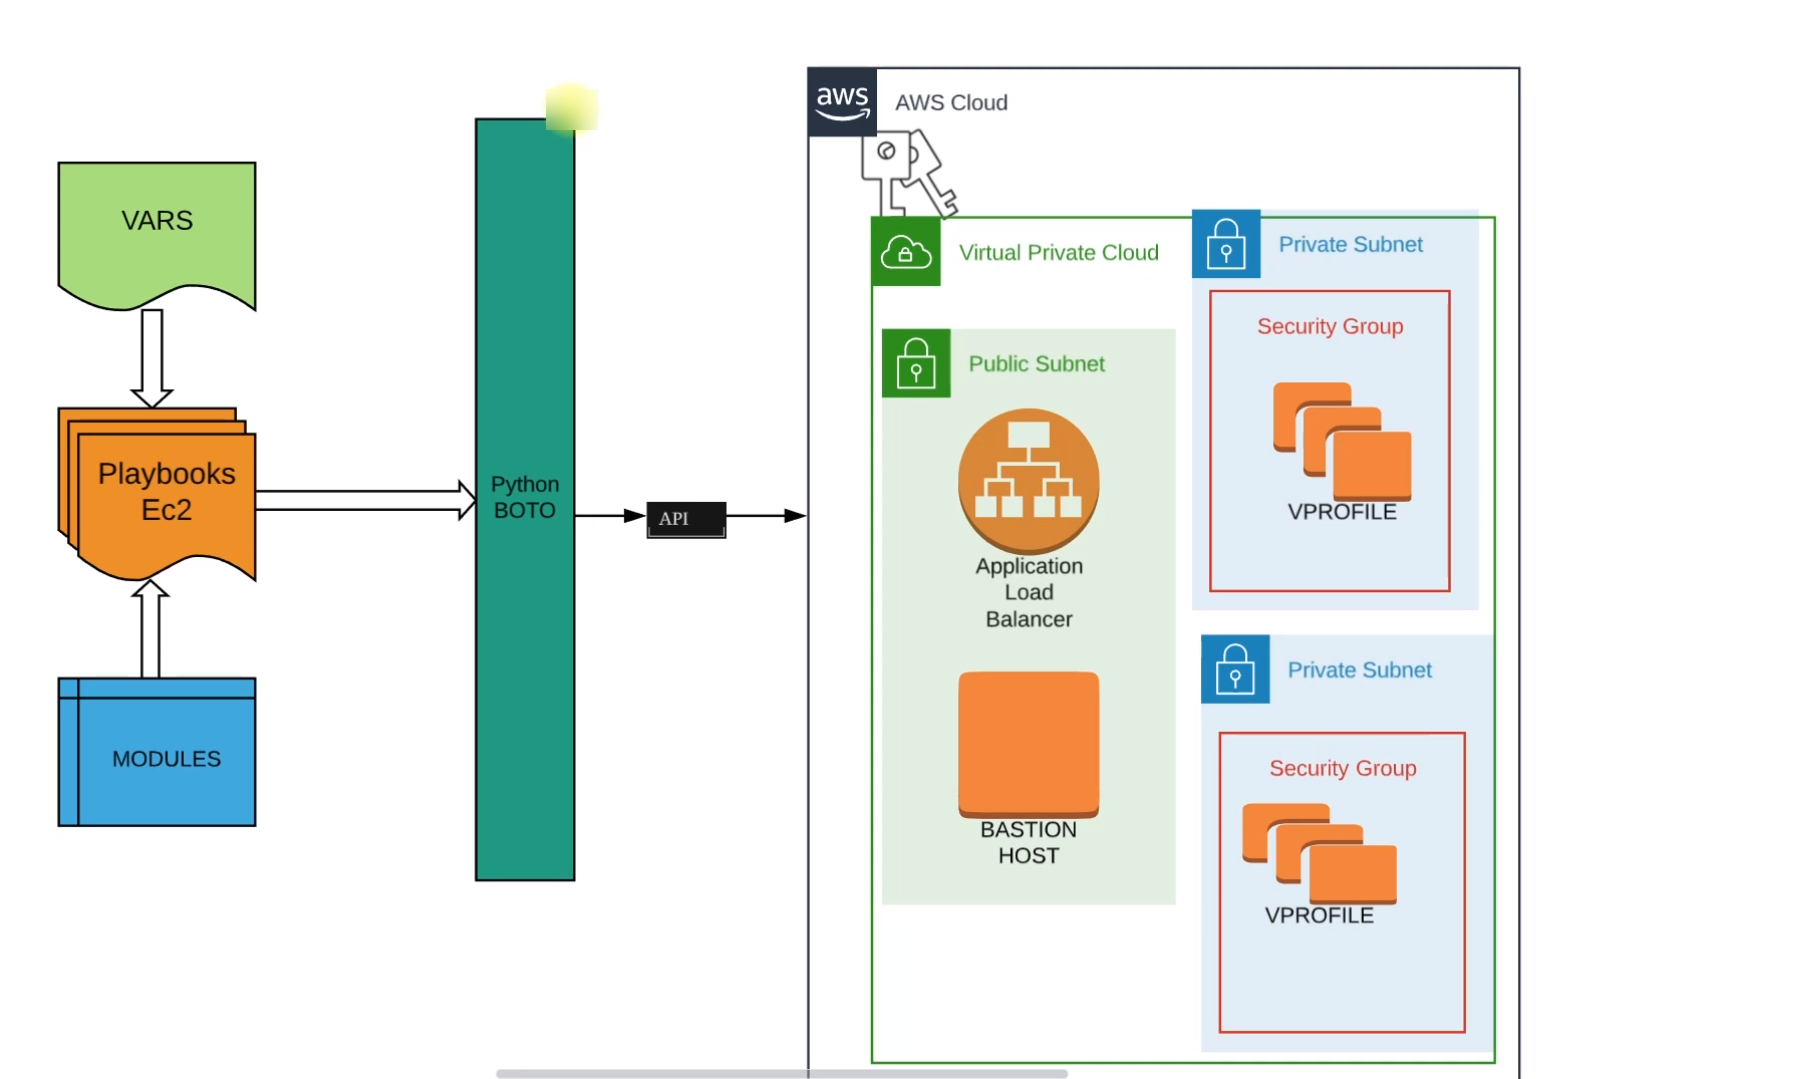
Architecture for stack setup
In this section, we are going to write a playbook that is going to set up the 3 tiers of our application which are database, caching, queue service, etc.
Here we'll have an Inventory file that will have the IPs of EC2 instances launched for the service in the previous section.
There is no API call for this execution, python is going to make SSH connection directly to EC2 instances using the inventory file.
All the services will be in a private subnet and Ansible will SSH to these services and set it up.
Flow of Execution
Fetch source code from previous VPC setup.
Execute VPC playbook
Write playbook for EC2, ELB, security groups, etc
Get into the application VPC
Write a playbook for the application stack setup.
site.yaml for VPC and Bastion Host
site.yaml is a common file or you can say a playbook runner file which will help us to call all the playbooks such as VPC, EC2, bastion host, etc from one place.
Here we'll import all the yaml files and execute this site.yaml only going ahead.
import_playbook
The import_playbook is a feature in Ansible that allows you to include and execute another playbook from within your current playbook. This can be useful for modularizing and reusing sections of your Ansible code, as well as managing complex tasks more efficiently.
We can import playbooks from the same directory and different directories by giving the path to the playbooks.
---

- import_playbook: vpc_setup.yaml
- import_playbook: bastion_instance.yaml
Here we have imported both playbooks present in the same directory. And we can run both the playbook from this single file site.yaml by ansible-playbook site.yaml .
Application Stack Setup
Here we'll now prepare the playbook for our multi-tier application stack. The objective of this playbook is to create EC2 instances for our multi-tier application stack. This playbook will contain the configuration for Ec2 instances for services like Nginx, Tomcat, RabbitMQ, MySQL, etc.
Playbook flow
First, the playbook will create a Security Group for the load balancer
Secondly, it will create a Security Group for EC2 instances
Then we'll lunch EC2 instances
Add Nginx EC2 instances under the Load balancer
We'll store the private IPs of our EC2 instances in a file for further use.
Create Key pair for Instances
- name: setup vprofile application stack
  hosts: localhost
  connection: local
  gather_facts: no
  tasks:
   #importing required variable file that will be used in this playbook.
    - name: including variable files
      include_vars: Variables/vpc_setup

    - name: inclucing ami ids for Vpro-tack instances
      include_vars: Variables/vpro-stack-setup

    - name: Including vpc output variables containing subnet, IG and NWG details
      include_vars: Variables/vpc_output_vars

    - name: create vprofilestack ec2 key-pair #creating key pair for instances
      ec2_key:
        name: vprostack_key
        region: "{{region}}"
      register: vrprostack_key_out
    - name: save private key into file into loginkey_vprostack.pem #saving the keypair in a file for further use
      copy:
        content: "{{vrprostack_key_out.key.private_key}}"
        dest: ./loginkey_vprostack.pem
        mode: 0600
      when: vrprostack_key_out.changed
Create SG for Load Balancer
    # Creating Security group for LoadBalancer of VPro app Stack
    - name: Create security group for Load Balancer
      ec2_group:
        name: vpro_ELB_SG
        description: Allow port 88 from everywhere and all port within SG
        region: "{{region}}"
        vpc_id: "{{vpcid}}"
        rules:
          - proto: tcp
            from_port: 80
            to_port: 80
            cidr_ip: 0.0.0.0/0
      register: vpro_ELBSG_out
Create SG for EC2 Instances
    # Creating Security group for EC2 instances of VPro app stack
    - name: Create Secrurity group for EC2 instances of VproStack
      ec2_group:
        name: vpro_EC2_SG
        description: Allow port 88 from everywhere and all port within SG
        region: "{{region}}"
        vpc_id: "{{vpcid}}"
        purge_rules: no #this no flag will not allow ansible to re-create or override SG if there is no changes to the rule
        rules:
          - proto: tcp
            from_port: 80
            to_port: 80
            group_id: "{{vpro_ELBSG_out.group_id}}"

          - proto: tcp
            from_port: 22
            to_port: 22
            group_id: "{{BastionSGid}}"

      register: vpro_EC2SG_out

 #Update Security Group with it's own SG Id to enable all the services interact with each other
    - name: Update Security Group with it's own SG Id
      ec2_group:
        name: vpro_EC2_SG
        description: Allow port 88 from everywhere and all port within SG
        region: "{{region}}"
        vpc_id: "{{vpcid}}"
        purge_rules: no #this no flag will not allow ansible to re-create or override SG if there is no changes to the rule
        rules:
          - proto: all
            group_id: "{{vpro_EC2SG_out.group_id}}"

Security Groups have been created and are ready to be associated.
Playbook for Creating EC2 Instance for Nginx
This playbook will lunch an instance in a private subnet to be used as Nginx Server:
    - name: Creating Nginx Web01
      ec2:
        key_name: vprostack_key
        region: "{{region}}"
        instance_type: t2.micro
        image: "{{nginx_ami}}"     # ami id is being fetched from a variable file
        wait: yes
        wait_timeout: 300
        instance_tags:
          Name: "web01"
          Project: Vpro
          Owner: Ritesh
        exact_count: 1      #it will not lunch the instance again and again
        count_tag:
          name: "web01"
          Project: Vpro
          Owner: Ritesh
        group_id: "{{vpro_EC2SG_out.group_id}}"
        vpc_subnet_id: "{{privsub1id}}"             #placing the instance in a private subnet
      register: web01_out
Playbook for Creating EC2 Instance for Tomcat
This playbook will lunch an instance in a private subnet to be used as Tomcat Server:
  # Creating EC2 instance for Tomcat

    - name: Creating Tomcat App01
      ec2:
        key_name: vprostack_key
        region: "{{region}}"
        instance_type: t2.micro
        image: "{{tomcat_ami}}"
        wait: yes
        wait_timeout: 300
        instance_tags:
          Name: "app01"
          Project: Vpro
          Owner: Ritesh
        exact_count: 1      #it will not lunch the instance again and again
        count_tag:
          name: "app01"
          Project: Vpro
          Owner: Ritesh
        group_id: "{{vpro_EC2SG_out.group_id}}"
        vpc_subnet_id: "{{privsub1id}}"
      register: app01_out
Playbook for Creating EC2 Instance for Memcached Service
This playbook will lunch an instance in a private subnet to be used as a Memcached Server:
    # Creating EC2 instance for Memcached Service

    - name: Creating Memcached MC01
      ec2:
        key_name: vprostack_key
        region: "{{region}}"
        instance_type: t2.micro
        image: "{{memcache_ami}}"
        wait: yes
        wait_timeout: 300
        instance_tags:
          Name: "mc01"
          Project: Vpro
          Owner: Ritesh
        exact_count: 1      #it will not lunch the instance again and again
        count_tag:
          name: "mc01"
          Project: Vpro
          Owner: Ritesh
        group_id: "{{vpro_EC2SG_out.group_id}}"
        vpc_subnet_id: "{{privsub1id}}"
      register: mc01_out
Playbook for Creating EC2 Instance for RabbitMQ
This playbook will lunch an instance in a private subnet to be used as RabbitMQ Server:
  #Creating EC2 instance for RabbitMQ

    - name: Creating RabbitMQ RMQ01
      ec2:
        key_name: vprostack_key
        region: "{{region}}"
        instance_type: t2.micro
        image: "{{rabbitMQ_ami}}"
        wait: yes
        wait_timeout: 300
        instance_tags:
          Name: "rmq01"
          Project: Vpro
          Owner: Ritesh
        exact_count: 1      #it will not lunch the instance again and again
        count_tag:
          name: "rmq01"
          Project: Vpro
          Owner: Ritesh
        group_id: "{{vpro_EC2SG_out.group_id}}"
        vpc_subnet_id: "{{privsub1id}}"
      register: rmq01_out
Playbook for Creating EC2 Instance for MySQL
This playbook will lunch an instance in a private subnet to be used as MySQL Server:
    #Creating Instance for MySQL Database

    - name: Creating MySQL DB01
      ec2:
        key_name: vprostack_key
        region: "{{region}}"
        instance_type: t2.micro
        image: "{{mysql_ami}}"
        wait: yes
        wait_timeout: 300
        instance_tags:
          Name: "db01"
          Project: Vpro
          Owner: Ritesh
        exact_count: 1      #it will not lunch the instance again and again
        count_tag:
          name: "db01"
          Project: Vpro
          Owner: Ritesh
        group_id: "{{vpro_EC2SG_out.group_id}}"
        vpc_subnet_id: "{{privsub1id}}"
      register: db01_out
    - debug:
        var: db01_out
Playbook for Creating ELB(Elastic Load Balancer)
This playbook will create an Elastic Load Balancer under vpro_ELBSG security group in all 3 public subnets. It will also attach the Nginx Server to this so that the ELB can route the traffic to and from the Nginx server.
    # Creating Elastic Load Balancer(ELB)

    - local_action:
        module: ec2_elb_lb
        name: "vpro-ELB"
        region: "{{region}}"
        state: present
        instance_ids:
          - "{{web01_out.tagged_instances[0].id}}"    #Defining the instances that will be attached to this Load Balancer. here Nginx server
        purge_instance_ids: true
        security_group_ids: "{{vpro_ELBSG_out.group_id}}"
        subnets:
          - "{{pubsub1id}}"
          - "{{pubsub2id}}"
          - "{{pubsub3id}}"
        listeners:
          - protocol: http # we can give http, https, ssl, tcp
            load_balancer_port: 80
            instance_port: 80
Storing Private IP
Private IPs remain unchanged and Ansible will communicate with instances via their private IPs hence, here we'll extract and store the private IPs of launched EC2 instances in a separate file for further use and to create an Inventory file:
    - name: Insert/Update private IPs and name in file provision-stack/group_vars/host_IPs
      blockinfile:
        path: provision-stack/group_vars/host_IPs
        block: |
          web01_ip: {{web01_out.tagged_instances[0].private_ip}}
          app01_ip: {{app01_out.tagged_instances[0].private_ip}}
          rmq01_ip: {{rmq01_out.tagged_instances[0].private_ip}}
          mc01_ip: {{mc01_out.tagged_instances[0].private_ip}}
          db01_ip: {{db01_out.tagged_instances[0].private_ip}}
    # Copying the security key pem file to provision-stack directory
    # In provision-stack directory all the playbooks for services like Nginx, MySQL, RabbitMQ etc will be written

    - name: Copy login key to provision-stack directory
      copy:
        src: loginkey_vprostack.pem
        dest: provision-stack/loginkey_vprostack.pem
        mode: '0400'
Dynamic Inventory
Now we'll create the Inventory file where all the private IPs will be grouped and using this inventory file Ansible will establish SSH connection to the servers and run the playbooks in the EC2 instances to configure the services like Nginx, Tomcat, RabbitMQ, etc:
    # Creating Dynamic-Inventory files with the IPs

    - name: Insert/Update Inventory file provision-stack/inventory-vpro
      blockinfile:
        path: provision-stack/inventory-vpro
        block: |
          web01 ansible_host = {{web01_out.tagged_instances[0].private_ip}}
          app01 ansible_host = {{app01_out.tagged_instances[0].private_ip}}
          rmq01 ansible_host = {{rmq01_out.tagged_instances[0].private_ip}}
          mc01 ansible_host = {{mc01_out.tagged_instances[0].private_ip}}
          db01 ansible_host = {{db01_out.tagged_instances[0].private_ip}}
          cntl ansible_host = 172.31.17.80 ansible_connection=local


          [webserver_group]
          web01

          [appserver_group]
          app01

          [rmqserver_group]
          rmq01

          [mcserver_group]
          mc01

          [dbserver_group]
          db01

          [control_machine]
          cntl

          [stack_inst:children]
          webserver_group
          appserver_group
          rmqserver_group
          mcserver_group
          dbserver_group

          [stack_inst:vars]
          ansible_user: ubuntu
          ansible_ssh_private_key_file=loginkey_vprostack.pem
[stack_inst:children]: This defines a group calledstack_instwhich is composed of the children groups listed below it. In this case, the groupstack_instincludes several other groups:webserver_group,appserver_group,rmqserver_group,mcserver_group, anddbserver_group. This organization allows you to target all hosts in thestack_instgroup, as well as any tasks you define that target the subgroups.[stack_inst:vars]: This section defines variables specific to thestack_instgroup. These variables will be applied to all hosts within thestack_instgroup. In this case, you're settingansible_usertoubuntuandansible_ssh_private_key_filetologinkey_vprostack.pem.Ansible will connect to these hosts as theubuntuuser and use the specified private key file for authentication.
Ansible will apply the ansible_user and ansible_ssh_private_key_file variables to them, making managing and automating tasks on those servers easy.
Moving Ansible Controller Machine into VPC
Now that we have prepared the Inventory file, the Ansible controller machine will run the playbooks on the targeted IPs via SSH. To establish an SSH connection among the devices, it has to be in the same VPC as the client machines.
So, our goal is to move our current controller machine to our application VPC. And to do so, we can do that in 3 ways:
i) VPC Peering: which is fine when executing once.
ii) We can make use of the Bastion Host machine that we created earlier
iii) We can create an AMI of our current controller and lunch the instance from that AMI into our application VPC.
For now, we'll use the 3rd way. When we'll lunch the instance from the AMI it will be an exact copy with all the files, and directories.
Creating Image from Ansible Controller Machine
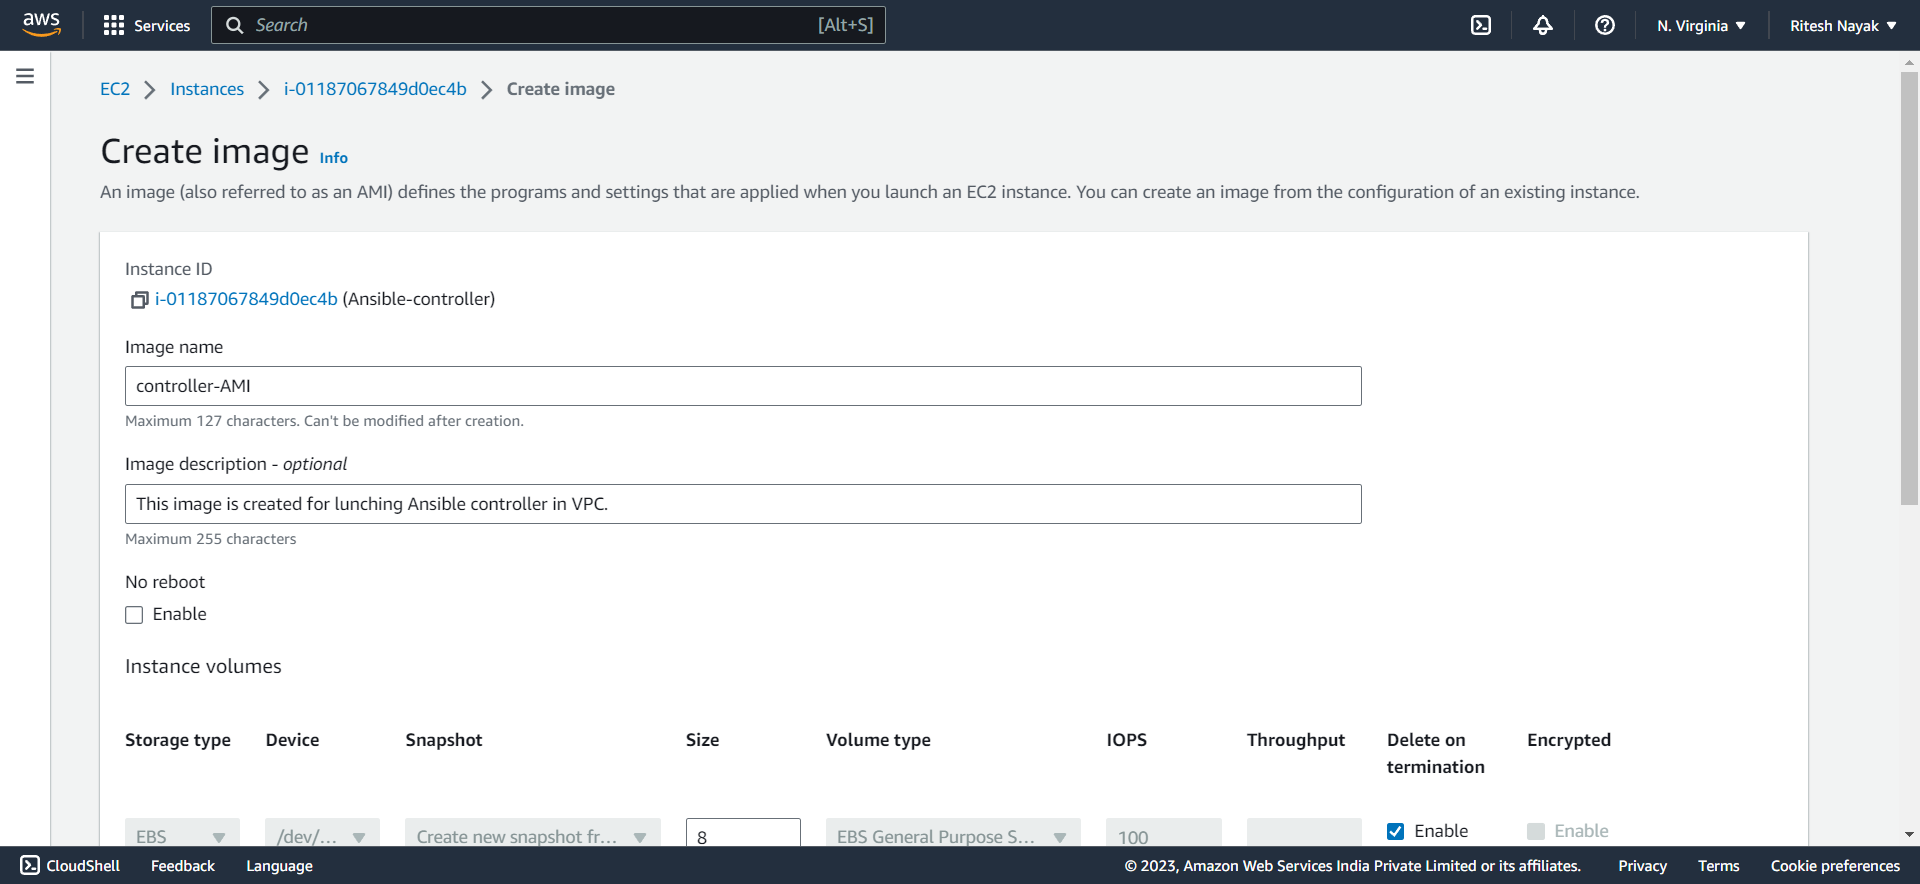

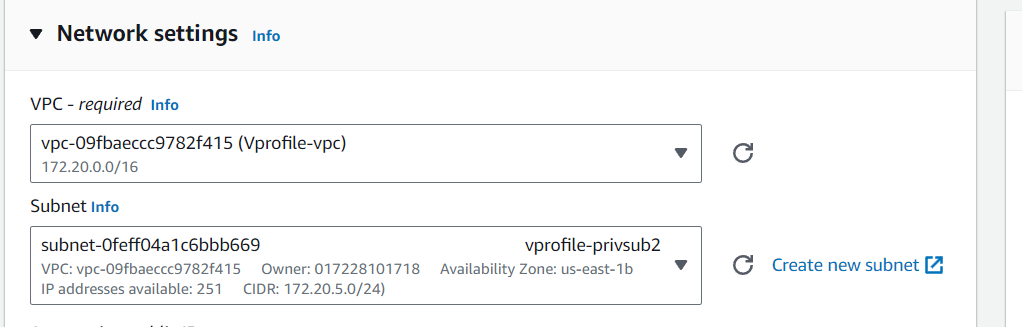
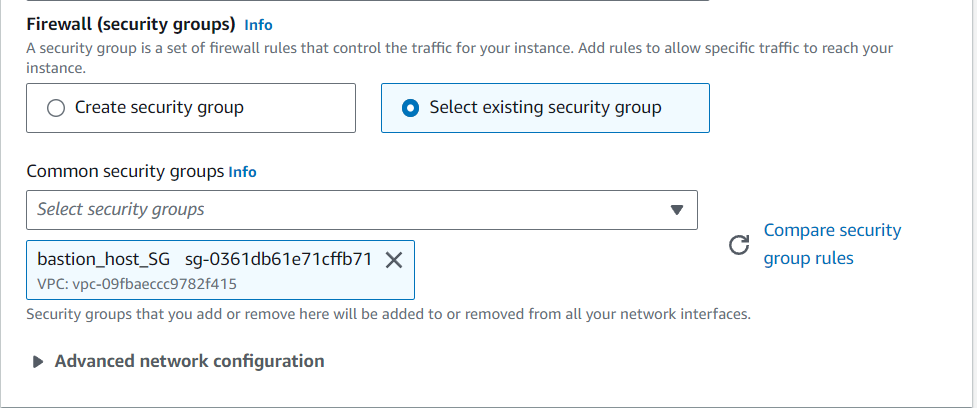
Launching Instances from the AMI
While launching the instance from the AMI, we make sure that this instance is hosted inside our project VPC instead of the default one as well as we can choose any available subnet:
Also, the security group has to be the same as the Bastion Host security group by which we can make SSH connections:
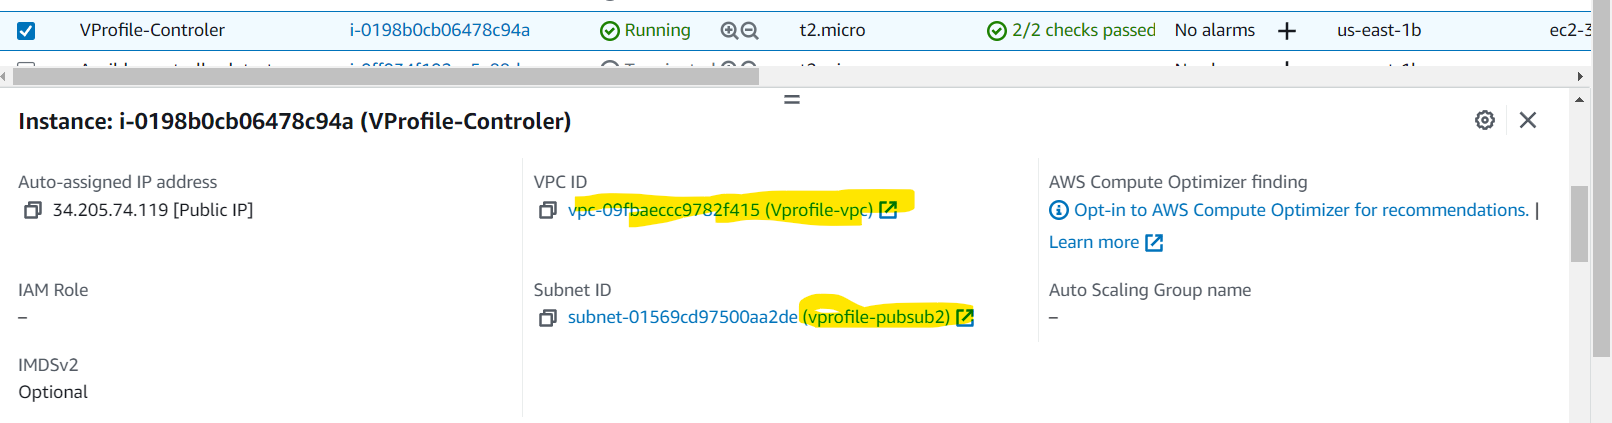
Now we can see that our instance is now launched in the same VPC as our other application stack instances
Preparing Ansible Config
[defaults]
inventory = inventory-vpro
host_key_checking = False
forks = 5
log_path = ./ansible.log
timeout = 15

[privilege_escalation]
become = yes
become_method = sudo
become_user = root
become_pass = False

[ssh_connection]
retries = 2
This file contains various settings and options that control how Ansible behaves when running playbooks and interacting with remote systems. Let's go through the sections and options you've specified:
[defaults]Section:inventory: Specifies the inventory file to be used. In your case, it's set toinventory-vpro.host_key_checking: This option is set toFalse, which disables host key checking. This can be useful when you want to avoid host key verification prompts.forks: Specifies the maximum number of parallel processes or threads that Ansible will use when executing tasks on multiple hosts. In your case, it's set to 5.log_path: Defines the path where Ansible logs will be saved. In your case, logs will be saved in a file namedansible.login the current directory.timeout: Sets the default timeout for the Ansible connections. In your case, it's set to 15 seconds.
[privilege_escalation]Section:This section configures privilege escalation settings for tasks that require elevated privileges (e.g., using
sudo).become: This option is set toyes, which means Ansible will use privilege escalation when executing tasks.become_method: Specifies the method to use for privilege escalation. In your case, it's set tosudo.become_user: Defines the user to which Ansible should escalate privileges. In your case, it's set toroot.become_pass: Specifies whether a password is required for privilege escalation. In your case, it's set toFalse, which means no password is provided.
[ssh_connection]Section:This section configures SSH connection-related settings.
retries: Specifies the number of times Ansible will retry establishing an SSH connection in case of failures. In your case, it's set to 2 retries.
The configuration file indicates that you've customized Ansible's behavior for your use case. It's worth noting that while some of these settings can be set globally in the configuration file, many of them can also be overridden at the command line when running Ansible commands.
Remember to adjust these settings according to your specific requirements and security considerations.
Playbooks for Setting up Services in EC2 Instances
As we have prepared the playbooks for EC2 instances now we'll install and configure all the respective services such as Nginx, MySQL, Memcached, RabbitMQ, etc in their respective servers.
build.yaml
- name: Generate artifact, copy artifacts and SQL file to files directory
  hosts: localhost
  connection: local
  become: yes
  tasks:
    - name: Install Jdk, maven and git in controller machine
      apt:
        name: "{{item}}"    #it will pick the name from the below loop and install one by one
        state: present
        update_cache: yes
      loop:
        - git
        - openjdk-8-jdk
        - maven

  # Cloning project to local machine
    - name: Clone application Source code from repository
      git:
        repo: 'https://github.com/devopshydclub/vprofile-project.git'
        dest: ./Vprofile-repo
        version: vp-rem
      register: git_status

# Installing Maven build tool and building the artifact
    - name: mvn install command to build artifact
      command: 'mvn install'                          # command module is used to run single commands
      args:
        chdir: Vprofile-repo
      when: git_status.changed
      register: mvn_info

    - name: Copy artifacts to files directory
      copy:
        src: "{{item}}"
        dest: files/ROOT.war
      with_fileglob: Vprofile-repo/target/*.war       # with_fileglob loop allows you to iterate over files in a directory that match a specified glob pattern and perform tasks on those files.


    - name: Copy SQL file to files directory
      copy:
        src: Vprofile-repo/src/main/resources/db_backup.sql
        dest: files/db_backup.sql
This playbook will install JDK and Maven on the controller machine, will clone the project code from the git repository, and build it. After build completion it will also copy the artifact to files directory for deployment.
db.yaml
---
- name: Setup MySQL with accounts db and remote login
  hosts: dbserver_group
  gather_facts: no
  tasks:
    - name: Installing mysql Service and dependancies
      package:
        name: "{{item}}"
        state: present
        update_cache: yes
        cache_valid_time: 86400

      loop:
        - mysql-server
        - mysql-client
        - python-mysqldb
        - python3-mysqldb
        - libmysqlclient-dev
      ignore_errors: yes
      tags:
        - packages

    - name: Start and enable mysql service
      service:
        name: mysql
        state: started
        enabled: yes
      tags:
        - svc

    - name: creating mysql user
      mysql_user:
        name: "{{dbuser}}"
        password: "{{dbpass}}"
        priv: '*.*:ALL'
        host: '%'
        state: present

    - name: Creating accounts DB
      mysql_db:
        name: "{{dbname}}"
        state: present

    - name: Enable remote login to mysql Service
      lineinfile:
        path: /etc/mysql/mysql.conf.d/mysqld.cnf
        regxp: '^bind-address'
        line: 'bind-address = 0.0.0.0'
        backup: yes
      notify:
        - restart mysql
      tags:
        - conf

  handlers:
    - name: Restart Mysql
      service:
        name: mysql
        state: restarted
This playbook will install MySQL service in the DB server, create the accounts database, and set up the user.
dbdeploy.yaml
---
- name: Deploy sql file on accounts db
  hosts: dbserver_group
  gather_facts: no
  tasks:
    - name: Copy SQL to dbserver
      copy:
        src: files/db_backup.sql
        dest: /tmp/db_backup.sql
      tags:
        - deploy

    - name: Restoring DB
      mysql_db:
        name: "{ {dbname} }"
        login_user: "{{dbuser}}"
        login_password: "{{dbpass}}"
        state: import                 # the copied sql file will be imported into the database and create the accounts db accordingly
        target: /tmp/db_backup.sql
      notify:
        - Restart mysql
      tags:
        - deploy
  handlers:
    - name: Restart Mysql
      service:
        name: mysql
        state: restarted
After running db.yaml playbook, the MySQL server is up and running however, there is no database created. To create the accounts db we need to deploy the sql file. This dbdeploy.yaml playbook will do the same and create the database.
tomcat.yaml
---
- name: Setup Tomcat8 & Deploy Artifact
  hosts: appserver_group
  #  gather_facts: no
  vars:
    timestamp: "{{ansible_date_time.date}}_{{ansible_date_time.hour}}_{{ansible_date_time.minute}}"
    tom_url: https://archive.apache.org/dist/tomcat/tomcat-8/v8.5.37/bin/apache-tomcat-8.5.37.tar.gz
  tasks:
    - name: Install JDK on Ubuntu 18/20
      apt:
        name: openjdk-8-jdk
        state: present
        update_cache: yes

    - name: Download Tomcat Tar Ball/Binaries
      get_url:
        url: "{{tom_url}}"
        dest: /tmp/tomcat-8.tar.gz

    - name: Add tomcat group
      group:
        name: tomcat
        state: present

    - name: Add tomcat user
      user:
        name: tomcat
        group: tomcat
        shell: /bin/nologin
        home: /usr/local/tomcat8

    - file:
        path: /tmp/tomcat8
        state: directory

    - name: Extract tomcat
      unarchive:
        src: /tmp/tomcat-8.tar.gz
        dest: /tmp/tomcat8/
        remote_src: yes
        list_files: yes
      register: unarchive_info

    - debug:
        msg: "{{unarchive_info.files[0].split('/')[0]}}"

    - name: Synchronize /tmp/tomcat8/tomcat_cont /usr/local/tomcat8.
      synchronize:
        src: "/tmp/tomcat8/{{unarchive_info.files[0].split('/')[0]}}/"
        dest: /usr/local/tomcat8/
      delegate_to: "{{ inventory_hostname }}"

    - name: Change ownership of /usr/local/tomcat8
      file:
        path: /usr/local/tomcat8
        owner: tomcat
        group: tomcat
        recurse: yes

    - name: Setup tomcat SVC file on ubuntu 16 and 18
      template:
        src: templates/tomcat8-ubuntu-svcfile.j2
        dest: /etc/systemd/system/tomcat8.service
        mode: "a+x"

    - name: just force systemd to reread configs (2.4 and above)
      systemd:
        daemon_reload: yes

    - name: Start & Enable tomcat SVC
      service:
        name: tomcat8
        state: started
        enabled: yes
      tags:
        - svc

    - stat:
        path: /usr/local/tomcat8/webapps/ROOT
      register: artifact_stat
      tags:
        - deploy

    - name: Stop tomcat8 svc
      service:
        name: tomcat8
        state: stopped
      tags:
        - deploy

    - name: Try Backup and Deploy
      block:
        - name: Archive ROOT dir with timestamp
          archive:
            path: /usr/local/tomcat8/webapps/ROOT
            dest: "/opt/ROOT_{{timestamp}}.tgz"
          when: artifact_stat.stat.exists
          register: archive_info
          tags:
            - deploy

        - name: copy ROOT dir with old_ROOT name
          shell: cp -r ROOT old_ROOT
          args:
            chdir: /usr/local/tomcat8/webapps/

        - name: Delete current artifact
          file:
            path: "{{item}}"
            state: absent
          when: archive_info.changed
          loop:
            - /usr/local/tomcat8/webapps/ROOT
            - /usr/local/tomcat8/webapps/ROOT.war
          tags:
            - deploy

        - name: Try deploy artifact else restore from previos old_ROOT
          block:
            - name: Deploy vprofile artifact
              copy:
                src: files/ROOT.war
                dest: /usr/local/tomcat8/webapps/ROOT.war
              register: deploy_info
              tags:
                - deploy
          rescue:
            - shell: cp -r old_ROOT ROOT
              args:
                chdir: /usr/local/tomcat8/webapps/

      rescue:
        - name: Start tomcat8 svc
          service:
            name: tomcat8
            state: started

    - name: Start tomcat8 svc
      service:
        name: tomcat8
        state: started
      when: deploy_info.changed
      tags:
        - deploy

    - name: Wait until ROOT.war is extracted to ROOT directory
      wait_for:
        path: /usr/local/tomcat8/webapps/ROOT
      tags:
        - deploy

    - name: Deploy web configuration file
      template:
        src: templates/application.j2
        dest: /usr/local/tomcat8/webapps/ROOT/WEB-INF/classes/application.properties
        force: yes
      notify:
        - Restart Tomcat
      tags:
        - deploy

  handlers:
    - name: Restart Tomcat
      service:
        name: tomcat8
        state: restarted
Nginx.yam
---
- name: Setup Nginx svc
  hosts: webserver_group
  gather_facts: no
  tasks:
    - name: Install nginx
      apt:
        name: nginx
        state: present
        update_cache: yes
        cache_valid_time: 86400
      tags:
        - package

    - name: Start & ENable Nginx
      service:
        name: nginx
        state: started
        enabled: yes
      tags:
        - svc


    - name: Disable Nginx default website
      file:
        path: /etc/nginx/sites-enabled/default
        state: absent
      tags:
        - conf


    - name: Deploy web config file
      template:
        src: templates/nginxvpro.j2
        dest: /etc/nginx/sites-available/vproapp
      tags:
        - conf


    - name: Enable vproapp website
      file:
        src: /etc/nginx/sites-available/vproapp
        dest: /etc/nginx/sites-enabled/vproapp
        state: link
      notify:
        - Restart Nginx
      tags:
        - conf

  handlers:
    - name: Restart Nginx
      service:
        name: nginx
        state: restarted
This one will install and setup the Nginx server. Remove the default application and replace it with our application.
site.yaml for Entire Stack
This site.yaml file will call all the playbooks and execute them one by one to establish and deploy the complete application:
---
- name: Setup Instances Vpro stack
  import_playbook: vpro-ec2-stack.yaml

- name: Build Artifact ROOT.war & SQL file to be copied in files/ directory
  import_playbook: build.yaml

- name: Set hosts to Ip Mapping in /etc/hosts file in all servers
  import_playbook: set_host_ip_map.yaml

- name: setup db server
  import_playbook: db.yaml

- name: Deploy sql file in db server
  import_playbook: dbdeploy.yaml

- name: setup Memcached service
  import_playbook: memcache.yaml

- name: Setup rabbitmq service
  import_playbook: rabbitmq.yaml

- name: Setup Tomcat Application Server
  import_playbook: appserver.yaml

- name: Setup nginx webserver
  import_playbook: web.yaml