A multi-tier Web Application Deployment
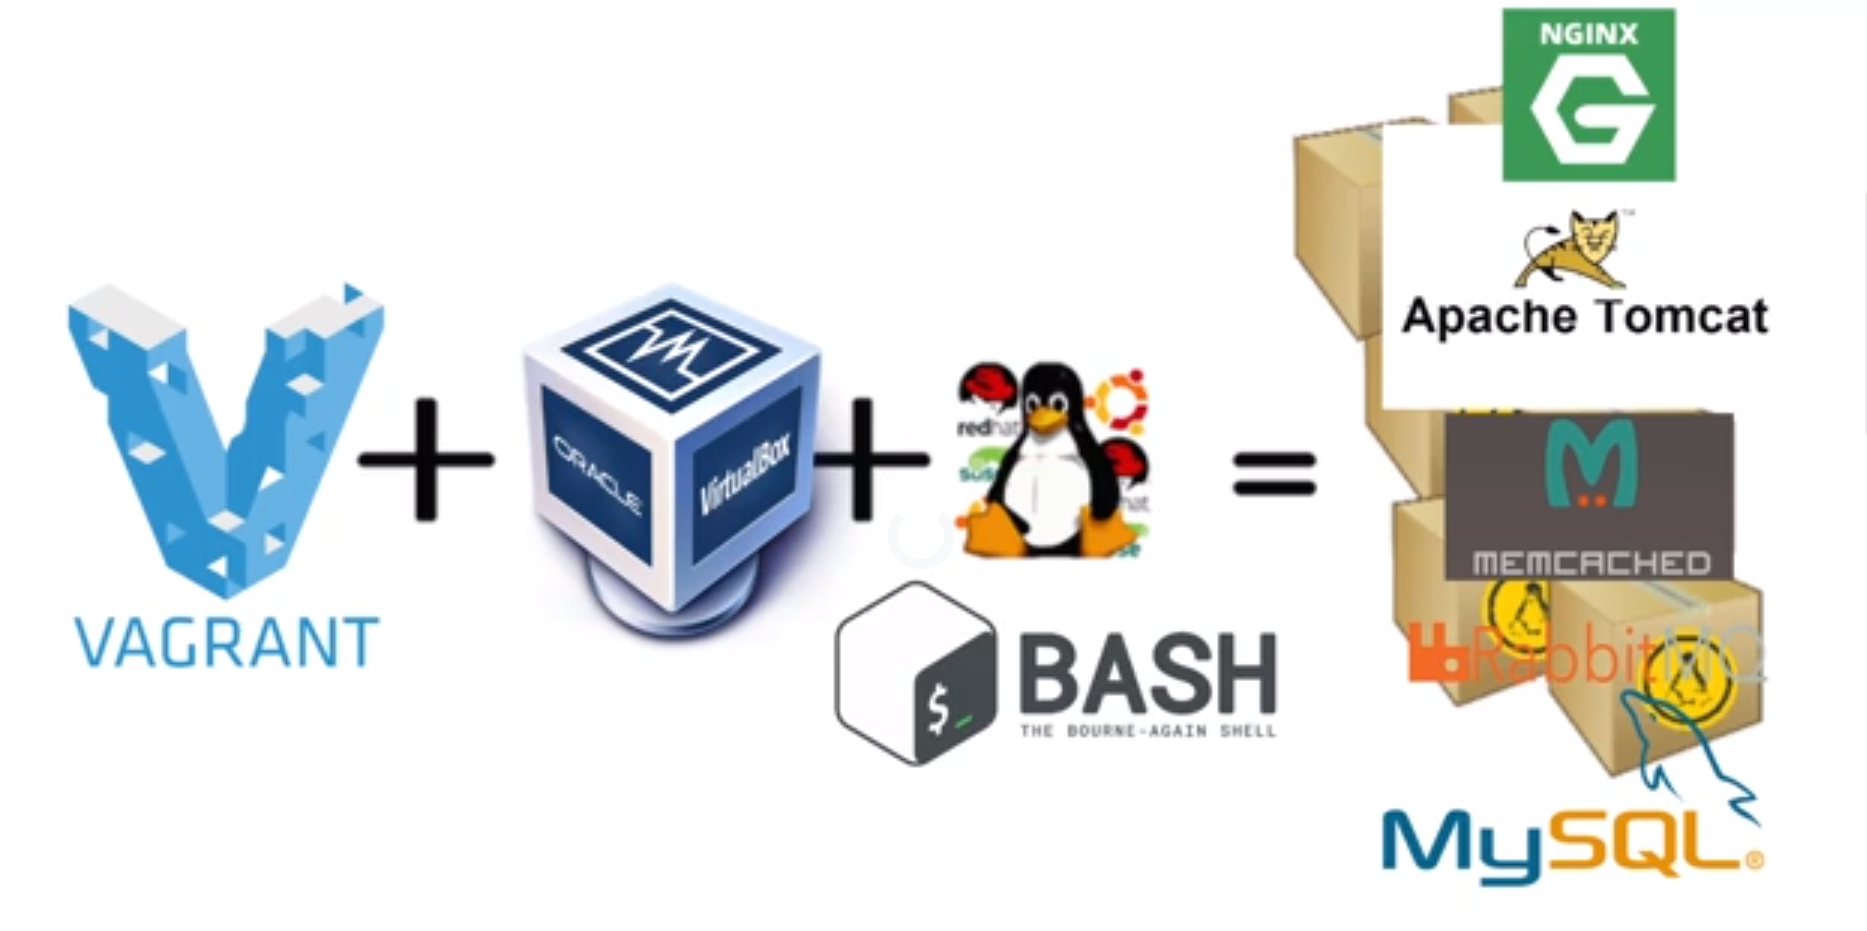
Setting up the entire stack locally using multiple VMs for each services Vagrant|VBox|Tomcat|Nginx|RabbitMQ|MySQL|Memcached|Maven
Passionate about helping organizations build scalable infrastructure and DevOps solutions with cloud technologies. Experienced in designing robust systems, automating processes, and driving efficiency through innovative cloud solutions. Advocate for best practices in DevOps and cloud computing, committed to enabling teams to achieve their full potential.
Project Overview
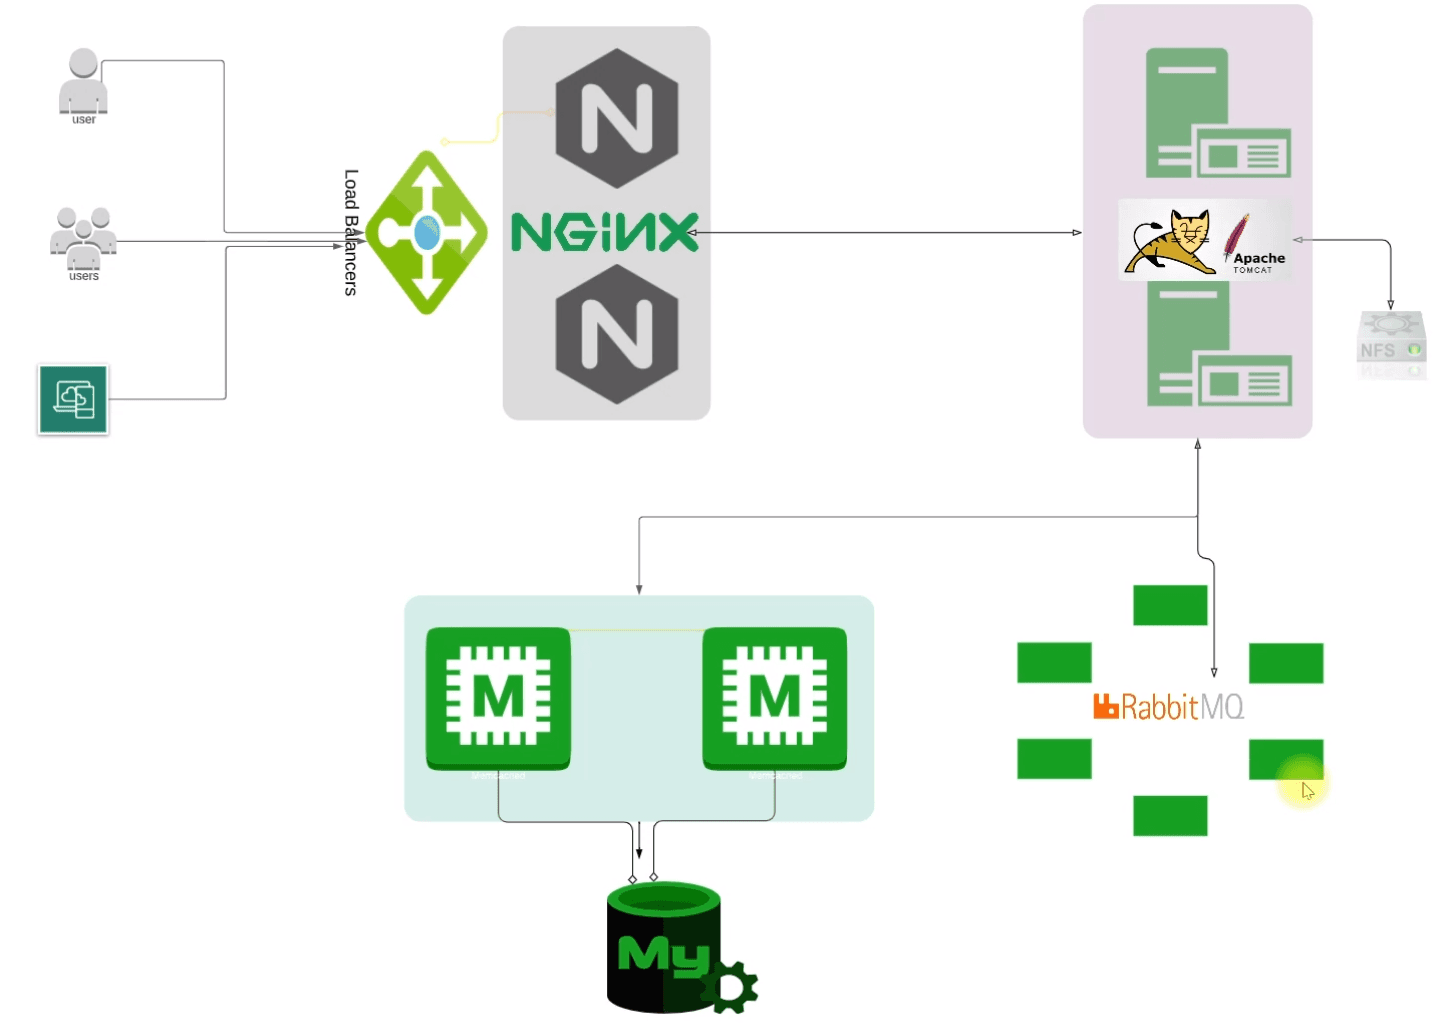
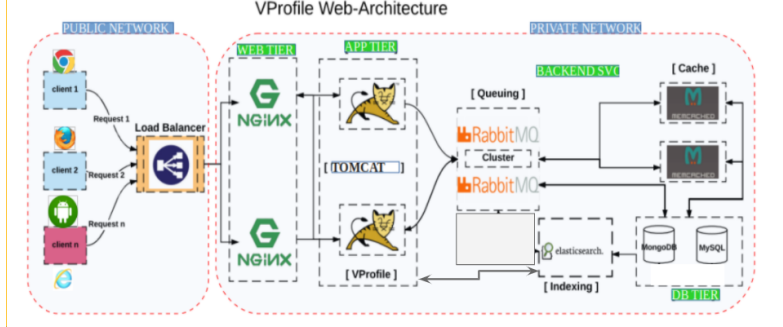
In this project, we'll be hosting a web application which is a social site developed by developers, and the application is based on Java.
The user can access the application using an IP address from his/her browser(as we are setting up the project locally for now).
The Load Balancer will provide this IP as shown below in the image.
We'll be using Nginx as the reverse proxy to create the Load balancing experience. As soon as the request comes from the users, Nginx will route the request to Apache Tomcat Service.
Apache Tomcat is a Java Web Application service. When the application is written in Java, it will be hosted on Apache Tomcat.
RabbitMQ is connected to Tomcat which is a Message Broker or Queueing Agent. To connect 2 applications, you can stream the data from this.
Memcached is a Database cashing service, it will be connected to the MySQL server. When the user logs in for the first time, it will be stored in MySQL DB and cached in Memcached so, the next time when the same user sends a request, it will be retrieved from the Memcached service.
Prerequisites
Tools Required
Hypervisor: Oracle VM Virtual Box
Automation: Vagrant
CLI: Git Bash
IDE: VS Code/Sublime Text/Notepad++
Services to be Implemented
Nginx
Tomcat
RabitMQ
Memcached
MySql
Flow of Execution
Setting up the tools explained in the Prerequisite section
Clone the Source code from the Version control system(Git)
cd into the Vagrant Directory and bring up the VMs
Setup all the services such as:
MySQL
Memcached
RabbitMQ
Tomcat
Nginx
App build and Deploy
Accessing the application from the browser
Setting up the VMs
Previously we have been using AWS EC2 instances in all our projects. However, here I have tried a new approach. In this project, we'll be firing up the VMs in our Local system for each service listed above.
Here we'll be using Oracle Virtual Box to lunch VMs with Vagrant to automate the lunch of these VMs.
Writing a Vagrant File
A vagrant file is nothing but a piece of configuration that will automate the lunch of multiple VMs locally through Oracle Virtual Box which is written in Ruby.
NB: Before writing and proceeding with VM setup we have to install the Hostmanager plugin by $ vagrant plugin install vagrant-hostmanager command.

Vagrant.configure("2") do |config|
  config.hostmanager.enabled = true
  config.hostmanager.manage_host = true

### Nginx VM ###
  config.vm.define "web01" do |web01|
    web01.vm.box = "ubuntu/bionic64"
    web01.vm.hostname = "web01"
    web01.vm.network "private_network", ip: "192.168.56.11"
  end

### tomcat vm ###
   config.vm.define "app01" do |app01|
    app01.vm.box = "geerlingguy/centos7"
    app01.vm.hostname = "app01"
    app01.vm.network "private_network", ip: "192.168.56.12"
    app01.vm.provider "virtualbox" do |vb|
     vb.memory = "1024"
     end
   end

### RabbitMQ vm  ####
  config.vm.define "rmq01" do |rmq01|
    rmq01.vm.box = "geerlingguy/centos7"
    rmq01.vm.hostname = "rmq01"
    rmq01.vm.network "private_network", ip: "192.168.56.16"
  end

### Memcache vm  ####
  config.vm.define "mc01" do |mc01|
    mc01.vm.box = "geerlingguy/centos7"
    mc01.vm.hostname = "mc01"
    mc01.vm.network "private_network", ip: "192.168.56.14"
  end

### DB vm  ####
  config.vm.define "db01" do |db01|
    db01.vm.box = "geerlingguy/centos7"
    db01.vm.hostname = "db01"
    db01.vm.network "private_network", ip: "192.168.56.15"
  end
end
In the above code, we have configured 5 VMs for each service such as Nginx, Tomcat, RabbitMQ, Memcache, and MySQL DB respectively.
Code Explanation
The
Vagrant.configure("2") do |config|block initializes the Vagrant configuration.config.hostmanager.enabled = trueenables the Vagrant Hostmanager plugin, which manages the hosts file on the host machine.config.hostmanager.manage_host = trueallows Vagrant to manage the host entries for the VMs.The
web01VM definition starts withconfig.vm.define "web01" do |web01|. This VM is using the "ubuntu/bionic64" box, has the hostname "web01," and is assigned the IP address "192.168.56.11" on a private network.The
app01VM definition starts withconfig.vm.define "app01" do |app01|. This VM is using the "geerlingguy/centos7" box, has the hostname "app01," and is assigned the IP address "192.168.56.12" on a private network. It also sets the memory allocation for the VM to 1024 MB using the VirtualBox provider.The
rmq01VM definition starts withconfig.vm.define "rmq01" do |rmq01|. This VM is using the "geerlingguy/centos7" box, has the hostname "rmq01," and is assigned the IP address "192.168.56.16" on a private network.The
mc01VM definition starts withconfig.vm.define "mc01" do |mc01|. This VM is using the "geerlingguy/centos7" box, has the hostname "mc01," and is assigned the IP address "192.168.56.14" on a private network.The
db01VM definition starts withconfig.vm.define "db01" do |db01|. This VM is using the "geerlingguy/centos7" box, has the hostname "db01," and is assigned the IP address "192.168.56.15" on a private network.
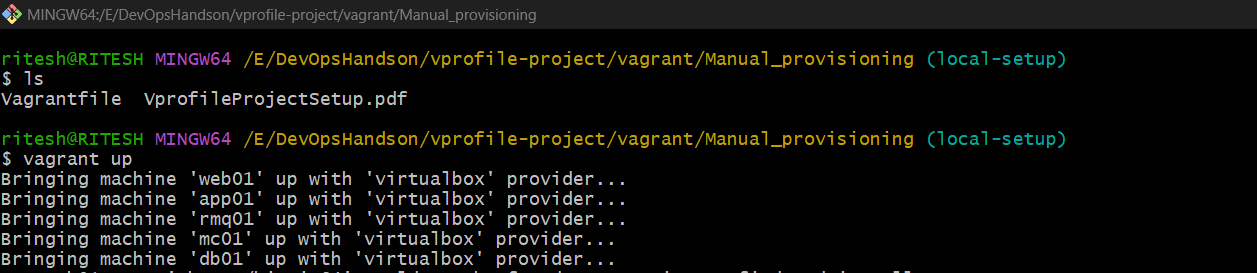
VMs up & Running(vagrant up )
Now after preparing the Vagrant file, we'll start the VMs using vagrant up command in the same directory where the Vagrant file is present.
Currently, on my Virtual Box, there are no VMs available:
Once we do vagrant up , it will start firing up VMs as below:
Once the entire setup is completed, we can see all the VMs listed in VBox

Validating the Connection among Servers
It is necessary to validate these servers because the Nginx server == will connect to ==> Tomcat.
Tomcat == to ==> Db and all other services accordingly.
We can validate by doing SSH to each server and making a simple ping to each service.
NB: Until now these are just empty servers(VMs), going forward we will set up all the services in their respective VMs.
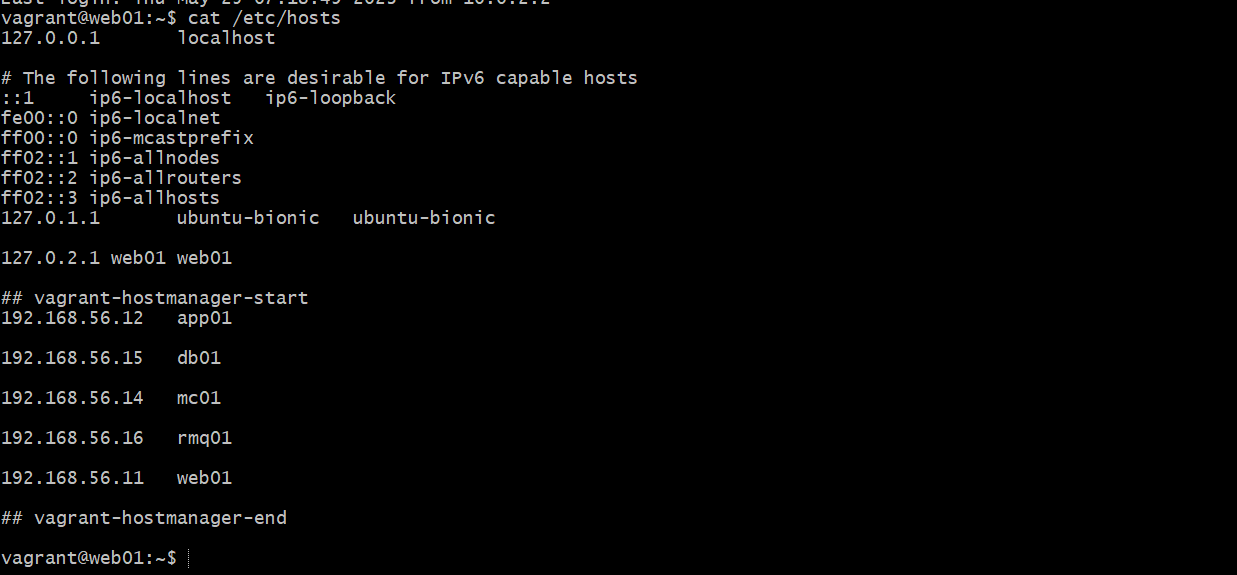
1) web01(For Nginx service)
vagrant ssh web01 will allow us to ssh into the Nginx VM
$ cat /etc/hosts will show the hosts below where all the services are listed that it will interact with:
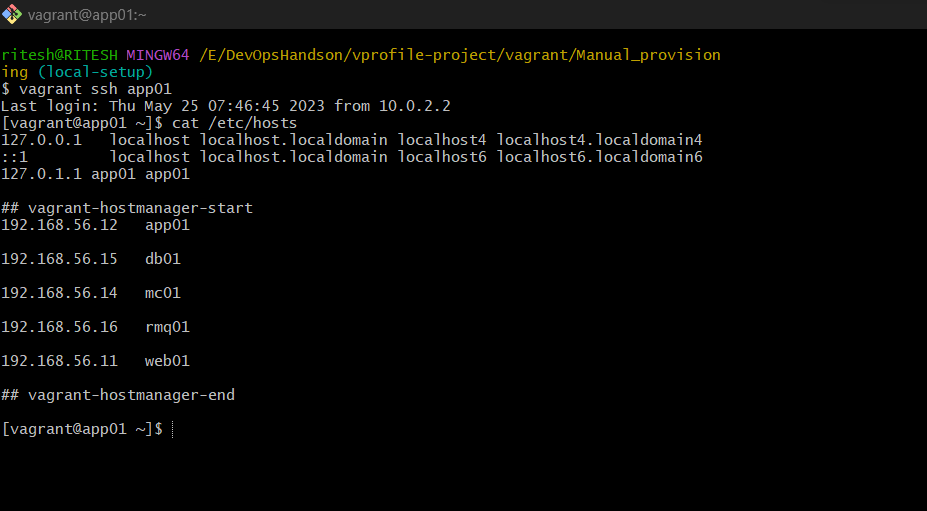
2) app01(For Tomcat service)
Setting up Services
1) Setup MySQL(Database SVC)
Updating the Server:
vagrant ssh db01will allow us to ssh into the DB server.sudo -iget the root privilegeyum update -yto update the server

Setting up the password for DB:
vi /etc/profile: This file typically contains system-wide environment variables and startup configurations for all users.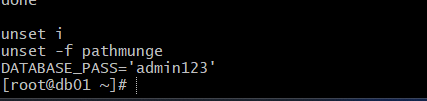
source /etc/profile: using this command you persist the password as an environment variable.Installing EPL repository:
yum install epel-release -y: The term "epl-release" typically refers to the "Extra Packages for Enterprise Linux (EPEL) release." EPEL is a repository project that provides additional software packages for Red Hat Enterprise Linux (RHEL), CentOS, and other compatible Linux distributions.Installing Maria DB and Git:
yum install git mariadb-server -y: This will install maria db server and git as well.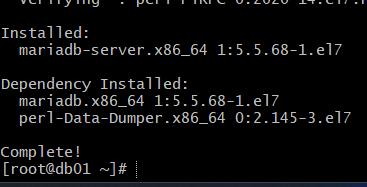

Starting up and enabling maria DB:
systemctl start mariadb: this command will start the DBsystemctl enable mariadb: it will enable the db service to up and run automatically when system reboots.
systemctl status mariadb: this will check the status of the DB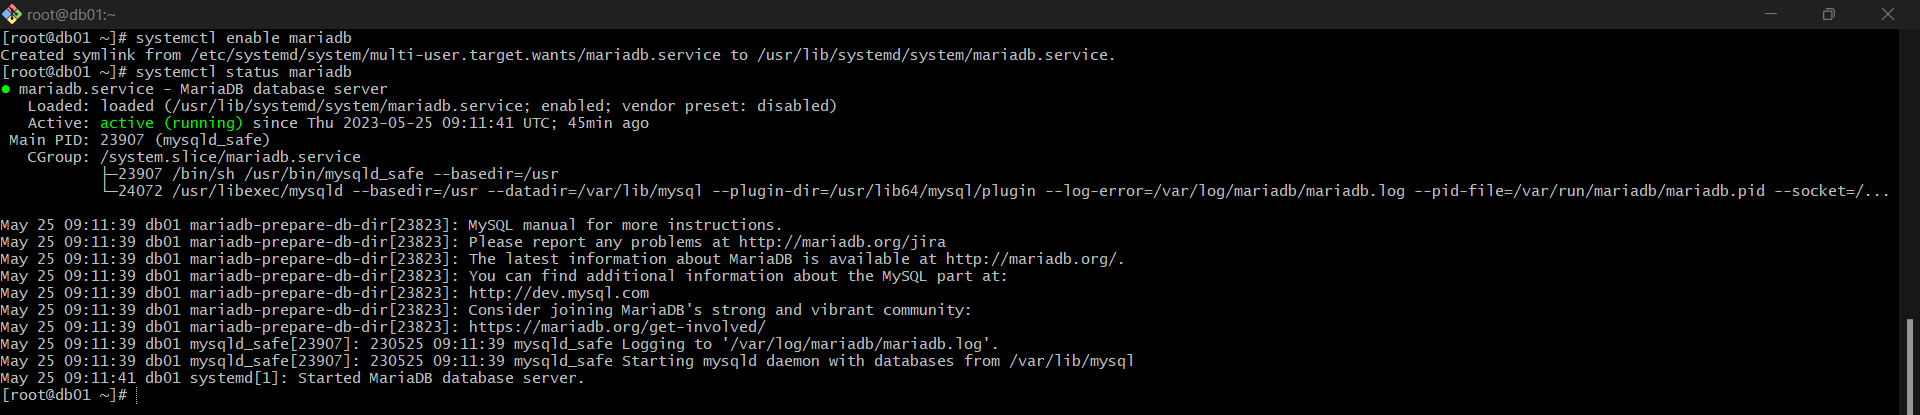
Setting up Root Password for Maria DB:
mysql_secure_installation: is a shell script that enables you to improve the security of your MySQL installation.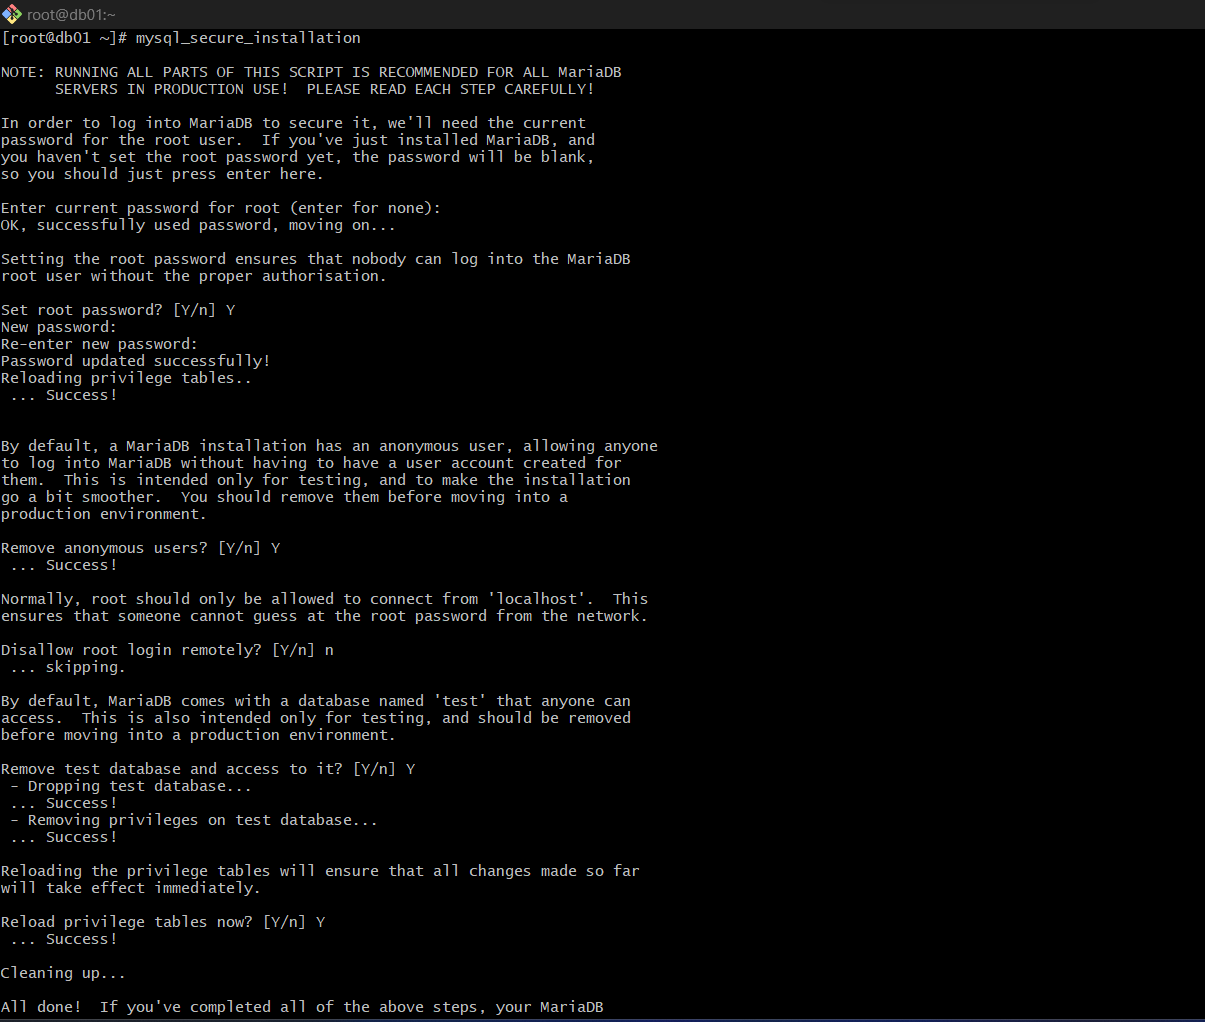
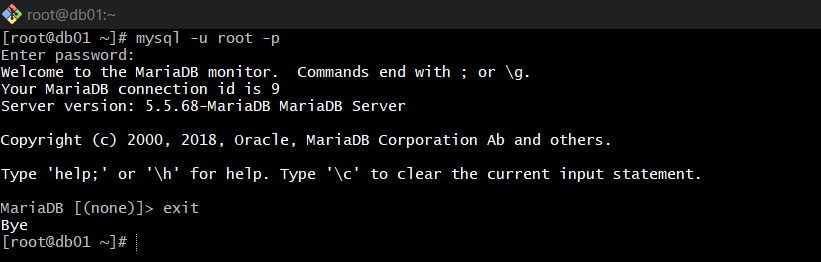
Logging in to SQL DB:
mysql -u root -p : using this command followed by the password we can login to the DB.
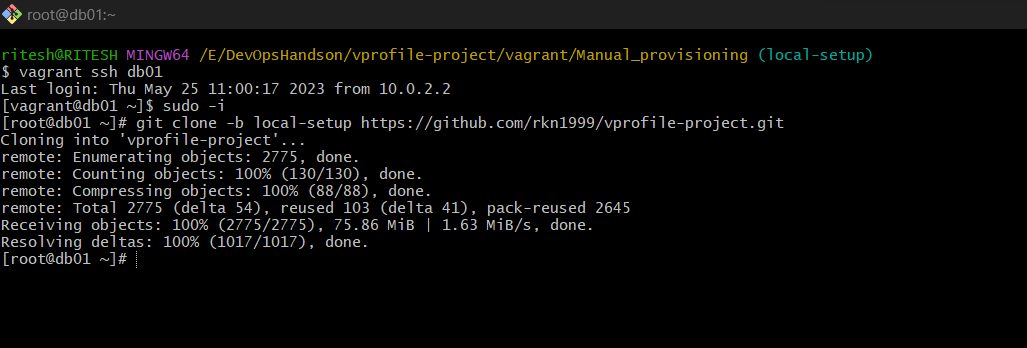
Cloning the Project Source code
We'll be cloning the VProfile project code to the DB server to run the SQL queries written in the project to make the DB ready to work with other services. To do so we have to clone the project to the DB server by:
git clone -b local-setup https://github.com/rkn1999/vprofile-project.git : this will clone the entire project to the server.
Once we cloned the project, we can see that we have a file named db_backup.sql which will help us to initialize the database.

Before that we have to create a database.
Creating a database in DB server
mysql -u root -p"$DATABASE_PASS" -e "create database accounts" : this will create a database named accounts.
mysql -u root -p"$DATABASE_PASS" -e "grant all privileges on accounts.* To 'admin'@'app01' identified by 'admin123' " : this will add a user in MySQL named admin. admin user from the database can be accessed from app01 server and it'll have full privileges on accounts database.
Running the db_backup.sql
mysql -u root -p"$DATABASE_PASS" accounts < src/main/resources/db_backup.sql
The above command will get into accounts database and run the db_backup.sql
mysql -u root -p"$DATABASE_PASS" -e "FLUSH PRIVILEGES"
The above command executes a SQL statement that reloads the grant tables in the MySQL server, making any changes to user accounts or privileges effective immediately.
Database setup completed
Now, after flushing the PRIVILEGES a database named accounts has been created in the MySQL
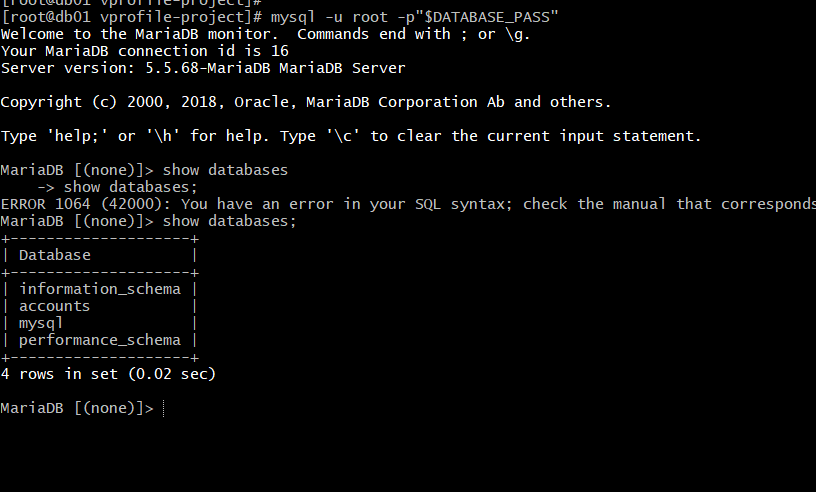
This is all done by the db_backup.sql query.
2) Setup Memcache(DB Caching SVC)
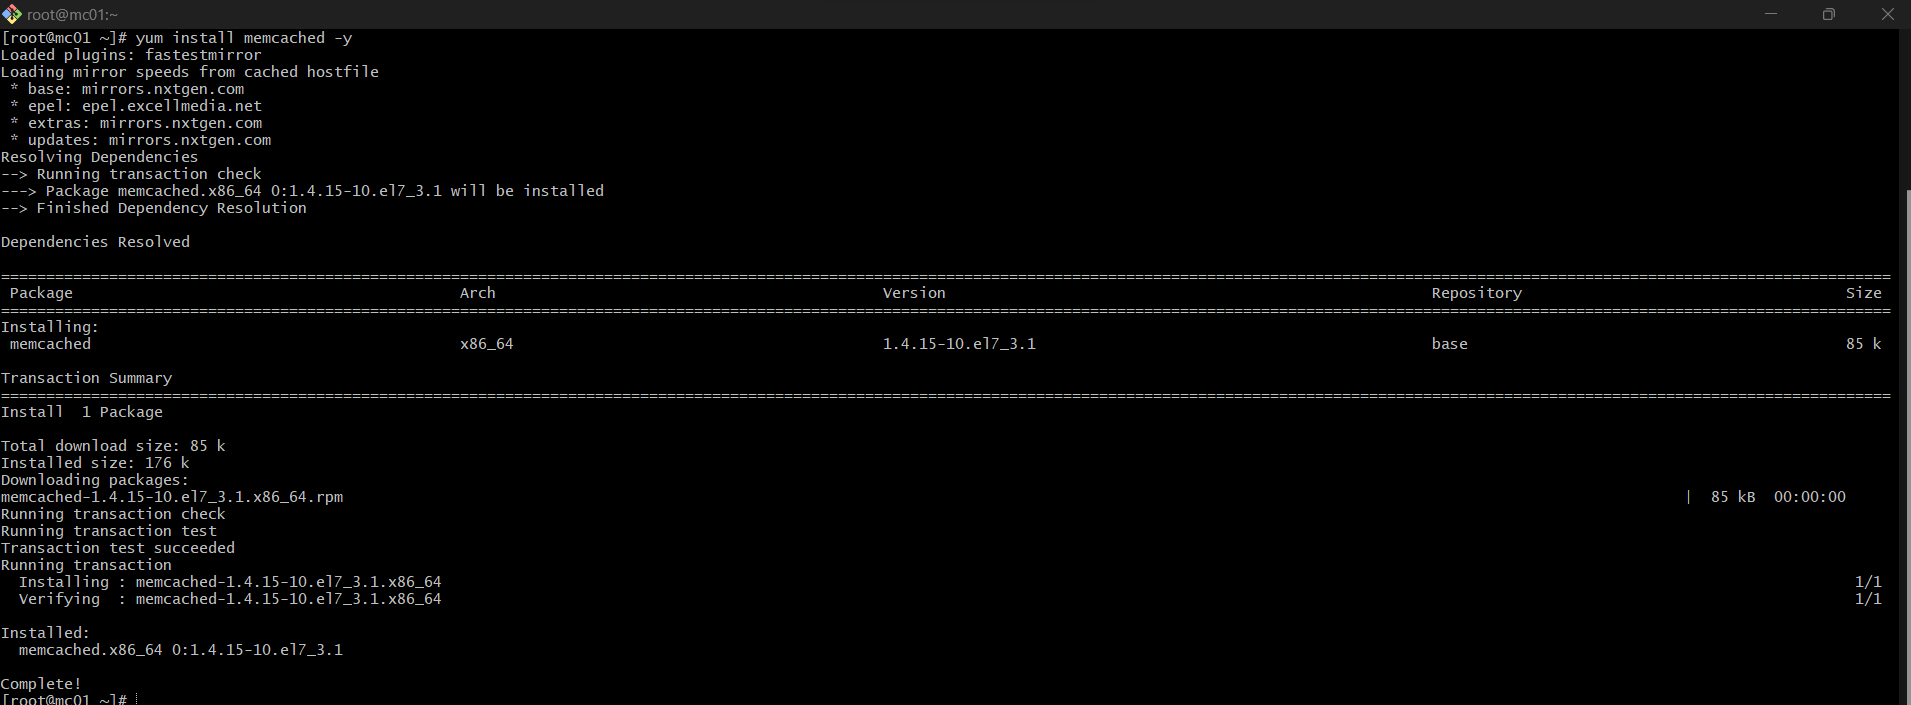
vagrant ssh mc01 will allow us to ssh into the Memcache server.
sudo -i get the root privilege
yum update -y to update the server
yum install Memcached -y : this will install the memcache service
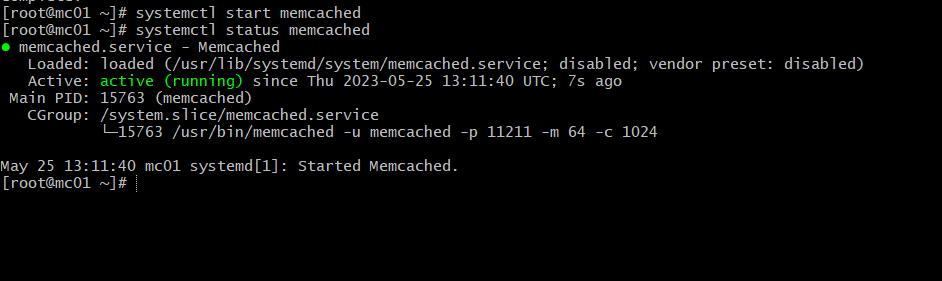
systemctl enable memcached : this will enable the memcache service so that, it will automatically up and run on system reboot.
systemctl start memcached : it will start the memcache service
memcached -p 11211 -u 11111 -u memcached -d : This is the command to start the Memcached service.
-p 11211: This option specifies the port on which Memcached will listen. In this case, it is set to port 11211.-u 11111: This option sets the user ID under which Memcached will run. In this case, it is set to user ID 11111.-u memcached: This option specifies an additional user ID. It seems like you have specified the-uoption twice, once with a numeric user ID (11111) and once with a username (memcached).-d: This option tells Memcached to run in the background as a daemon.
We can also validate whether it's listening to the above said port by ss -tunlp | grep 11211:

Memcache setup is completed !
3) Setup RabbitMQ(Broker/Queue SVC)
vagrant ssh rmq01 will allow us to ssh into the RabbitMQ server.
sudo -i get the root privilege
yum update -y to update the server
yum install Memcached -y : this will install the memcache service
Installing dependencies for RabbitMQ
yum install wget -y
cd /tmp/ : move to tmp directory
wget http://packages.erlang-solutions.com/erlang-solutions-2.0-1.noarch.rpm : download this RPM

sudo rpm -Uvh erlang-solutions-2.0-1.noarch.rpm : installing the downloaded RPM

sudo yum -y install erlang socat : installing erlang and after completing this the dependencies installation has been completed.
Installing RabbitMQ Server
curl -s https://packagecloud.io/install/repositories/rabbitmq/rabbitmq-server/script.rpm.sh | sudo bash : Downloading RabbitMQ with a bash script which will setup the RabbitMQ repository.

sudo yum install rabbitmq-server -y : Now this will install the RabbitMQ server
Starting the Service
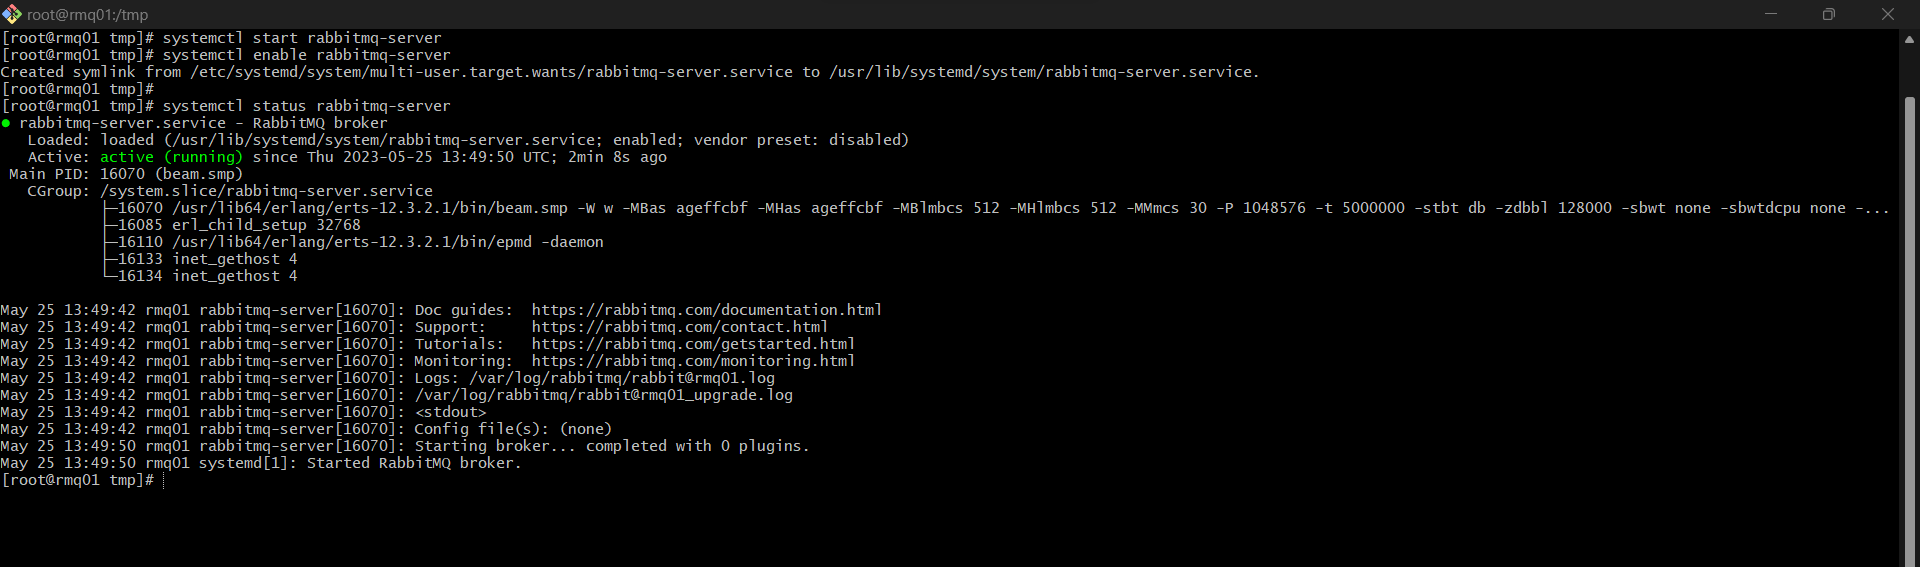
systemctl start rabbitmq-server : this will start the service
systemctl enable rabbitmq-server : this will enable the server
Config Changed in RabbitMQ
sudo sh -c 'echo "[{rabbit, [{loopback_users, []}]}]." > /etc/rabbitmq/rabbitmq.config' : this will pass the output of loobback_users into rabbitmq.config file.
sudo rabbitmqctl add_user test test : it will add a user test with password test

sudo rabbitmqctl set_user_tags test administrator : this will give administrator prevelege to the user test.

Restarting RabbitMQ server
systemctl restart rabbitmq-server : this will restart the server and persist the config changes.
4) Tomcat Setup(Application SVC)
Tomcat is the service where our application will be hosted.
vagrant ssh app01 will allow us to ssh into the Tomcat VM where it will be installed.
sudo -i get the root privilege
yum update -y to update the server
Tomcat Dependancies
yum install java-1.8.0-openjdk -y : Tomcat requires open JDK 1.8.0 to be installed.
yum install git maven wget -y : we also need git, maven and wget to be installed as part of dependencies for our project.
Tomcat Installation
cd /tmp/ : move to tmp directory
Download Tomcat package :
wget https://archive.apache.org/dist/tomcat/tomcat-8/v8.5.37/bin/apache-tomcat-8.5.37.tar.gz

Extracting the package:
tar xzvf apache-tomcat-8.5.37.tar.gz
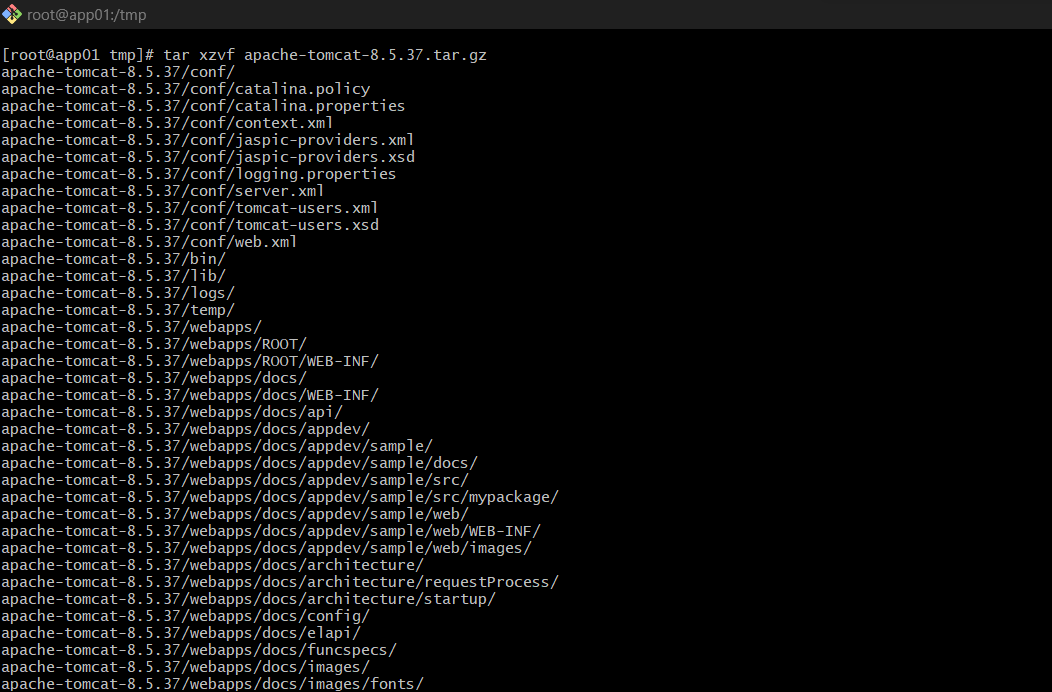
After extracting we can see the tomcat directory:

Adding Tomcat user
useradd --home-dir /usr/local/tomcat8 --shell /sbin/nologin tomcat
Copying data to Tomcat home directory
cp -r /tmp/apache-tomcat-8.5.37/* /usr/local/tomcat8/

Making Tomcat user the owner of tomcat home dir
chown -R tomcat.tomcat /usr/local/tomcat8
Setting up Systemd for Tomcat
By setting up the systemd we can start and stop the Tomcat Service just by the command start tomcat and stop tomcat and to do so, we have to create a file as tomcat.service at the below given path with vi:
vi /etc/systemd/system/tomcat.service : it will create a file and the below snippet will be the content of the file to support the Tomcat service.
[Unit] Description=Tomcat After=network.target [Service] User=tomcat WorkingDirectory=/usr/local/tomcat8 Environment=JRE_HOME=/usr/lib/jvm/jre Environment=JAVA_HOME=/usr/lib/jvm/jre Environment=CATALINA_HOME=/usr/local/tomcat8 Environment=CATALINE_BASE=/usr/local/tomcat8 ExecStart=/usr/local/tomcat8/bin/catalina.sh run ExecStop=/usr/local/tomcat8/bin/shutdown.sh SyslogIdentifier=tomcat-%i [Install] WantedBy=multi-user.target
systemctl daemon-reload: Once you make changes to the Tomcat service file we have to reload it.
Starting and Enabling Tomcat Service
systemctl enable tomcat
systemctl start tomcat
systemctl status tomcat
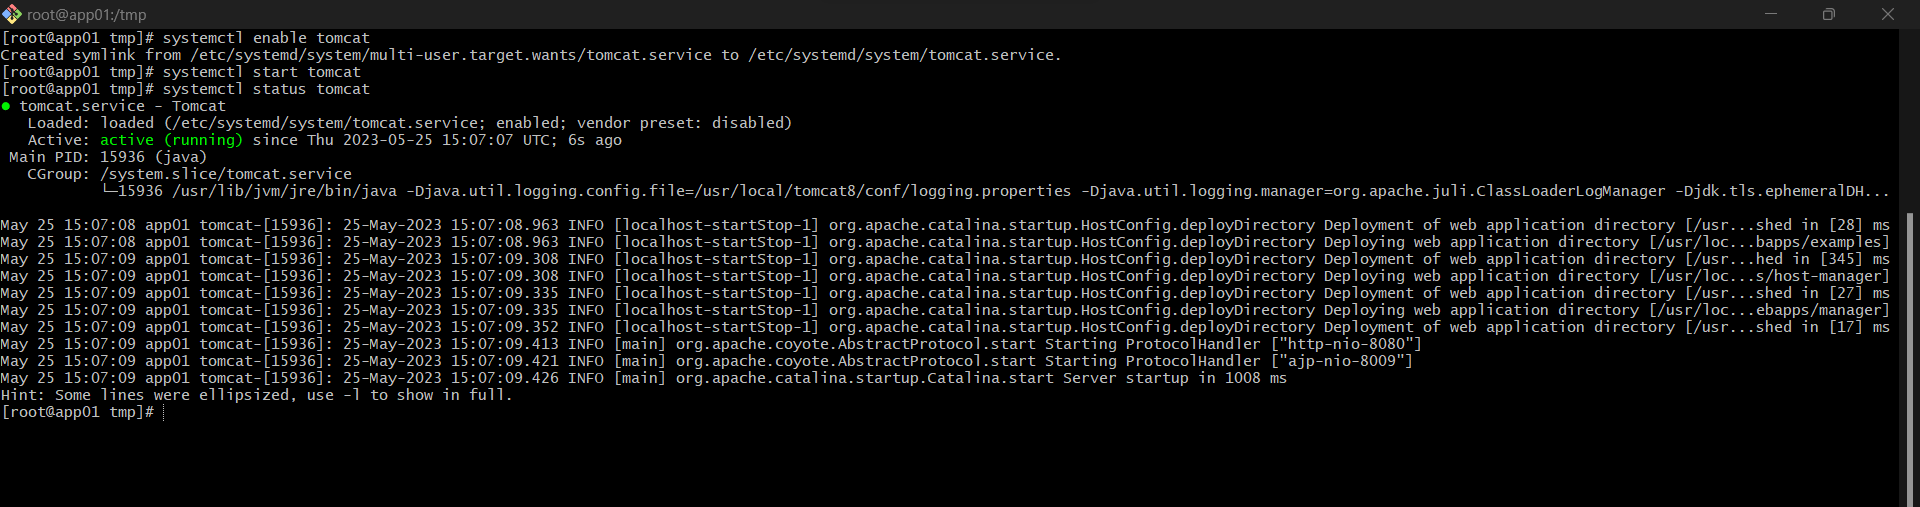
With this, service setup is DONE !!!
Code Build & Deploy Artifacts
Cloning the Source Code
git clone -b local-setup https://github.com/rkn1999/vprofile-project.git : this will clone the project to /tmp directory and from here we'll be build the project and generate the artifact.

Updating Configuration File
However, before generating the artifact, we have to update the configuration file which will help to connect to all the backend services.
The configuration file is present in src/main/resources/application.properties which has the content as below:
#JDBC Configutation for Database Connection
jdbc.driverClassName=com.mysql.jdbc.Driver
jdbc.url=jdbc:mysql://db01:3306/accounts?useUnicode=true&characterEncoding=UTF-8&zeroDateTimeBehavior=convertToNull
jdbc.username=admin
jdbc.password=admin123

#Memcached Configuration For Active and StandBy Host
#For Active Host
memcached.active.host=mc01
memcached.active.port=11211
#For StandBy Host
memcached.standBy.host=127.0.0.2
memcached.standBy.port=11211

#RabbitMq Configuration
rabbitmq.address=rmq01
rabbitmq.port=5672
rabbitmq.username=test
rabbitmq.password=test

#Elasticesearch Configuration
elasticsearch.host =192.168.1.85
elasticsearch.port =9300
elasticsearch.cluster=vprofile
elasticsearch.node=vprofilenode
Here, all our configuration is correct according to our service such as DB name, user, passwords etc.. if there is any changes we have to make it in here accordingly.
Once this configuration is done we can build the artifact.
Building the Artifact using Maven build
mvm install : command will start downloading the dependencies and build the project artifact. And below you can see the packaging has been successful.
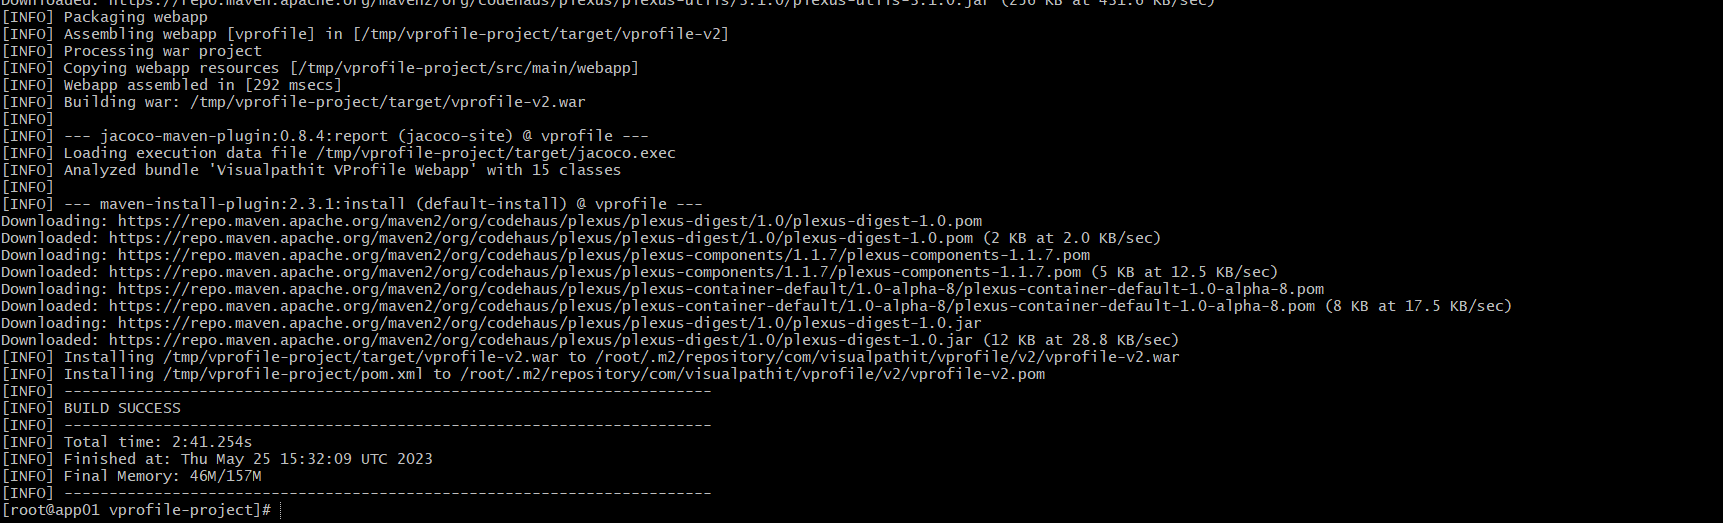
After build success we can see that vprofile-v2.war file has been created in the target folder.

This .war file is the packaged version or working software which we're going to deploy in Tomcat Server.
Deploying the Artifact to Tomcat
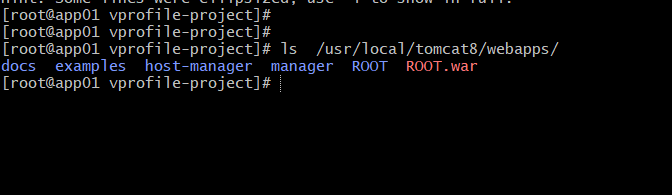
Before deploying our application package/artifact, bydefault there is a tomcat application present in the file location(/usr/local/tomcat8/webapps/ROOT ) where our application would be relying. So we have to remove that.
rm -rf /usr/local/tomcat8/webapps/ROOT : this command will remove the existing tomcat webapp.
cp target/vprofile-v2.war /usr/local/tomcat8/webapps/ROOT.war : now this command will copy the vprofile-v2.war from target directory to /usr/local/tomcat8/webapps directory and will be renamed from vprofile-v2.war to ROOT.war .
Now, the .war file has been copied to the desired location:

Now, restart the tomcat service by systemctl start tomcat
Once you restart the Tomcat service, it will extract the ROOT.war and make it the default application.
And from now, our Vprofile application has been set as default application for Tomcat.
Here, the application packaging and deployment has been completed to the Tomcat service.
Nginx Setup(ReverseProxy/Web SVC)
We are at the final step of our project deployment. Here we will be setting up Nginx as our reverse proxy to generate the HTTP request.
vagrant ssh web01 will allow us to ssh into the Tomcat VM where it will be installed.
sudo -i get the root privilege
apt update -y to update the server as this is a Ubuntu server.
apt upgrade to upgrade the system to latest patches
Installing Nginx
apt install nginx -y : this will simply install nginx in ubuntu system
Creating a configuration file
Here we'll be creating a configuration file which will be used to redirect the traffic from Nginx to Tomcat server on port 8080. This configuration file will be placed at /etc/nginx/sites-available/ and the name of the file will be vproapp . So, the complete path will be /etc/nginx/sites-available/vproapp . And the config file will be having the below configuration:
upstream vproapp {
server app01:8080;
}
server {
listen 80;
location / {
proxy_pass http://vproapp;
}
}
Removing the default Nginx web page
rm -rf /etc/nginx/sites-enabled/default : this will remove the default Nginx webpage from the location /etc/nginx/sites-enabled/default .
Activating the Application
Finally, we can activate the application and make it availe to use. To do so, we have to create a link between /etc/nginx/sites-available/vproapp and /etc/nginx/sites-enabled/vproapp with the command :
ln -s /etc/nginx/sites-available/vproapp /etc/nginx/sites-enabled/vproapp
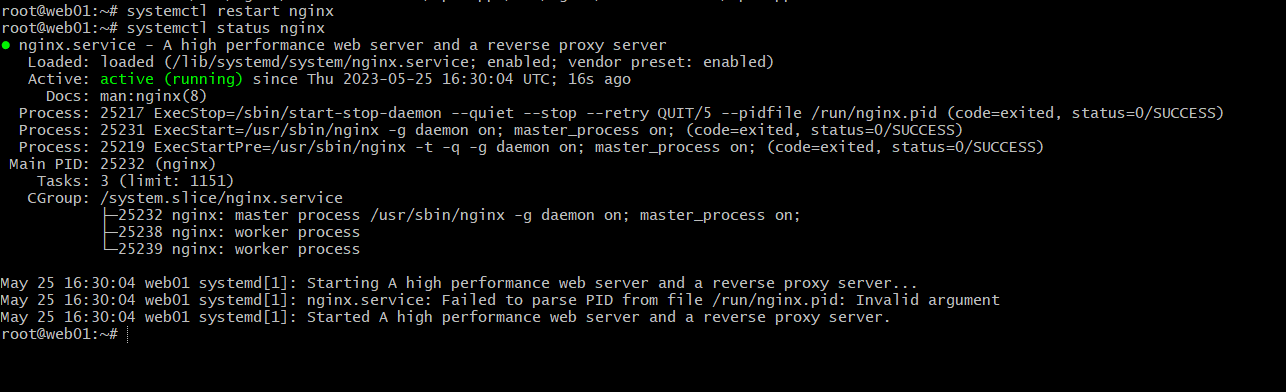
And finally restart Nginx with
systemctl restart nginx : after all the setup restart the Nginx service and make sure it's up and running .
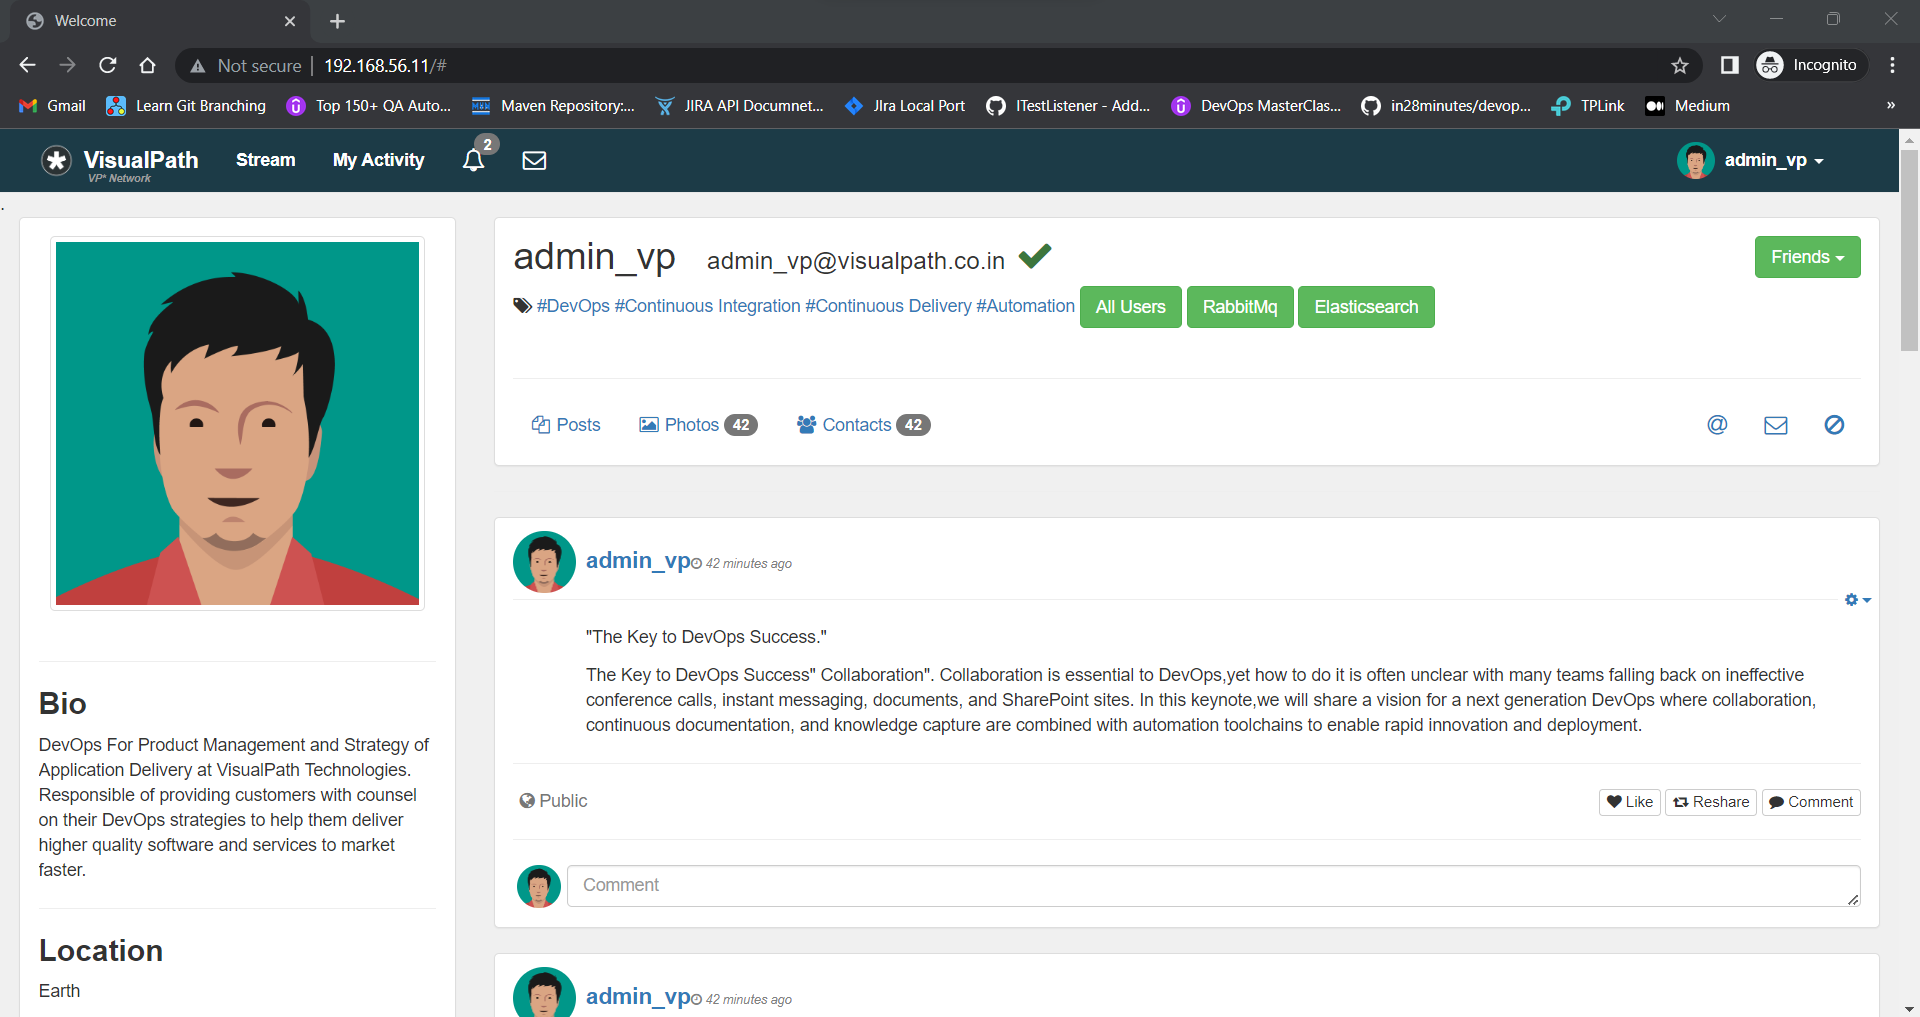
Accessing App from Browser
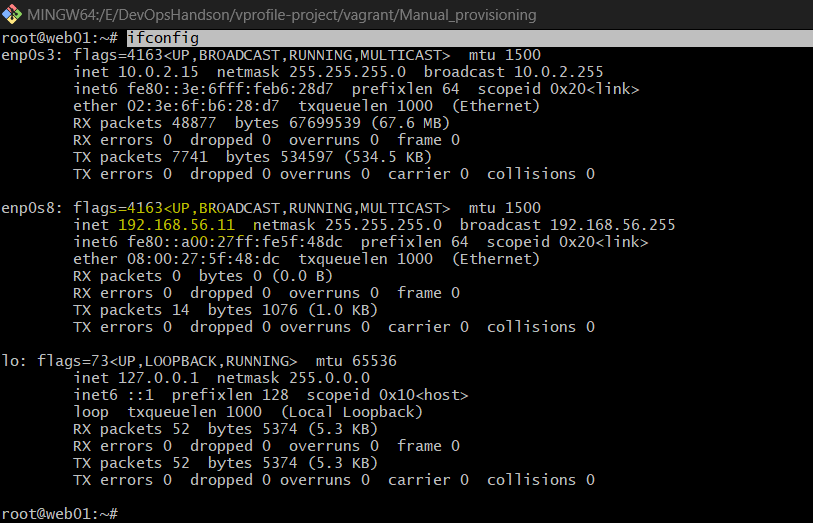
Now to access the Web Site from browser we need the IP address of the server(web01) where it is hosted. If it was an EC2 instance we could simply access it from it's public IP by editing the inbound rule and exposing the IP.
However, as we have set everything in our local system we'll be needing the IP address of the hosted VM.
ifconfig : this command will give us the IP address of the VM and the highlighted IP address the one we need.
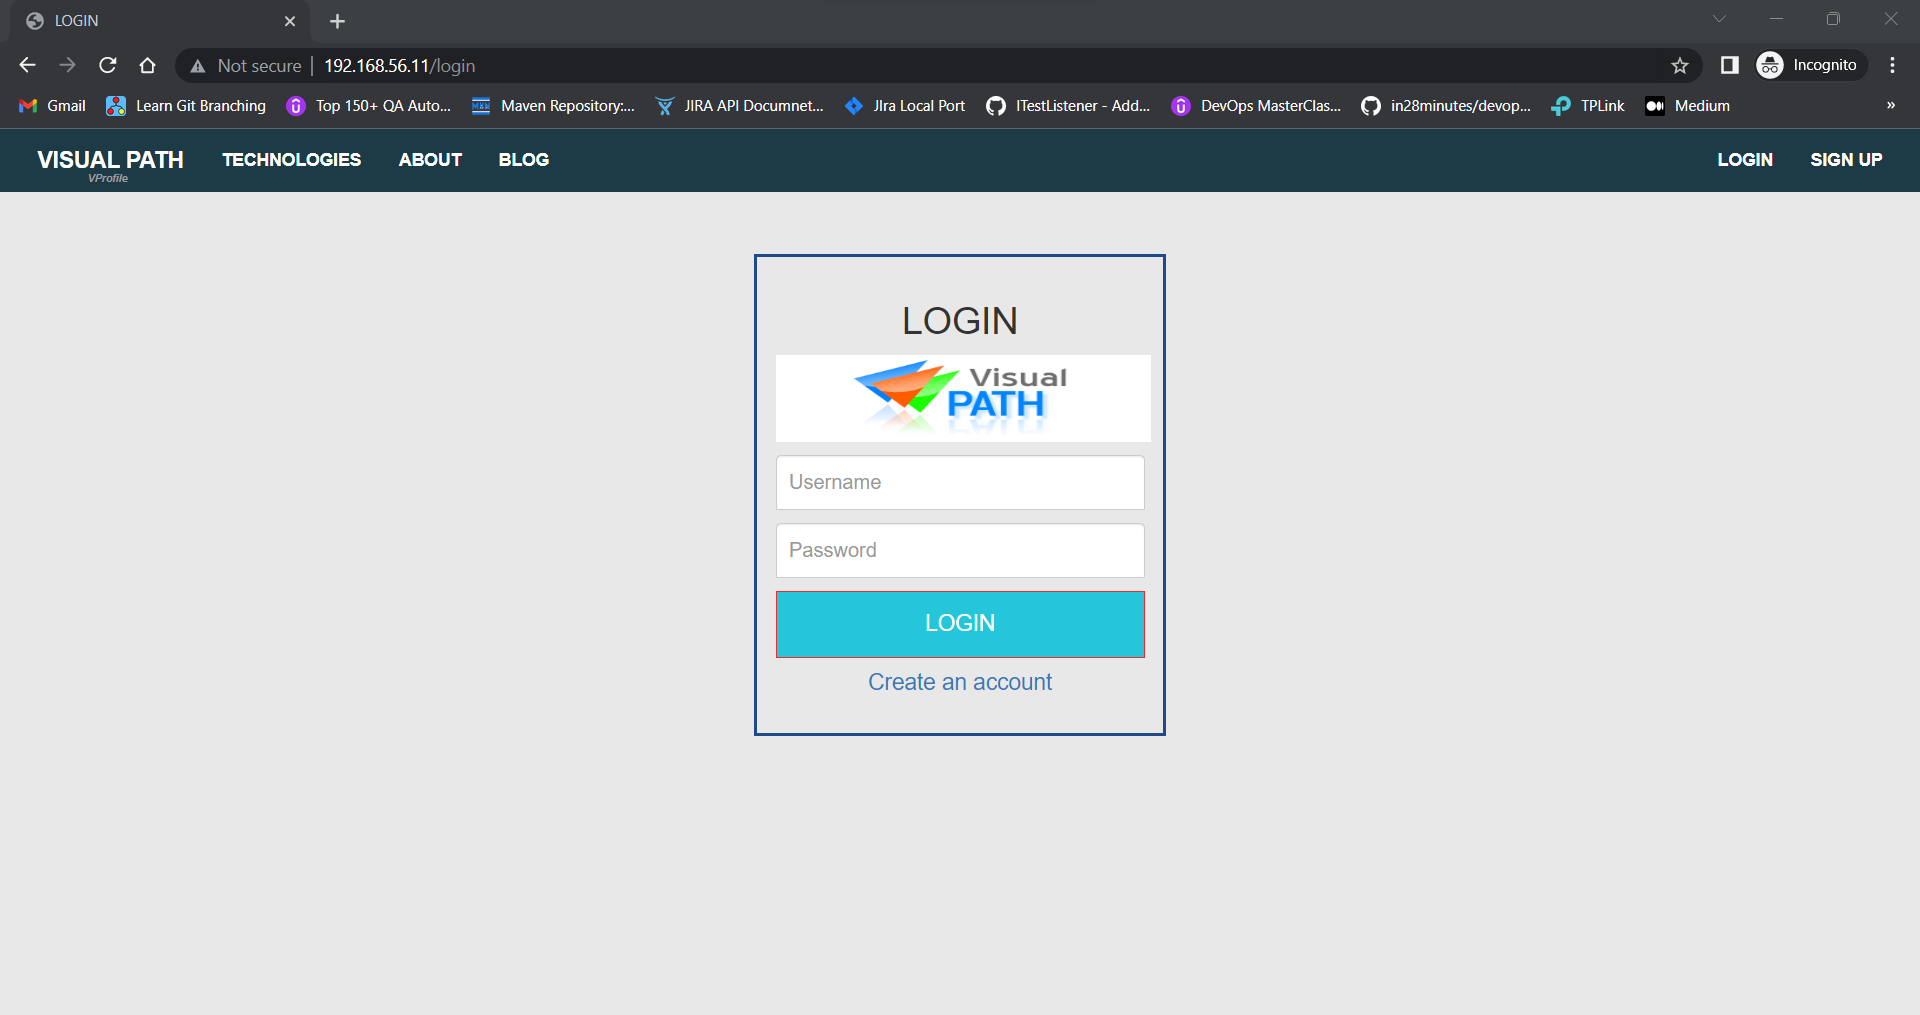
We are also able to login to the application and this login credentials are coming from MySQL: